R&R Tech
- Author: Mike Greer
- Subject Matter: 2014 Mini Cooper Countryman AWD
- Issue: Difficult access
Mike Greer’s advice: Don’t turn away an all-wheel Mini Cooper just because it seems too complicated.
My article is going to be a little different this time, and geared more toward the R&R technician. It’s about a car that came to us from a large local dealership that has 13 different locations and works on 14 different makes of vehicles. The subject vehicle is a 2014 Mini Cooper Countryman AWD, with a six-speed manual transmission. Mini is one of the only makes that this dealership does not sell; being in good standing with this dealership, they brought it to us to perform the repairs needed and get their customer back on the road. With very little information available on the internet for removal and installation, we did think about purchasing a short term subscription to BMW/Mini service information, but hey, it’s a clutch job so how hard could it be?
The vehicle needed a clutch replacement, which seemed fairly straight forward, so we jumped right in to get this back to the customer as quickly as we possibly could. We ended up needing to call the local Mini dealer and order OE parts since there was limited availability of aftermarket clutch parts. This vehicle was equipped with a Dual Mass Flywheel set up, so with this knowledge we started the removal process. Remove the air box, get the battery out of the way, removed the bell housing bolts, etc., all from the engine compartment, then raise the vehicle up to start taking off the front two wheels. Also, a good trick we found was taking the driver’s side head light out, and removing the front bumper cover as this gave us better access to the transmission and it was removed fairly easily and quickly, we felt that this added step saved us a lot of time not trying to fight getting access in such a tight area. After this, things started to get interesting.
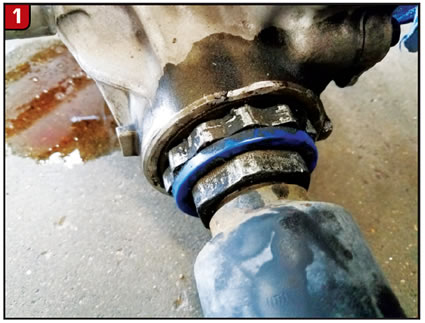
Figure 1 shows the rear driveshaft where it attaches to the Power Transfer Unit. We discovered a TSB that referred to this attachment. It told us we needed a special tool to get it apart and it is a large wrench end that attaches to a long half-inch extension to get it apart (Figure 2). We obviously did not have anything even remotely close to this tool, nor did any of our other shops in the area. Calling the local dealer, we could buy the special tool, but it was a little over a week out to get one. Upon further investigation we decided the PTU possibly could come out with the driveshaft still attached.
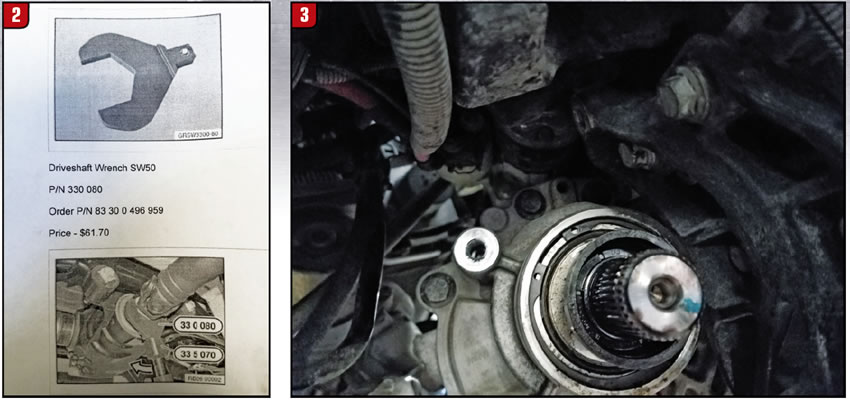
After unbolting the PTU and separating it from the transmission we found the next road block: the intermediate shaft in the PTU is too long to get the PTU removed without it hitting the back of the engine. We started looking over how everything is put together, to see if we could still make this work. While looking, we found a snap ring around the passenger side axle (Figure 3). With that snap ring removed (and with the help of a sharp, new pry bar, and hammer) the axle popped out of the PTU, allowing us to remove that PTU with the driveshafts still attached. This might not be the easiest method, but it worked, and we transmission technicians always seem to find a way to get ’er done!

Figure 4 shows the PTU on the floor with the attached pieces mentioned. After getting these parts out of the way, we could then remove the transmission. As a side note, if you do need to service the driveshaft for any reason, you will need that special tool I mentioned previously to get the driveshaft separated from the PTU. Back on track, everything else went very smoothly and we finished replacing the clutch, flywheel and all associated parts. We put the vehicle back together, and then went for that final test drive.

Some additional notes: Make sure the correct parts are ordered for these vehicles and the labor charge is sufficient. This was a very big clutch job, and very expensive as the total bill came out to be around $2,700 retail. Make sure if it is supposed to have a Dual Mass Flywheel (DMF) it gets replaced, trying to cut corners on a job like this does not do you or your customer any good. Not pricing this job out correctly up front can mean one of those phone calls that you do not want to make after the vehicle is disassembled. It can mean a very large pricing difference, as well as correct fitments.
This is where the LUK clutch catalog or online catalog can come in handy with this catalog you can check to see if they offer the DMF set up for your application. LUK offers a much more affordable option for your customers versus the OE parts (for many applications, LUK or Valeo are the OE supplier), so you will save your customer quite a bit of money if your application is available from them. In their catalog, you can also find the “flywheel options” if you are sending out the flywheel to be surfaced, as the information in the catalog will tell you if it is a flat, step, DMF (cannot be turned), or cupped style. It will give you dimensions and measurements so you can make sure the flywheel will still be in spec after having it surfaced.
In closing, I just want to say if you get one of these all-wheel drive Mini Coopers in your shop, do not turn it away for fear of being too complicated. The job ended up being fairly easy, the shop made good money, and the R&R technician made good time on it. Next time he will be able to do it even faster, and have an even better turnaround time.