A 2002 Lexus RX300 equipped with a 3.0-liter V6 engine and U140F transmission was brought into our facility with a few concerns. The customer said that “it has a leak, a grinding noise when taking off from a stop, and it just doesn’t seem to shift right.”
They went on to tell us that this noise had been intermittently occurring for about a year, there were no warning lamps on, and they also stated that they make frequent stops. They mentioned that the vehicle had been to other shops to address these concerns with no success. A different shop had replaced both front axles, but that did not correct their issue, so they took it to another shop after they lost confidence from the initial shop’s attempt at repair.
This second shop recommended that the transmission should be replaced with no real explanation as to why, so at this point the customer asked friends for advice on whom to trust with their vehicle, and were referred to our location.
After the customer interview, we performed our evaluation of the vehicle. We scanned the vehicle’s control systems, collected DTCs stored in any of the vehicle modules, performed a battery and charging system test and a road test to duplicate the customer’s concern, and then lastly performed an under-hood/under-vehicle inspection.
On a previous 2002 RX300 I had been fooled by a bad ground on the back of the intake manifold, and although there is a fairly specific concern associated with that ground issue, I always look at it first on these cars just to make sure. The ground was intact on this car.
The results of my evaluation revealed no DTCs stored in any of the modules. After several consecutive stops, I was able to duplicate the customer’s concern of a grinding sound when just starting to accelerate from a stop. The transmission was not shifting well; it had kind of a slide-bump on the 1-2 shift and a flare on the 2-3 shift and I also noticed a “judder” feel on take-off at the same time the noise was heard. During the under-vehicle inspection, I saw that there was a leak between the transmission and the PTU, and also from the output seal on the PTU. The transmission fluid condition was poor and the PTU fluid was low, thick and black in color.
This vehicle had about 180,000 miles on the odometer. In my opinion, it had too many miles to warrant an attempt of any kind of repair on the existing transmission, so I determined that the transmission and PTU needed to be replaced. The customer was advised on what we found and what the options were for repair, and then authorized the repairs. He was a little reluctant due to the cost, but he was out looking at and pricing used cars before he came in and knew what he was looking at to replace it. For this application Certified Transmission includes a remanufactured PTU with the reman transmission, so they basically come as a set.
The transmission and PTU were replaced. There is a specific ECM memory reset that needs to be done, and the steps are as follows:
- Connect the Toyota Diagnostic Tester to the vehicle.
- Reset the ECM (PCM).
- Start the engine and warm it up to normal operating temperatures before test-driving.
- Perform a thorough test drive with several accelerations from a stop with “light throttle” application until proper transmission shifting is verified.
After the reset procedure was performed, we performed a final road test to make sure the vehicle is working properly, leak free and ready to return to the customer. During the final road test, the transmission was shifting very nicely now, but we noticed that the grinding and judder feel were still present. There were no codes and not much information to lead us in the right direction. There was no indication of an issue on the scan tool PIDs.
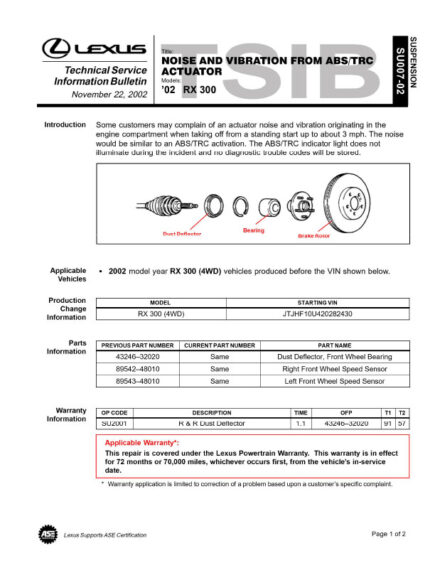
We began researching possible causes. A TSB containing information about a noise and vibration was found: SU007-02 (see Figure 1).
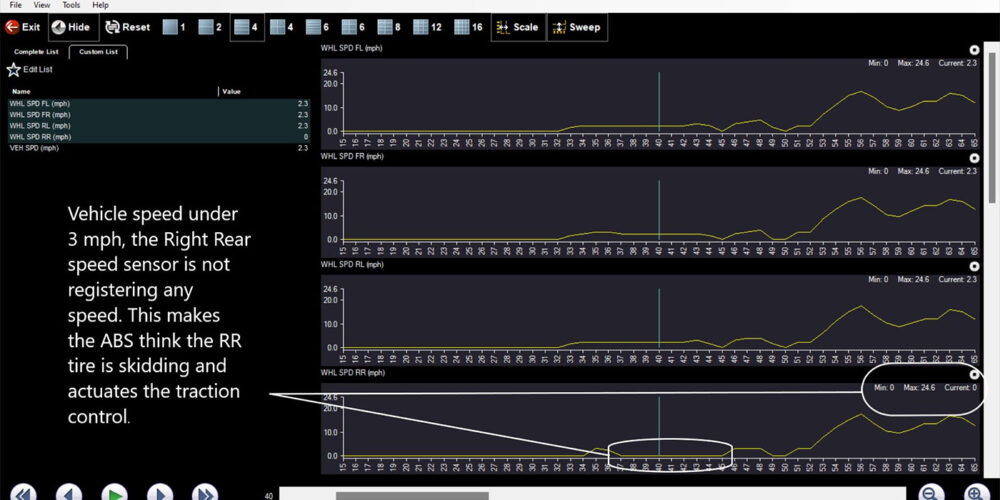
Armed with this information, we drove the vehicle again while monitoring the wheel speed sensors. What we found was that at low speed (under 3 MPH), the right rear wheel speed sensor was dropping out and reading 0 MPH, causing activation of the traction control and causing a noise and vibration feel (see Figure 2).
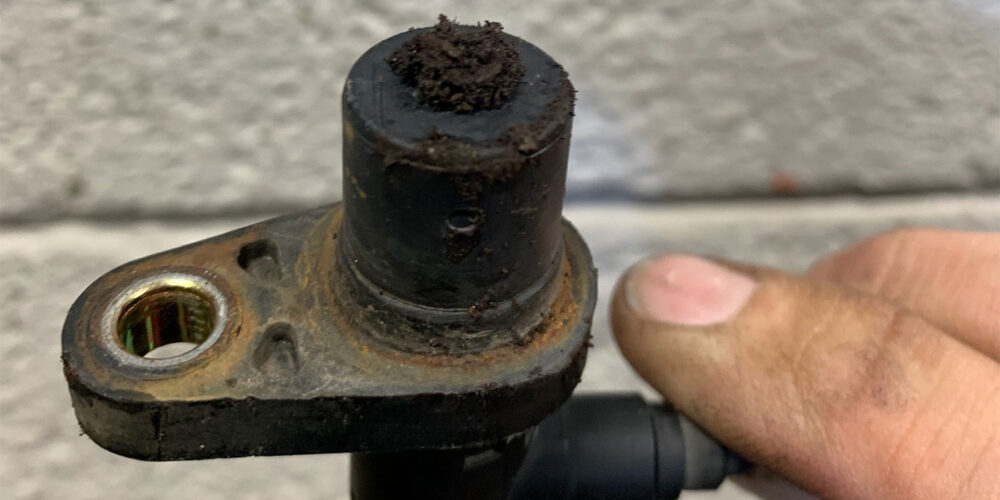
We inspected the right rear wheel speed sensor. We found that the connector was secure and that there were no visible cuts or breaks in the wiring. We removed the speed sensor and did a visual inspection and found that the magnet was covered in metal particles (see Figure 3).
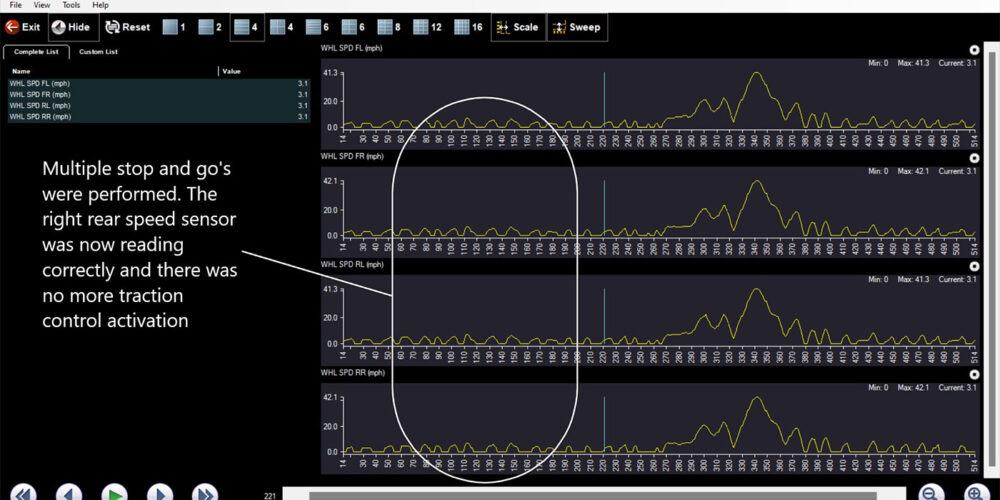
We opted to replace the speed sensor and drove the vehicle again. We took another movie of the speed sensors, and all the readings were correct. There was no more errant traction control activation (see Figure 4).
Even though the TSB addressed the same noise we were experiencing, we did not have to do everything indicated in the TSB. What the TSB did was lead us in a direction that would eventually identify our problem area. The vehicle is now shifting correctly, there are no leaks and the noise has been eradicated.
We drove the vehicle a couple more times to confirm that everything was working correctly. After doing so, the vehicle was then returned to a very pleased customer.