
TASC Force Tips
- Author: Dan Tucker
With the transmission industry changing almost every day, we have to stay on top of the “3 C’s” if we plan to survive. The 3 C’s, of course, are Complaint, Cause and Correction. But in the transmission business, working through the 3 C’s can leave us a little short of our goal. We can’t quit just because we have found a bad part. Once we understand that a particular part has failed, it may help us to reduce repeat failures if we can understand why it failed.
Now, I realize it’s a struggle just to get the job in and out the door, and sometimes the path to finding a bad part is so long and time consuming that we just want to fix it and go on to the next job. In other words, we are sick of the vehicle and we want to forget it.
This is where we come up with the “mystery fixes.” What is a mystery fix? It is when we have narrowed down a problem to a particular area, thrown a part at it and fixed the problem, even though we can’t see anything wrong with the part we replaced. What’s wrong with stopping here? Well, if you have a part fail but you don’t know why, it may leave you replacing that part over and over again in future rebuilds just because it might fail. Sometimes dissecting a part to see why it failed can allow you to save the part. Or, if you know more about why a part failed, you may be able to cut back on repeat failures of that part.
Here is a real-life story of a mystery part failure that came to visit our shop. We recently had a 2004 Pontiac Grand Prix with a 4T65-E and 74,000 miles come in with the filter stopped up. We scanned the vehicle to find a DTC P1811 (Maximum Adapts Exceeded) and a P0748 (Pressure Control Solenoid Circuit Error). The technician doing the scanning looked at both codes as being corrected with a normal overhaul and a new pressure-control solenoid (PCS).
We took the unit out and found that the third clutches were destroyed, and that is what had stopped up the filter. Further inspection revealed a possibility of some water intrusion. We have all seen this from time to time – a slightly rusted part here and there, along with valve-body gaskets that are a nightmare to get off. We did the basic overhaul, replaced all the seals, band, clutches, converter and solenoids because of the water, inspected the internal wiring and connectors, and back in the car it went.
We couldn’t determine where the water came from. The filler tube is clear of rainwater hitting it off the underside of the hood. The inside of the radiator appeared to have no fluid in it, and the car didn’t look as if it had gone swimming, though that can be difficult to verify. We checked the carpet pad and it was dry, with no odor. As a precaution, the cooler was replaced. We cleared all the Transmission Adapts and took it on a long test drive. It worked great. It was 4:45 p.m., and we called the customer and told them the car was ready. They said they would pick it up the next morning.

So, you guessed it. We got ready to close and the technician pulling this 2004 Grand Prix inside said, “Man, that car slammed into reverse.” I went over to the car as it was idling in park, and my ear could detect that dreaded high line buzz. As everyone was leaving the shop, it was me, the car and the Tech2 spending the evening together. Can any of you relate to this?
I ran a scan and there was that P0748. This was the reason for the high line pressure and bang reverse. I turned the ignition off and back on again with the Tech2 looking at the DTC Specific P0748 and the Test This Ignition = Failed. I knew the proper thing to do at that point was start resistance testing standing on my head, but I took a different approach. I grabbed an internal harness in our good-used-part section that had all known-good solenoids and sensors on it and plugged it up to the car’s wiring harness instead of the transaxle harness. Using the Tech2 I reran the test and it passed. To verify it was not in the car’s wiring, I plugged it back up to the transaxle and reran the test. It failed. I repeated this another time because I couldn’t believe we had a problem inside the transaxle. After all, the customer was coming in the morning and I didn’t want to have to pull that side cover in the car. But after a few minutes I realized that the cover had to come off.
Next morning we called the customer and asked them to postpone picking the car up. We jerked the side cover off, and after three technicians looking for something visually wrong and finding nothing, we threw a new internal harness in it, along with a new PCS solenoid. We slapped it back together and road-tested it for more than 30 minutes, and it was fixed. The customer picked it up at noon and we said a prayer as its taillights vanished from sight.
After several days we knew it was fixed but it took a mystery part – or, in this instance, parts – to get it gone. Now I was stuck with this harness and PCS lying on my bench, laughing at me. As I was looking at the harness I had a flashback of a side cover being pulled from another 4T65-E about four months earlier because during the overhaul we created a DTC P0717 (Erratic Turbine Speed Sensor) and replacing the turbine sensor and internal harness corrected that problem. The common denominator between the two jobs was the harness.
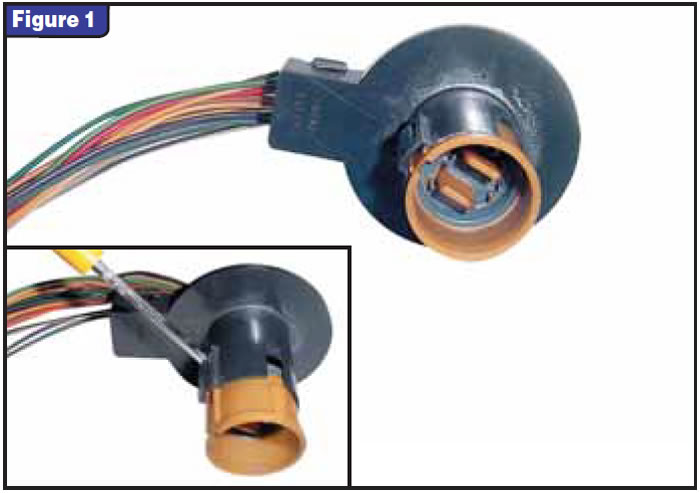
This harness is very similar to the proven 4L60-E/4L80-E harness that has been around a long time. It just doesn’t give much trouble. As I sat there looking at that harness, I was wondering whether we were going to have to start replacing all internal harnesses during an overhaul. This would require stocking several harnesses to accommodate the many different pressure switches and internal mode switches. These harnesses aren’t cheap, either, ranging from $55 to $75. With all this in mind I figured, “What do I have to lose?” I got out my pocket screwdriver, squinted my eyes at it with a Clint Eastwood glare as if to tell the harness I’m going in and started dissecting it. After removing the split loom and finding nothing wrong with the wiring, I took out the inside plastic sleeve that retains the wires securely in the case connector, and there it was! It was full of corrosion and debris. None of this is visible without taking the connector apart (see Figure 1).
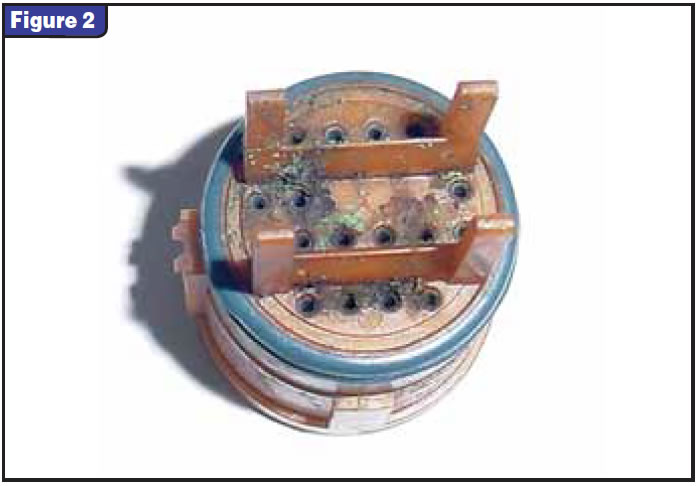
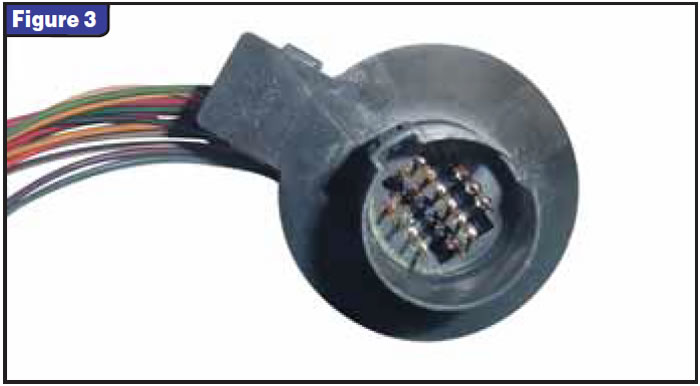
The debris and corrosion were shorting the terminals together inside the connector (see figures 2 and 3). It takes only about 30 seconds to pop the securing sleeve out and inspect the connectors. You can easily put it back together if you find nothing wrong with it. And, of course, I’m sure you can clean it and reuse it, but I would recommend replacing the harness if you find one contaminated as badly as the one shown in figures 2 and 3.
Now I was thinking, “What is the difference between the 4T65-E’s connector and the 4L60-E/4L80-E’s? The 4L60-E/4L80-E harnesses are down low, away from the heated condensation that the 4T65-E has to endure, as the 4T65-E connector is near the vent. It is one of those instances in which a familiar part placed in a different environment can function with less-than-satisfactory results.
One thing for sure: We will be inspecting these connectors during an overhaul from now on – especially on transmissions/transaxles that come in with circuit codes.
Dan Tucker is owner of Tucker’s Transmission in Pine Bluff, Ark., and a member of the TASC Force (Technical Automotive Specialties Committee), a group of recognized industry technical specialists, transmission rebuilders and Sonnax Industries Inc. technicians. ©2007 Sonnax Industries Inc.


