R&R Tech
- Subject: AWD DISABLED light on instrument panel illuminated; no codes present
- Vehicle Application: Chevrolet Venture van
- Essential Reading: Diagnostician, R & R
- Author: Chris Foster
A few weeks back a customer came to the shop and said “Hi! I was sent here by so-and-so, and he said you would be able to fix my car, because he does not have time to figure it out.”
“Well, I am always up for a challenge,” I replied. “What is going on with it?”
We then got into a discussion of how long he had been working on the car, and how everything “worked great.” She then explained to me that the dealer looked at it and said it was going to be $XXX to fix it, and she just didn’t think they were right because “everything works ‘OK’; it is just the ALL WHEEL DRIVE DISABLED light is on, and nobody can find out what is wrong with it.”
“Sure,” I told her. “Leave it with me and I’ll see what I can do.”
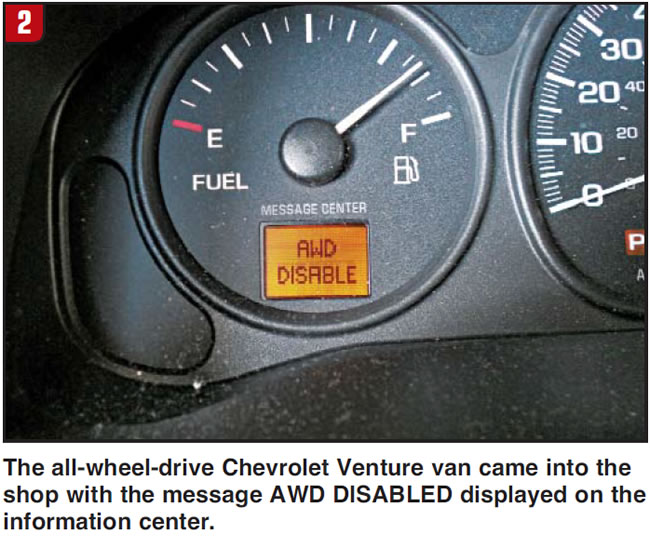
Wow, what a treat I was in for. I brought the Buick into the shop later that day to perform the preliminary checks and noticed that the information center flashed AWD DISABLED, and the message remained on through the entire check-out and road test. I instantly agreed with the customer that this was “bothersome,” to say the least, not really even caring whether the all-wheel drive worked. Just this annoying message on the instrument panel was enough to make a person not want to drive the car, a distraction from an otherwise nice drive.
I hooked up my scan tool only to have it reveal ‘no codes present’ in any of the modules. “This is crazy,” I thought to myself. “How can there be a warning message displayed with absolutely no diagnostic trouble codes? Where am I going to go from here? Has to be a bad scan tool!”
I went through the pain of borrowing a scan tool from a friend of mine at the local dealer so I could read all the ABS data and find out why the AWD DISABLED message was displayed. We all know the sad outcome of that tale! Nothing; no code in the PCM, BCM, ABS, IPC or any other module. Boy, was I stuck.
I did some quick research on the Internet, and all that led me to was a whole bunch of forums with people asking how to turn off the AWD DISABLED message in their 2000-whatever vehicle. I read through them as time permitted, probably scrolling past some pretty pertinent information, but hey, we are all busy.
Needless to say, I did not find much help. I called some buddies at the dealerships and got all kinds of answers, including “You have to replace the rear differential,” “Replace the pump checkvalve” (whatever that is) and “Try and reprogram it.” All good information, but just not really giving me anything solid to go on. I completed my Internet research and came up with the ever-popular “tire-size variation” starting point.
Well, sure enough, just before this all happened, the owner had bought two new rear tires and was saving up for the front ones. The place where she bought the tires told her that the front tires were fine and she needed only rear ones. The tread depth was close but had a significant difference.
I consulted the owner’s manual (of all things) and there was a description of her concern in the “warning lamps” section. It read, “The AWD DISABLED message will be displayed in the event a temporary spare is placed on the vehicle.” It went on about the criteria for this event and then said the message would go away once the tire-size variation was corrected.
“Perfect,” I said. Now I had documented proof to show the customer what we needed to do first. Before continuing with the diagnosis of this concern, she said, she would have to save up for the tires, and if that didn’t fix it, she would be back to see me. As luck would have it, it took her only a week to get the new tires and put 150 miles on the SUV. I know this only because that was the one thing different about the vehicle when she brought it back with the same annoying message displayed.
“Oh, well, I needed new tires anyway” is how she began that conversation. “That had to be done anyway.”
“So leave the rest to me,” was my reply.
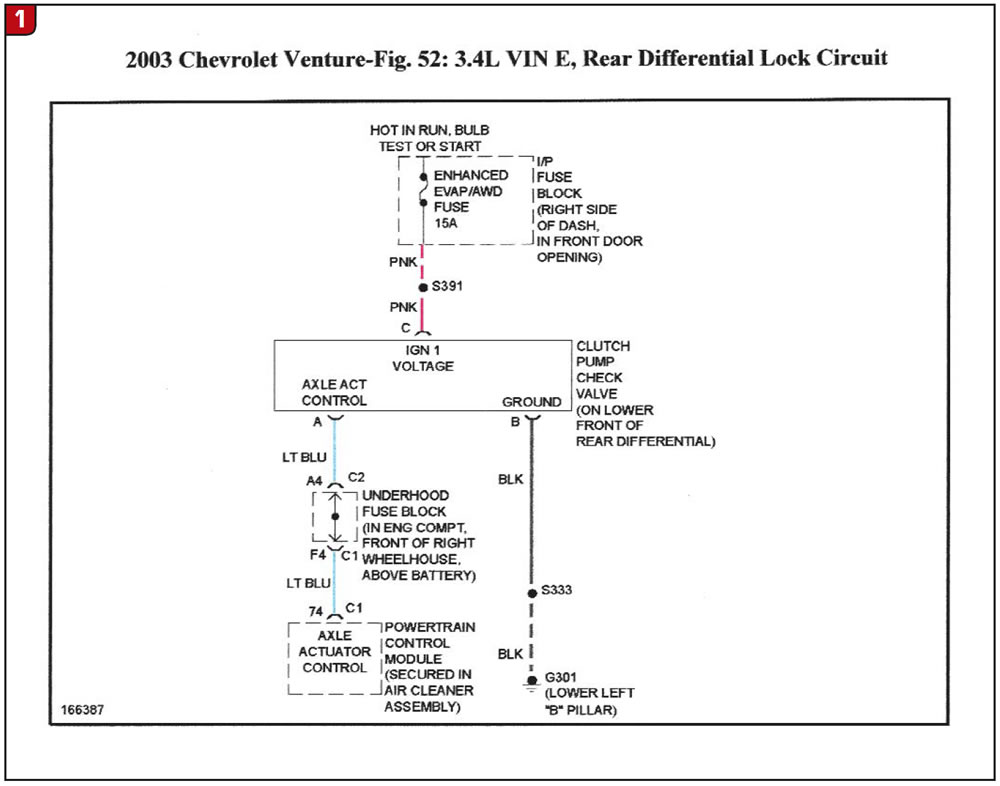
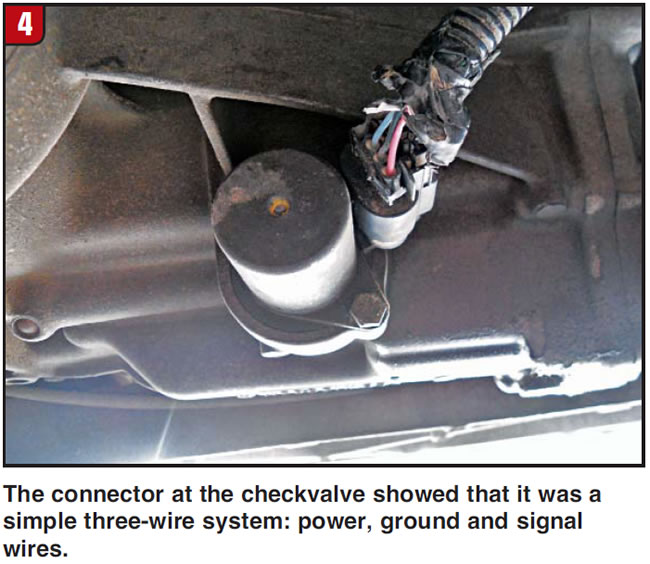
I put all other advice and thoughts of an “induced” problem aside and finally pulled up a wire diagram (Figure 1). “Wow! This looks difficult,” I thought. A power wire, a signal wire, a ground, a fuse, a checkvalve and a PCM make the whole program work – way more simplified than trying to find out why shift solenoid E in a 5R110W loses voltage when you select D3 – or is it?

A week later, a Chevrolet Venture van came in with the same problem, and I used it to write this article and take photographs as the repairs were made. Although the Buick beat me up a little bit, this one was “quick and painless” (we all know what that means).
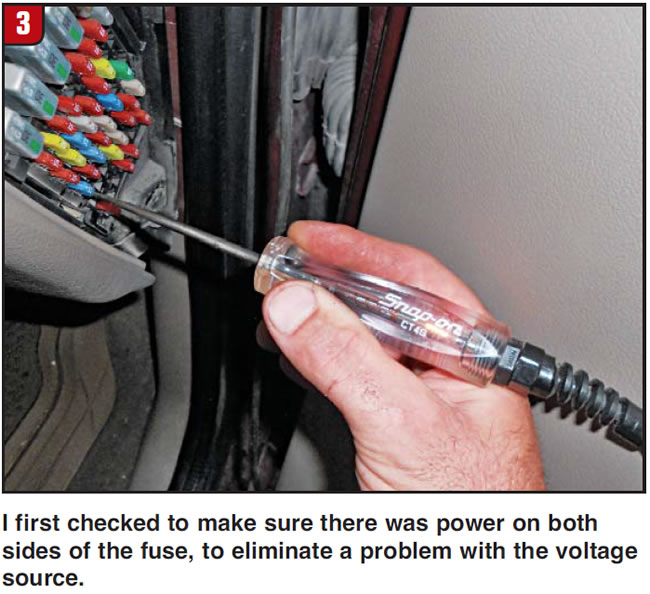
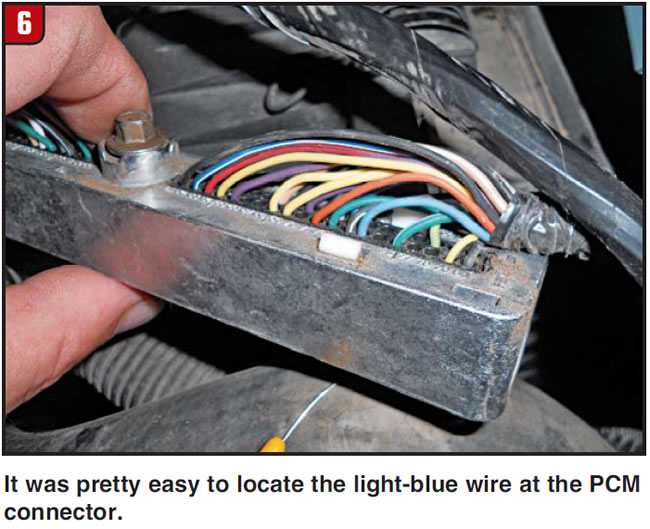
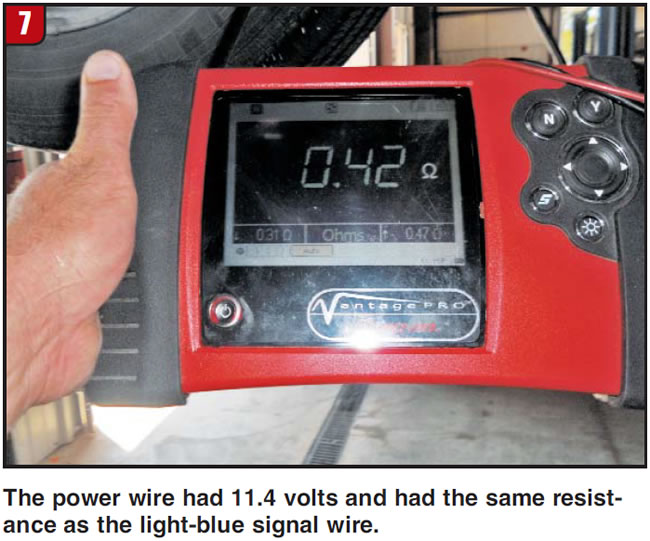
I checked the fuse to make sure there was power on both sides, eliminating the ignition switch. The simplified wire diagram did not really show any types of splices or connectors that concerned me, and so I decided to check the entire wire, from the source to the component. There was 11.4 volts at the checkvalve in the rear differential and 0.01 ohm resistance from the fuse panel, so I knew it was not a voltage problem. I then unplugged the PCM and found the light-blue signal wire in pin 74. There was 0.42 ohm resistance in the wire from the PCM to the checkvalve, which should be OK.
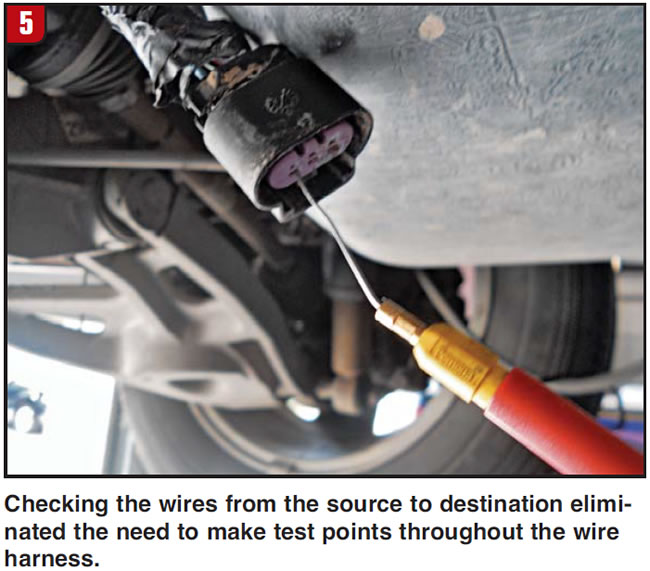
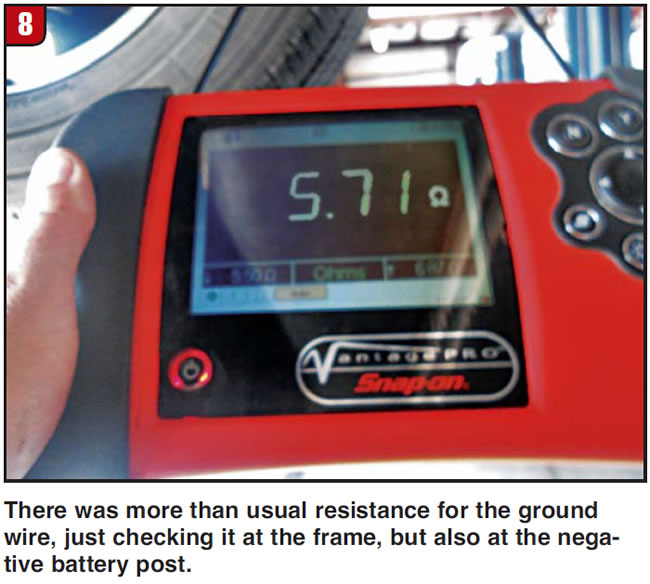
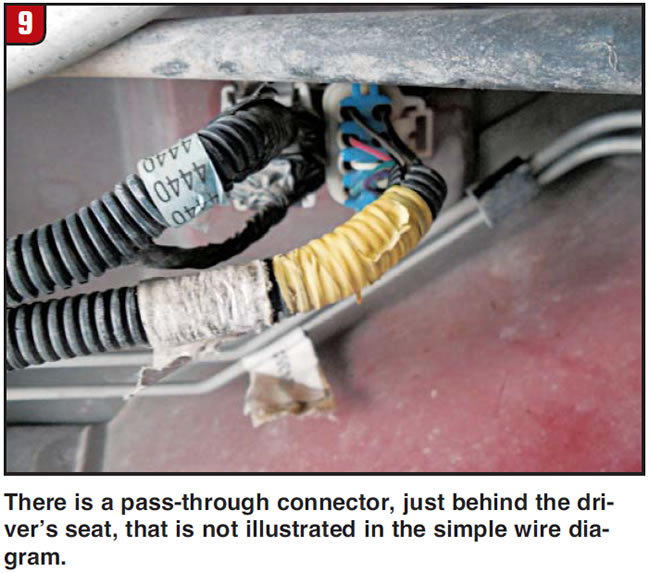
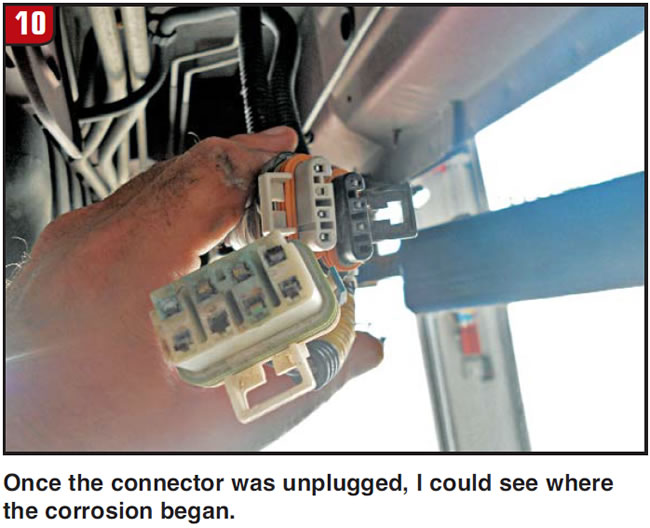
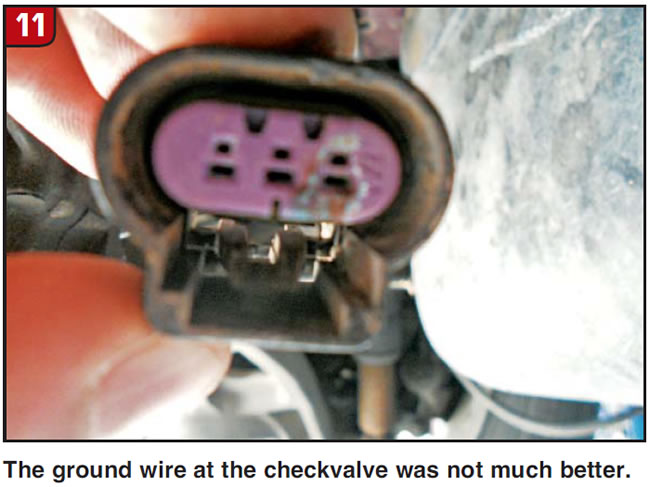
That left me with the ground wire. It had 5.71 ohms of resistance. Of course, we need this as close to zero as possible. A quick check of the simplified wire diagram shows the wire grounded on the B pillar. Easy enough; there must be a “pass-through” connector under the seat or in the firewall not shown in the diagram. There are actually three connectors on a pass-through bulkhead connector right behind the driver’s seat – not shown in any diagram and exposed to all the elements and the ever-popular drive-through carwash that sprays the undercarriage.
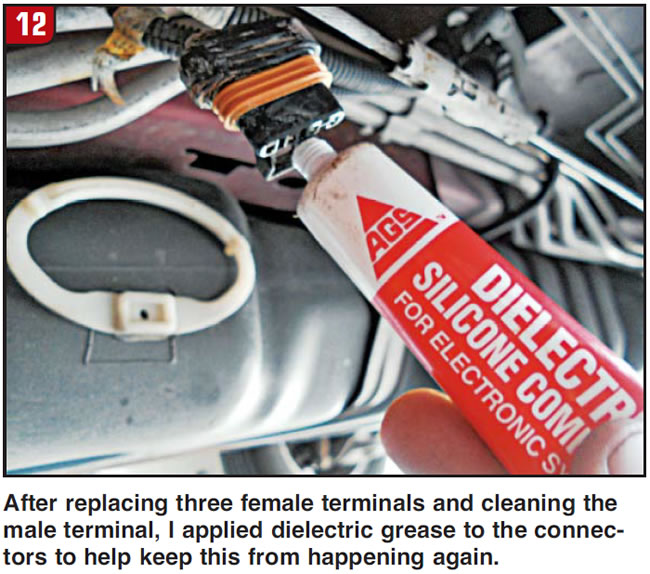
Not being able to find a connector end, I replaced three of the female terminals, soldered the connections and applied a little dielectric grease around each plug to help prevent the problem from recurring. The light is off, AWD works and the customer is happy.
Chris Foster is a diagnostician and the manager of Certified Transmission’s new location in Topeka, Kan.