TASC Force Tips
- Author: Rod Cayko
No, I’m not talking about our daily routine, but rather a routine we perform daily that not only makes our shop money but also saves valuable time. I’m talking specifically about the salvage and reuse of parts that otherwise would be scrapped, using a piece of equipment many shops already own but may not be using to its fullest potential.
A flywheel grinder can be used for much more than just resurfacing flywheels. By buying a few relatively inexpensive pieces of tooling and using a little imagination, a shop can realize a good return on investment. In my shop, the flywheel grinder is arguably the most-profitable piece of equipment we have ever bought.
When we bought our grinder way back in 1986, I had no idea of the problems we would solve with it. At the time, a “transmission pump tooling” package was offered that allowed us to resurface almost all pump stators (covers) and even some pump bodies such as those in 700-R4s and 2004Rs. This was very helpful, because at the time 700s were still routinely breaking pump rings and rotors, and good used pumps were scarce. We salvaged thousands of dollars in just 700-R4 pumps alone.
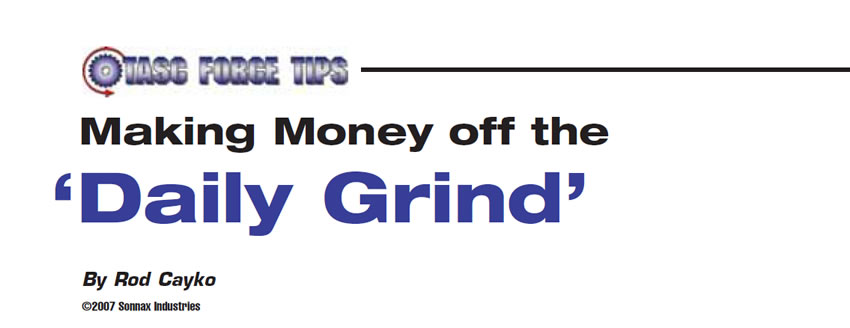
What I found interesting, though, after checking numerous pumps for runout with the dial indicator (see Figure 1) was just how badly warped some pumps can be. In 1986 overdrives were coming of age, but three-speed automatics were still our bread-and-butter units. Some of the pumps – such as those in 904s and T-400s – could have 0.020 inch or more warpage across their faces yet visually appear to be quite usable. After surfacing them, we discovered, they typically had only around 0.001 inch runout. We decided from that point forward to make it a rebuild procedure to resurface all pumps regardless of how good they “appeared.”
Interestingly, several mysterious problems seemed to disappear once we made pump resurfacing standard procedure. Various hot complaints such as delayed engagements, sloppy shift feel, loss of oil from the vent on hard pulls, loss of lockup control and other routinely experienced pump-related problems mostly became faded memories. As one could guess, aluminum pumps with a large surface area – such as those in E4OD/4R100 – are commonly badly warped, but you might be surprised to learn that cast-iron pump stators with small surface areas – those in 46-47REs, for example – warp badly too, and just as often!
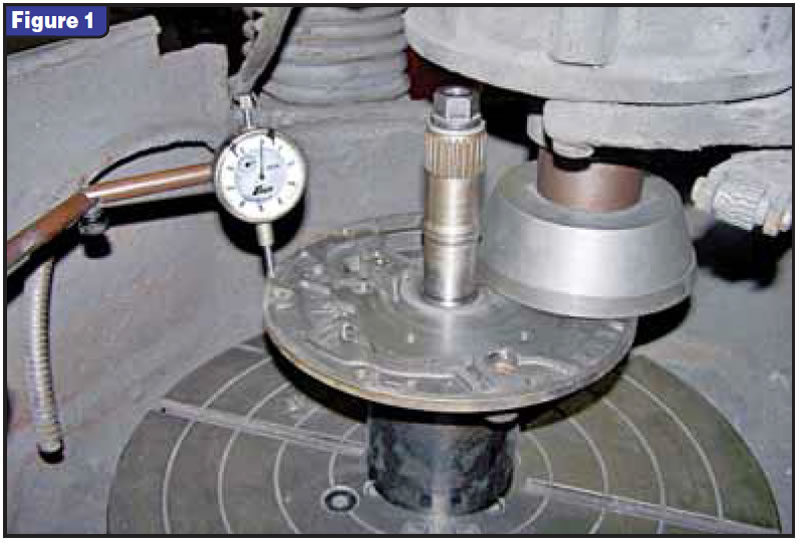
So the pump grind became a slam-dunk winner for us, but what else could we use the grinder for? A magnetic chuck mounted to the grinder table using nuzzle clamps anchored in the T-slots allows you to resurface just about anything you can get under the grinder head (see Figure 2). We have used it to resurface hard-to-find import-transmission pressure plates and top plates that have metal-to-metal surface scoring and/or hot spots. It can be used to dial in clutch-pack clearances when there is an undesirable clutch-pack stack-up height, or when no selective steels or pressure plates are available. Sometimes drum snap rings are ground as an additional method of setting clearances.
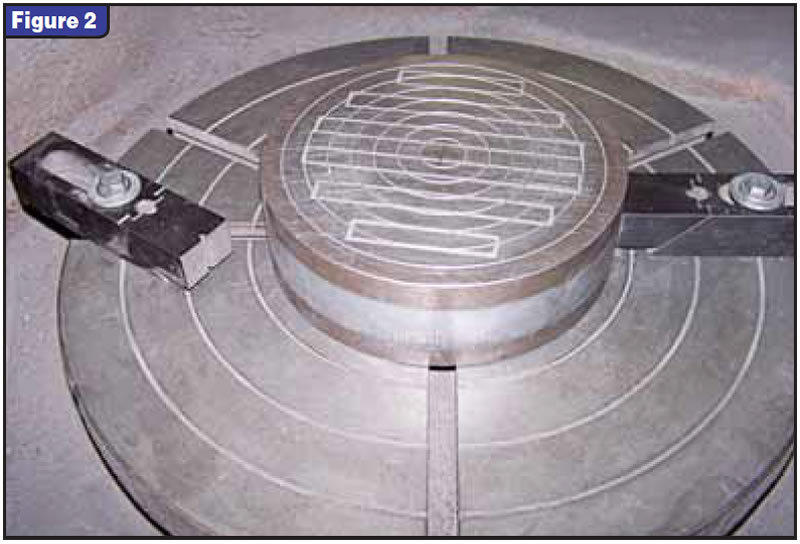
Some snap rings for manual transmissions also can be “made selective,” and even something as small as U-joint clips can be trimmed down when you see the need. (Some manufacturers are now using selective U-joint retention clips.) Thrust plates, selective washers and spacers can be ground, not only for clearance but also to true them up when slight scoring is present. We machine the 46-47RE overdrive-clutch piston-to-hub selective spacers three at a time, down to the more-commonly needed 0.184-inch thinner spacer (see Figure 3). This may seem as if it would take too much time, but after the machine is set up the grinder’s auto-feed feature simply grinds off what we set it to.
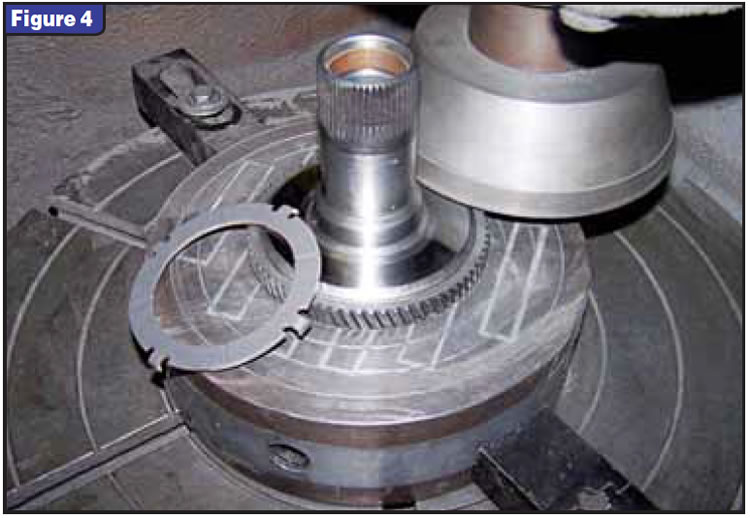
A 4L60-E input-hub thrust-washer flange is commonly damaged from the brass washer wearing against it and generating metal, so the hub often must be replaced. The factory washer is prone to point loading over the four areas where the lube grooves are stamped into the washer. This can cause premature wear and galling against the hub. A quick setup on the magnetic chuck and grinding the hub usually cleans up any wear (see Figure 4).
The aftermarket offers two bi-metal washers impregnated with PTFE material like the Teflon® pump bushings, and these are much more forgiving washers to run on these hubs. The factory hub has a high hardness, which makes it difficult to turn on a lathe, but the grinder stone will cut through it easily. This is one of the advantages to grinding as opposed to cutting on a lathe, as a grinding stone will typically grind through hard spots but a typical lathe bit might not. A tool post grinder could be used on the lathe to grind it, but setup time and cost could make it prohibitive. We save up several of these various components and grind them as a batch to save time.
Another component we salvage for reuse is the good old C6 sun shell. It’s common for the snap ring to sink into the splines, and if the wear is bad enough the front planetary will rub against the shell, generating metal. We install a saver shim into all of them, as they all are usually worn some, and the grinder will actually help to better align the shell to the rear thrust washer.
44-46-47RH/REs commonly sink the rear output hub into the output-shaft shoulder. We have been grinding these ring-gear/output hubs three at a time, using nuzzle clamps to anchor them, and then using hardened snap rings to replace the material removed, thus restoring proper stack-up height. It’s a quick and easy salvage of the output hubs. These units are prone to gear-train sinking in other locations, and this is just one area that can be addressed easily.
Occasionally we have run into a component we wish to grind but, because of its odd shape or material, neither the magnetic chuck nor nuzzle clamps would anchor it for grinding. We then have used our three- and four-jaw chucks from the lathe to anchor parts when no other method could be used. Setup time is always a concern, so it is good to know all your anchoring options before trying to grind a component. Tall components such as A4LD and 4L30-E bellhousings can be trued by simply bolting them directly to the turn table (see Figure 5). Height to the grinder stone is really your only restriction, and stones of different heights and shapes are readily available, which can help with clearance constraints.

The only change that must be done before grinding critical components is to reset grinder-head vertical tilt. Flywheel grinders typically come from the manufacturer with about a 0.015-inch rearward tilt for faster flywheel grinding. You will want to readjust the grinder head to an almost-vertical position. It should be set only about 0.004 to 0.006 inch lower at rear, using the dial indicator. It’s a simple adjustment, but an important one. While you’re at it, confirm that there is NO side-to-side tilt, as this directly affects flatness and/or parallelism of the work piece.
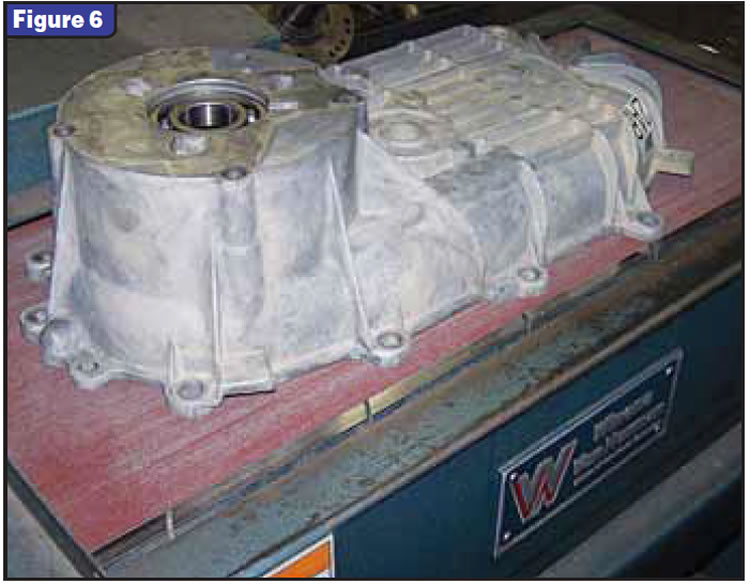
Another piece of equipment in the shop, which could be considered related to the grinder, is our BG600 belt-grinder surfacing machine. It is actually more of a “sander on steroids” than a grinder, but it can be used to refinish some components for which precision grinding isn’t practical or necessary. We use it to flat-sand warped aluminum transfer-case halves (see Figure 6) and various valve bodies, knock down high spots from various pump bodies (which also helps decrease excessive gear side clearance) and resurface miscellaneous parts that may not fit under the grinder head or simply don’t justify setup time. Care and technique are critical when “sanding” on this unit, as it can remove quite a bit of material, depending on the grit used (60- to 360-grit) and force exerted. But with a little practice, it too has become another part of our shop’s daily grind.

Rod Cayko owns Rod’s Transmission Services in Coeur d’ Alene, Idaho, and is a member of the TASC Force (Technical Automotive Specialties Committee), a group of recognized industry technical specialists, transmission rebuilders and Sonnax Industries Inc. technicians. ©2007 Sonnax Industries Inc.


