Easy Fix for 4T60-E Accumulator-Housing Pin Wear - Transmission Digest

Easy Fix for 4T60-E Accumulator-Housing Pin Wear

Accumulator-piston wear is common and fixes are readily available, but the little pocket where the piston pin sits in the accumulator housing also wears, and this is a more-difficult problem to solve. This article describes a way to salvage accumulator housings using parts and tools you have lying around in your shop.

Easy Fix for 4T60-E Accumulator-Housing Pin Wear

TASC Force Tips

Subject: Salvaging worn accumulator housings
Unit: 4T60-E
Author: Gregg Nader

TASC Force Tips

  • Subject: Salvaging worn accumulator housings
  • Unit: 4T60-E
  • Author: Gregg Nader

Accumulator-piston wear is common and fixes are readily available, but the little pocket where the piston pin sits in the accumulator housing also wears, and this is a more-difficult problem to solve. This article describes a way to salvage accumulator housings using parts and tools you have lying around in your shop.

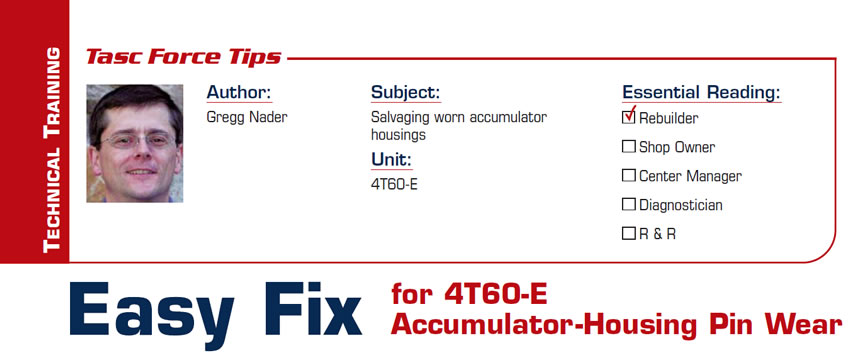
We have all seen worn accumulator pistons from the 1-2/2-3 accumulator in a GM 4T60-E. Figure 1 shows an example of excessive clearance in a piston-pin bore.

This clearance causes problems because line pressure leaks into neighboring lower-pressure accumulator circuits and effectively reduces clutch-apply pressure. Inconsistent shifts, slips, bumps and clutch failure are all tied to wear at the accumulator-piston-pin bores. The most-economical repair is to ream the pin bore and install the Sonnax 0.014-inch oversized replacement pins. Many times, however, the piston is worn so excessively that the oversized pins will not work. In these situations, the piston needs to be replaced.

The situation becomes more difficult when the accumulator housings have worn so excessively where the pin seats that even the 0.014-inch oversized pins flop around with no support. The following procedure allows you to salvage these accumulator housings, ensuring that the pins are securely held in place.

You will need the following items:

  • 3/8-inch drill bit
  • 2 accumulator pistons, with seals (to be used a drill-guide)
  • 3/8-inch cup plug from a 604 overhaul kit (the one intended to be used when the park-link pivot shaft is removed).

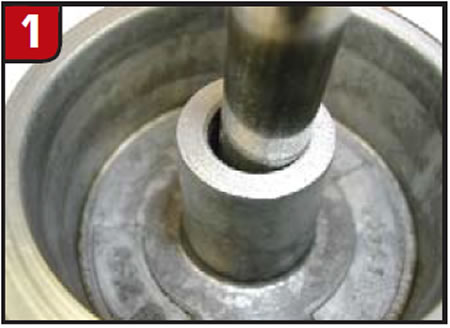
Blunt the tip of the drill bit as shown in Figure 2 so it will stop at the bottom of the housing and not drill too deep. Drill through the two accumulator pistons with the 3/8-inch drill bit. It helps to use a new drill bit and pistons that are not excessively worn.

As shown in Figure 3, the drilled-out pistons will now work as an effective drill guide for drilling out the housing. The blunted drill bit will stop when it bottoms in the housing.

Installation is a snap. Place the cup plug over the new pin and drive it home.

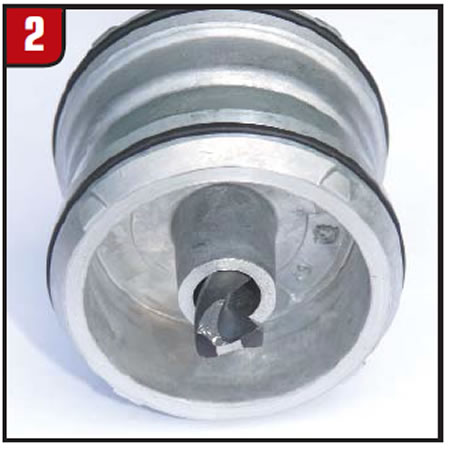
Figure 4 shows the drill in place after the housing has been drilled to accept the 604 cup plug.

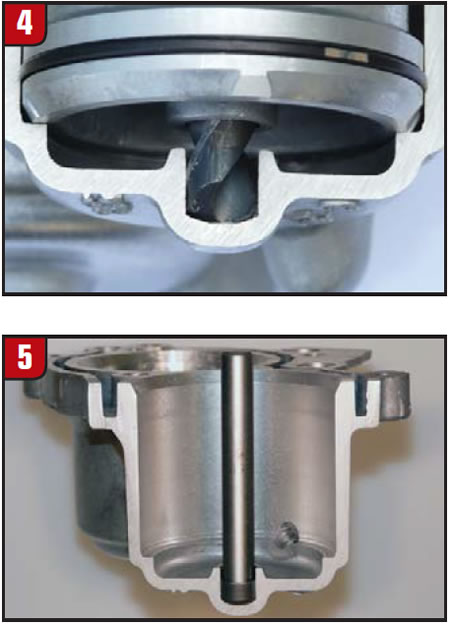
Figure 5 shows a cut-open section of a drilled housing with 604 cup plug installed and oversized pin held securely in place.

Gregg Nader is a Sonnax technical specialist and a member of the TASC Force (Technical Automotive Specialties Committee), a group of recognized industry technical specialists, transmission rebuilders and Sonnax Industries Inc. technicians.

You May Also Like

Sherlock Holmes Approach to an AB60 No-Move Situation

The effectiveness in diagnosing automatic transmission malfunctions is an art form. Although there are similarities among the wide varieties of transmissions on the road, each transmission has its own peculiarities. Aside from having mechanical, hydraulic, and electrical hardware systems to contend with, software/programming issues and various vehicle platforms make diagnostics much more difficult.  Using scopes provides

ab60

The effectiveness in diagnosing automatic transmission malfunctions is an art form. Although there are similarities among the wide varieties of transmissions on the road, each transmission has its own peculiarities. Aside from having mechanical, hydraulic, and electrical hardware systems to contend with, software/programming issues and various vehicle platforms make diagnostics much more difficult. 

GM 6T40 Pump Identification Guide

The 6T40 was introduced in 2008 for General Motors front-wheel-drive cars in the Chevrolet Malibu and has gone through several changes throughout its three generations, specifically in the pump area. The 6T40 is closely related to the more lightweight 6T30 and the heavier duty 6T45 and 6T50. Generation one started phasing out during the 2012

Seeing the Forest AND the Trees

They say that the proverbial phrase “I couldn’t see the forest for the trees” means that a person or organization cannot see the big picture because it focuses too much on the details. Related Articles – 4L60E Harsh 1-2 Shift – TASC Force Tips: Diagnosing 8L45 & 8L90 Shift Complaints – TASC Force Tips: Hydraulics

The Manifold Pipeway

The Honda six-speed transmission has been on the bench of many specialty shops for one reason or another (figure 1). But, for those of you who have yet to lay your hands on one, mounted on the upper side of the unit is one of the largest, if not the largest solenoid and pressure switch

8L90 Vacuum Testing

Below are the diagrams for vacuum testing GM 8L90 transmissions. Note: OE valves are shown in rest position and should be tested in rest position unless otherwise indicated. Test locations are pointed to with an arrow. Springs are not shown for visual clarity. A low vacuum reading indicates wear. For specific vacuum test information, refer

Other Posts

Diagnosing AS68RC intermittent pressure switch/linear solenoid performance codes

Intermittent pressure switch codes on vehicles with the Aisin Seiki AS68RC transmission have been very difficult to nail down to one specific cause. The two most common pressure switch codes for this transmission are P0746 clutch pressure control solenoid A or linear solenoid A performance or “Stuck Off,” which also includes pressure switch 1 mechanical

Tasc-Tips-May-Figure-1-Linear-Solenoid-B-at-High-Duty-Cycle-1400
Chrysler ZF8 generations 1 and 2 identification guide

In 2019, some Chrysler/Ram/Jeep applications that utilize the ZF8HP transmission moved to a second-generation unit with a new designation and numerous changes for better performance and durability. Gen. 1 units are classified as 8HP45, 8HP70 and 8HP90; while Gen. 2 are classified as 8HP50, 8HP75 and 8HP95. Internally, the Gen. 2 transmission had numerous hard

Tasc-Tip-April-Figure-1-Gen.-1-'B'-Brake-Components-1400
GM 6L series no-movement conditions: Analysis and repair tips

I am certain that many have experienced a no-movement forward, no-reverse or abnormal pressure condition with a GM 6L series transmission, especially since they are one of the most popular unit families in shops today. So, let’s examine some conditions and causes along with a few diagnostic tips for troubleshooting. We’ll go through a few

TASC-Tip-feature-1400
Critical wear areas and vacuum test locations: GM 10L and Ford 10R series

Sonnax has provided the following guide on critical wear areas and vacuum test locations for the GM 10L series and the Ford 10R series. Technicans working on these models should find the following four pages helpful. Related Articles – California’s Rohnert Park Transmissions is a multi-generational success story – When a transmission problem isn’t a

02feb23_TASC-feature-1400