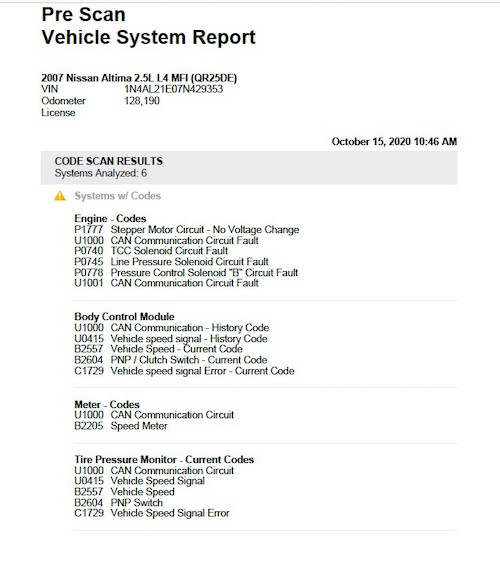
This is a tale of a neglected Nissan in need of some serious TLC. I came to care for this 2007 Nissan Altima that would go into limp mode with transmission codes. Upon initial inspection of the transmission, the fluid was new, but fluid was leaking out of the bell housing area. There were multiple DTC’s stored, including CAN communication and transmission codes. (See Figure 1).
Before visiting our shop, someone had installed a used transmission in this vehicle. It had all the classic tell-tale signs of being a used transmission; the neon paint on the bell housing, bolt holes, and yellow writing on it. The customer had stated the same suspicion but was unsure as he had only owned the vehicle for two weeks.
After test-driving the car, analyzing the DTC’s, and noting that the transmission was leaking fluid out of the bell housing, I recommended replacing the transmission with our remanufactured CVT. The owner approved the replacement transmission, and we proceeded to install the new unit. It was just the start of an adventure to get this Nissan healthy again.
During the transmission installation, issues began to arise. Firstly, I found the TCM had silicone and zip ties holding it and the connector together. The lock tabs had been broken off. I recommended replacing the damaged connectors as well as the TCM. Due to the added cost of the TCM, the customer decided against replacing it at this time, but he agreed to the connector/pigtail replacement. We had the Altima for several days before the customer was going to pick it up. During this time, I was able to take two additional test drives, about ten miles each, with no issues.
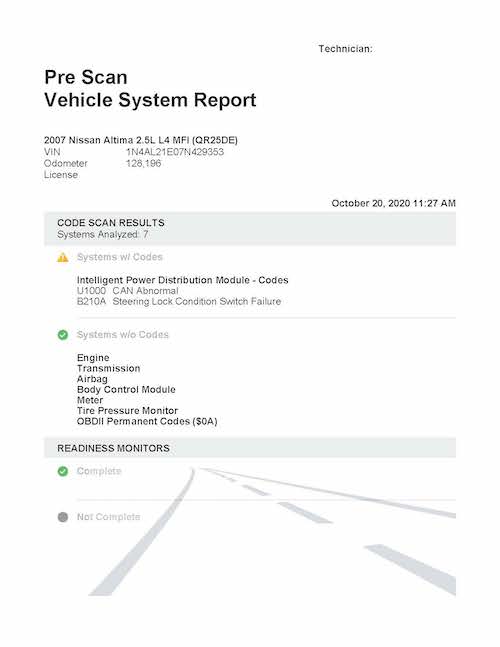
The customer picked up the car and drove it problem-free for about a week before the transmission went into limp mode and the check engine light illuminated. The customer dropped the vehicle off at our shop, and I checked for DTC’s. There were only two DTC’s, and both were in the Intelligent Power Distribution Module (IPDM). At the time, I was not sure if these codes were relevant to the transmission issue the customer experienced. The test drive revealed no issues. We requested that the customer come in for a test drive so we could see what the customer was experiencing. (See Figure 2).
During the test drive with the customer, the vehicle had no abnormal symptoms. The customer approved the installation of the TCM because of our previous recommendation and the previous damage. After the new TCM, the car drove with no issues, and the customer took it home.
Two weeks later, the customer brought the car back. The concern was the same as before: intermittent limp mode. This time the instrument cluster was not showing what gear the transmission was in (no PRNDL lights). The customer stated that after cycling the key a few times, the indicator would come back on. Upon scanning the systems, the same transmission codes from the initial visit were back, minus the IPDM codes. After pulling the codes, I took it for a drive around the block to see how the vehicle performed. To my frustration, everything worked fine, so back to the shop to hook up to the scope.
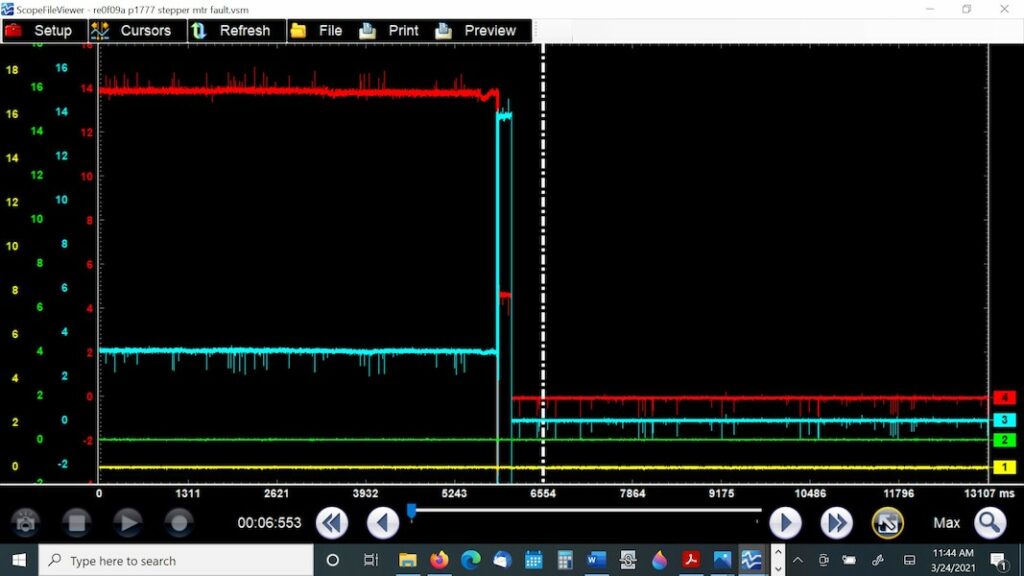
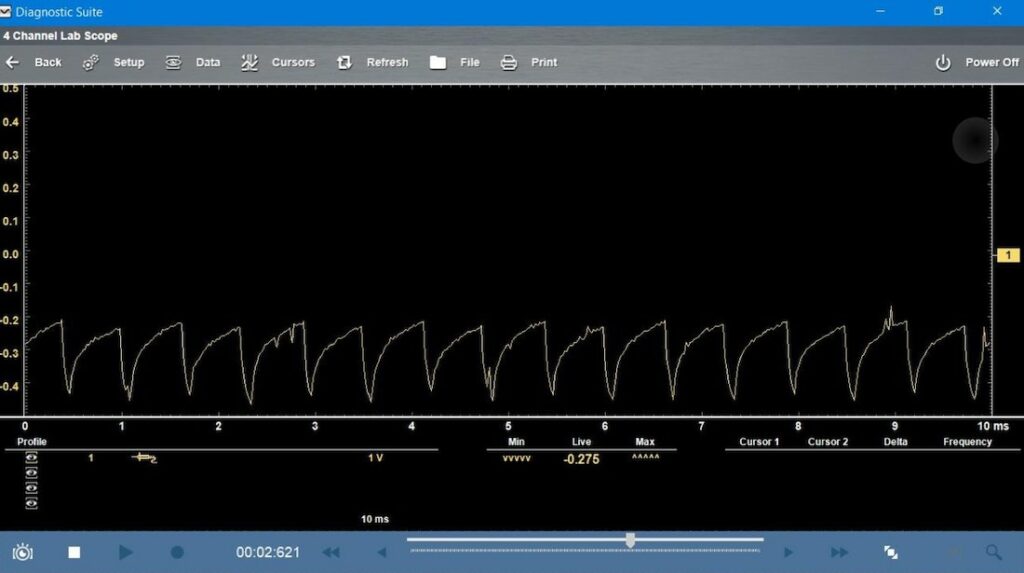
I opened the hood and hooked up my lead to the stepper motor circuit. The pattern looked good while it was running, but then it suddenly spiked and lost communication with the IPDM. The cluster would not show the gear range, and the car was in limp mode, which described the customer’s concern exactly. The entire event lasted only for a fraction of a second. Limp mode always prevailed until I cycled the key. The DTC’s would also clear after the key cycle. At that point, I started checking the wiring to the IPDM, which all looked good with no issues—looking for wires pulled out or corrosion. (See Figure 3).
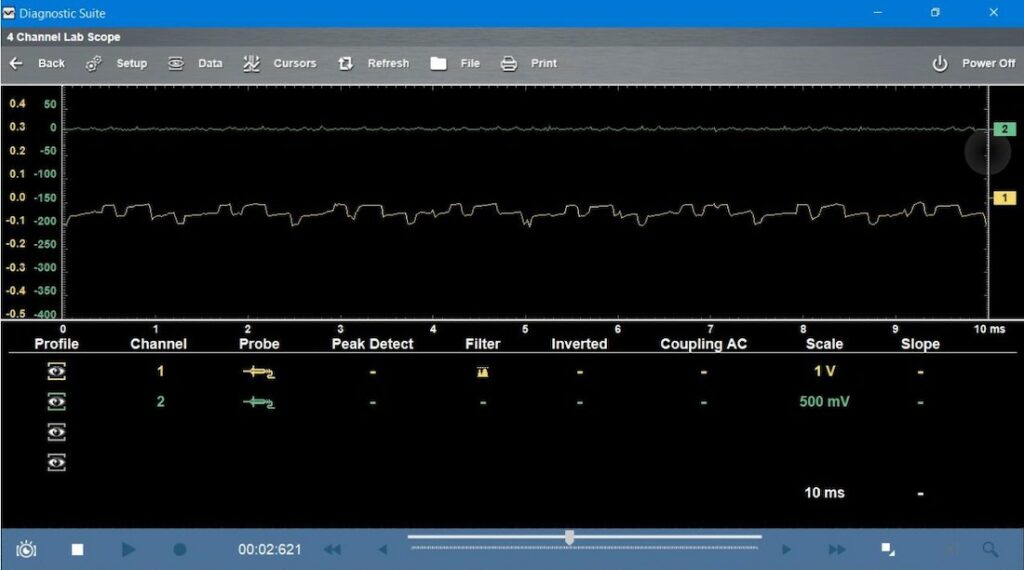
I now know there is a fault, but I am not sure of the root cause. It was time to run back through the basic checks. I performed a battery/charging system analysis. The battery and the generator passed with minimal ripple from the generator. The next step was to perform a voltage drop test on the ground circuits. I started with a break-out-box (BOB) at the OBD2 connector and tested the sensor ground. This did not look like a proper ground voltage drop. It was picking up some sort of signal from somewhere through another component’s ground. I then went to the TCM and voltage-drop tested there. The pattern looked the same. This was when I finally got down to the root of the problem. (See Figure 4).
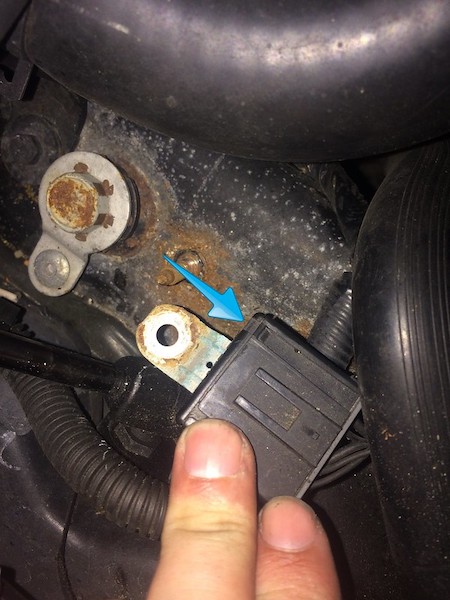
I unbolted the IPDM and lifted it out of the way. My wave signal went away all at once, relays started to cycle in the IPDM, and the instrument cluster stopped working. I was getting close. I pulled the wiring harness out of its hold-down clamps and pulled it away from the body that led into the interior, looking for a damaged harness. Buried under the harness, I found a ground cluster next to the brake master cylinder that was faulty, loose, and dirty. (See Figure 5).
I cleaned and repaired the ground cluster and retested the ground, and the pattern looked good. (See Figure 6).
I then drove the vehicle several more times, and everything worked well. No codes, no limp mode.
Now the Nissan had all the TLC it needed and was ready for the customer. Using the correct equipment to diagnose, remembering the fundamental laws of electricity, and applying diligence to discovering the root cause, got this one out the door. In our business, it’s all about doing what it takes to make the customer happy.