Up to Standards
- Author: Mike Weinberg, Contributing Editor
The most-misunderstood and, consequently, the most-problematic of all functions of the standard transmission is synchronization. To synchronize means to coordinate multiple functions to happen at the same time. Hollywood has shown us time and again men synchronizing their watches before some type of mission, so that everyone’s part is carried out on the same timetable.
In a transmission we have a sequence of events that must take place in a precisely timed manner to get a smooth, effortless, clash-free shift. Let’s follow these events to understand the theory of operation and with that knowledge find the solutions that will fix and prevent further shift problems.
The shift cycle begins with the driver depressing the clutch, which disconnects the input shaft of the transmission from the torque output of the engine crankshaft. There is a momentary lag during which the input is still driven by the disconnected clutch through inertia while slowing. This is called “spin-down time” and often is responsible for a slight grind when the transmission is going to reverse from neutral on units that do not include a synchronized reverse or a reverse brake. This reverse grind is usually the product of a driver who is moving the stick into reverse without allowing clutch inertia to subside.
On a normal upshift or downshift between forward speeds, if the driver rushes the shift and moves the lever before the clutch disconnects, or if the clutch is worn or improperly adjusted and does not release properly, the shift will be notchy and require high effort, indicating the beginning of damage to the synchronizer components and the speed gears.
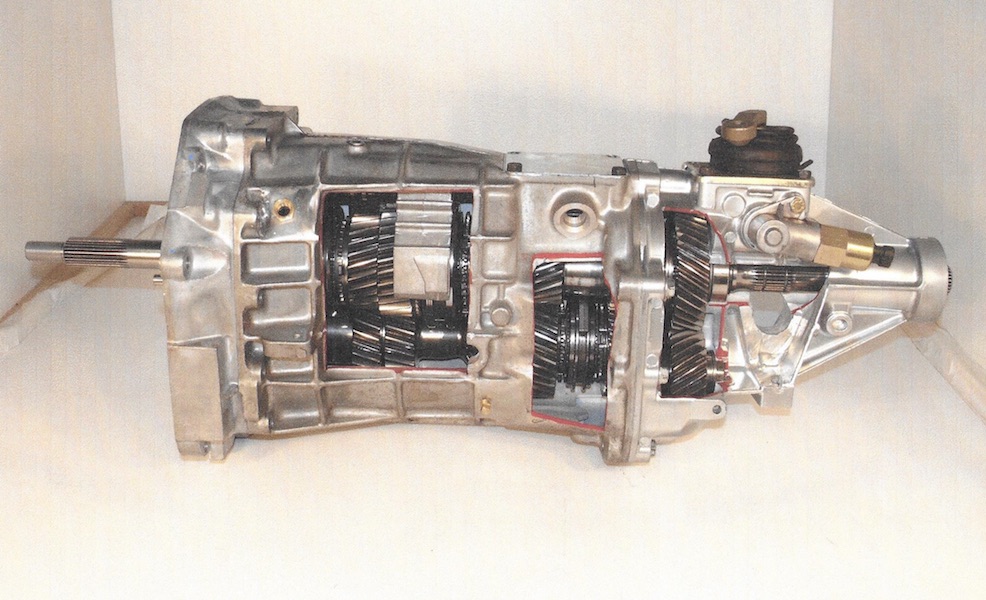
As the driver moves the shift lever, the shift fork moves the synchronizer sliding sleeve in the direction of the speed gear selected (see Figure 1). The synchronizer keys (struts, dogs, pressure pieces etc.) move with the slider and begin to move the ring onto the cone of the speed gear being selected. At this point the driving wheels are turning the transmission mainshaft (output shaft) through the driveshaft or drive axle. The synchronizer assemblies are splined to the mainshaft and are turning at the same speed as the driveshaft or axle. The speed gears are in mesh with the countershaft, which always turns at the same speed as the input shaft.
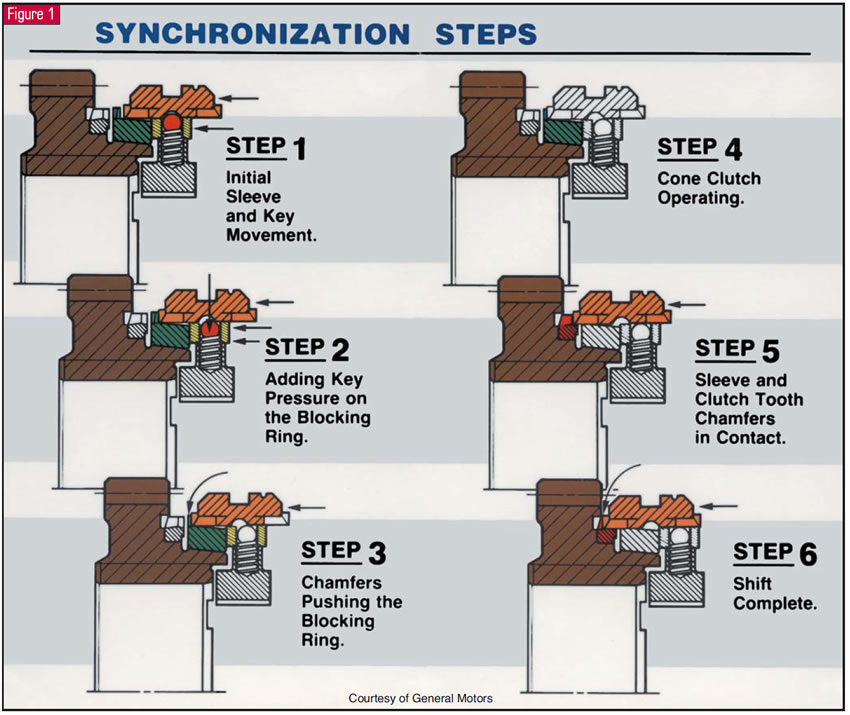
As the sliding sleeve of the synchronizer presses the synchro or blocking ring farther onto the cone of the speed gear, friction of the ring begins to match the speed gear to the speed of the mainshaft. The outer teeth of the synchro ring are not lined up with the inner teeth of the sliding sleeve and “block” further movement of the sleeve onto the coupling or engagement teeth of the speed gear. As the speeds equalize between the output shaft and the speed gear, the synchro ring will “relax” and turn slightly as the friction coefficient drops so that it lines up with the inner teeth on the speed gear, allowing the gear to engage the coupling teeth of the speed gear.
The speed gear is now locked to the mainshaft, and as the driver engages the clutch and the input receives torque from the engine, power flows from the input gear into the counter gear and from the counter gear to the speed gear, which now turns the mainshaft at the ratio selected and sends power to the drive wheels. This all occurs within a very short time, and any wear, excess end play, clutch problem or abuse by the driver will create a shift problem.
Careful inspection of the transmission on disassembly is the beginning of the failure analysis that you are about to perform. Too often the teardown and inspection are rushed and there is little or no attention to detail. Pretend you are counting money, because no one is in a hurry to give away money and, truth be known, you are counting your money. Anything missed on the inspection probably will cost the shop money in either time, parts you cannot sell the customer after a repair price has been agreed upon, or both.
Start with an obvious, often-overlooked problem – end play. Check the end play in the unit before you remove the cases. Excess end play can be caused by worn or failed bearings or other parts and will result in gear jump-out, grinding shifts, and broken or worn collateral parts.
Because of the amount of driver control over the transmission on manually shifted units, you should note the general condition of the vehicle and the clutch when you remove the transmission. Always remove the clutch and flywheel when you remove a transmission. Depending on the wear found and the mileage of the vehicle, it usually makes sense to replace the clutch during a transmission repair. The customer then will have a new clutch and a repaired transmission while paying R&R labor only once. The customer gets value added, and the shop writes a more-profitable repair order and protects its work under warranty.
After the end play is checked and the transmission has been completely disassembled and thoroughly cleaned, a part-by-part inspection will create an estimate that covers all the damaged parts and at the same time provide a correct root-cause-failure analysis. If you cannot establish a failure sequence, you will never be sure of fixing the problem. This is the difference between a technician and a parts replacer. Replacing parts without curing the cause or problem will only create more failed parts after a period of time.
As with every other part of the car, there has been a huge change in synchronizer technology. Once there were only single-cone rings of brass or bronze. Now there are double- and triple-cone rings, which may be lined with a clutch-type paper, sintered metal, carbon fiber or other compounds. All of these compounds are designed to use a specific lubricant for proper operation. Make sure that the lube fill you use is correct for the synchronizer package. If you put in the wrong lube you will have shift complaints, noise and possible early failure of the components.
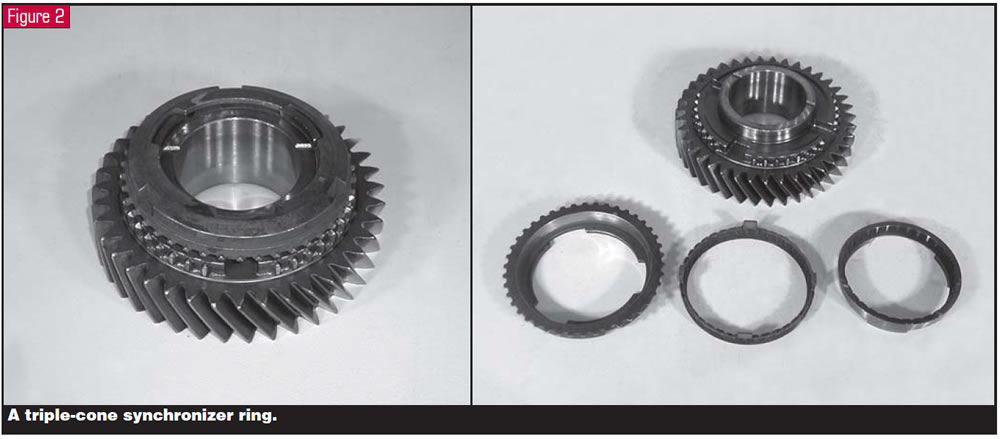
Double- and triple-cone synchronizers are here to stay. The design is an elegantly simple way of increasing the surface area of the ring, which increases the amount of friction and, therefore, the amount of torque the ring can handle without increasing the centerline distance between the input shaft and the countershaft. Late-model vehicles are designed as a compact package in which weight and size are at a premium for fuel mileage and emissions control. Along with the higher-revving engines in use today, that creates a need for more-efficient synchronizers.
A secondary benefit of this type of synchronizer design is that in many instances the synchronizer cones are detachable from the speed gears. One of the biggest traps we used to get caught in was the worn cones on the speed gears. It wasn’t enough to just measure the height that the blocking ring sat up on the cone of the speed gear. This did not take into account the wear or distortion of taper on the cone.
The correct way to check any speed gear with a permanent cone is to mark up the cone with layout blue or a good felt-tip permanent marker, twist a known good ring (preferably new) down onto the cone as it would be during a shift, and then look at the pattern made on the cone. You cannot easily measure a taper, and even if you could, what are the correct specs? The pattern left by the ring is simple and never lies. You will find many rings that sit up perfectly but leave skips or are grabbing the cone only at the top or bottom. This is a comeback waiting to happen. If you do this on the teardown, you will not have to add parts out of your pocket.
Remember how close the timing is in the shift sequence. Any part that is worn will create a problem. Shift forks, rails, worn shift lever, clutch problems, end play, damaged speed gears, sloppy fit between the synchro slider and hub – all create timing issues and comebacks.
Observe the entire vehicle and make notes. If you see a 5.0-liter Mustang come in with two good tires on the front wheels and no tread on the rears, shouldn’t this ring an alarm bell? When you are about to deliver the vehicle to the customer, one of the greatest “CYA” moves you can make is to go for a drive with the owner. Let the owner drive and observe their habits. Do they ride the clutch? Do they rush their shifts? Do they think it is OK to shift without a clutch? Do they make 5th-to-1st downshifts at 50 mph? Do they use the gearbox to slow the car at red lights instead of using the brakes?
Protecting yourself with this knowledge and some gentle suggestions to cure bad habits will add a layer of protection to your warranty liability. I know your time is valuable, but you can never waste time by protecting your checkbook.