


A 2006 Chevy 2500 truck rolled into the shop with a complaint of a reverse delay, but mainly after the vehicle warmed up a bit. Cold, reverse apply seemed to be okay. The truck was equipped with a 6.0-liter engine and 6L90 transmission. In addition, all other gears were fine and there were no trouble codes set. The vehicle had 65,000 miles on it and the fluid was not too discolored. The pan had little material in it. The customer stated that the reverse hesitation had been getting steadily worse.

After everything external was ruled out such as the computer, sensors, wires, etc., the transmission was removed and partially disassembled. The 3-5/Reverse drum was found to be bad, which is becoming a common problem on 6L80 and 6L90 models.

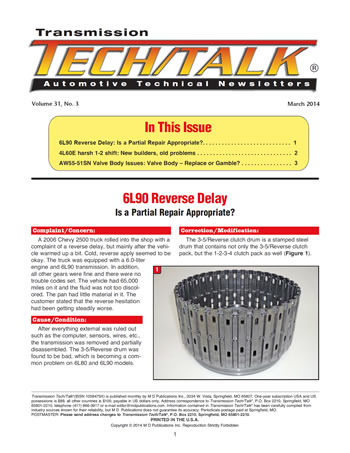
The 3-5/Reverse clutch drum is a stamped steel drum that contains not only the 3-5/Reverse clutch pack, but the 1-2-3-4 clutch pack as well (Figure 1).
The drum is the one directly next to the pump cover and the cover sealing rings seal the bore of the drum. The bore (center) of the drum is steel and is welded to the shell part of the drum. It is the welded area of the drum that is the problem.
Other transmission types have had cracking problems on various components, some obvious, other much harder to see as is the case on the 6L80/6L90 3-5/Reverse drum. Much of the time, the crack is virtually invisible (Figure 2). The best way to determine if there is a crack is to heat the drum and pour solvent into it, enough to cover the bottom, and then hit the outside with air. If itʼs cracked, it will bubble.

Currently, the drum is available from OE under part # 24259851. The drum comes loaded, pistons, clutches, etc. and is a drop in. Note that 6L80 is a different number.
Once the diagnosis is confirmed, the question remains how to proceed with the repair and what should the cost be? It comes as no surprise that repair costs are through the roof today, rather due to increases in everything or a decline in car counts. With vehicle quality improving every year, it has certainly made an impact on how many repairs are made vs. cars taken to the bone yard. It is imperative to contain cost and not force customers to make alternative choices like buy a new car or scrapping theirs.
The decision as to how the Chevy truck would be repaired was based upon mileage, symptoms, fluid condition, and what would actually address the problem. That is why just the 3-5/Reverse drum was replaced rather than performing a compete rebuild.
Doing the partial repair was not hard to do. The valve body was loosened just enough so that the compression seals between the pump cover and valve body did not touch. No torn valve body gaskets to contend with. The bell housing/pump assembly was removed and the 3-5/Reverse drum was lifted out. The input shaft/4-5-6 drum remained in the case. The pump has an O-ring, not a gasket. A new loaded OE clutch drum was then installed.
Dropping the 3-5/Reverse drum into the case can be somewhat of a chore because of the clutch packs. With the input shaft vertical, rotate the output shaft and input shaft in different directions to enable the frictions to drop over the hubs. Once installed, verify proper thrust washer clearance between the drum and pump. Other than the drum, the sealing components that require replacement are minimal and new fluid will also help the war effort.
In the end, the shop made a good profit, the vehicle was repaired and the customer did back flips. Sometimes a partial repair is a win-win for everyone.


A 2003 Chevy Trailblazer shows up for repair with 170,000 miles on it. The vehicle was equipped with a 5.3-liter engine and a 4L60-E transmission. It had to be repaired for the usual reasons; the 3-4 clutch and band were smoked.
The transmission was rebuilt with the customary parts and procedures, reinstalled along with a reman torque converter and taken for a test drive. Everything seemed to work well on the test drive, except for one little issue. When the transmission made a 1-2 upshift, the windows rattled because of how hard the shift was and at all throttle positions. Nothing “creative” was done to the valve body, and line pressure seemed normal.
After a little backtracking and a review of oil schematics, the culprit turned out to be the 1-2 accumulator valve train. It was just a bit out of kilter.
The 4L60-E family of transmissions (4L60-E, 4L65-E, 4L70-E) has been around for decades and is still the number-one transmission being repaired. There have been countless changes and much information released concerning the 4L60-E over the years to address the many issues that have popped up.
Seasoned rebuilders have certainly seen it all; however, technicians just taking on the role have not. Certain subtle changes that occur on any transmission can trip up even a veteran, let alone a newbie.
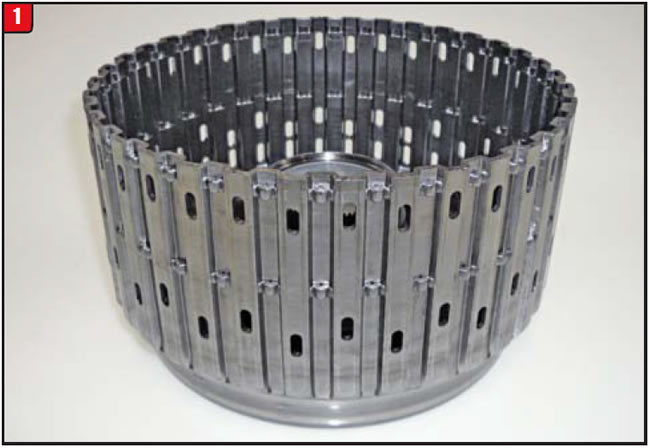
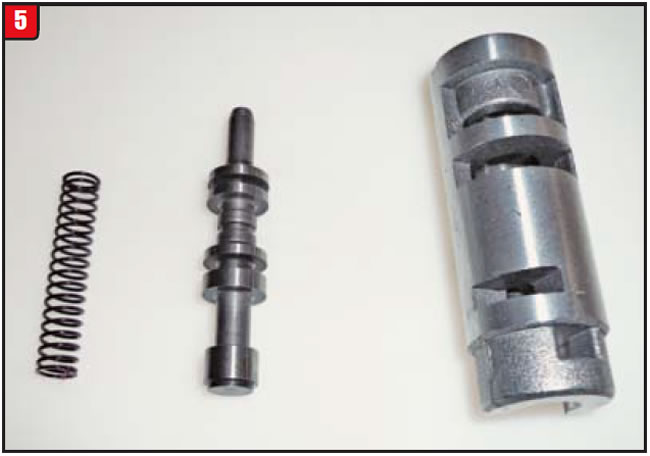
Case in point is the accumulator valve train, which is positioned between the EPC and shift solenoid (Figure 3). As with most models of transmissions that have been around for a long time, changes have occurred to items like the accumulator valve that, if not obvious, can cause it to end up being misassembled.
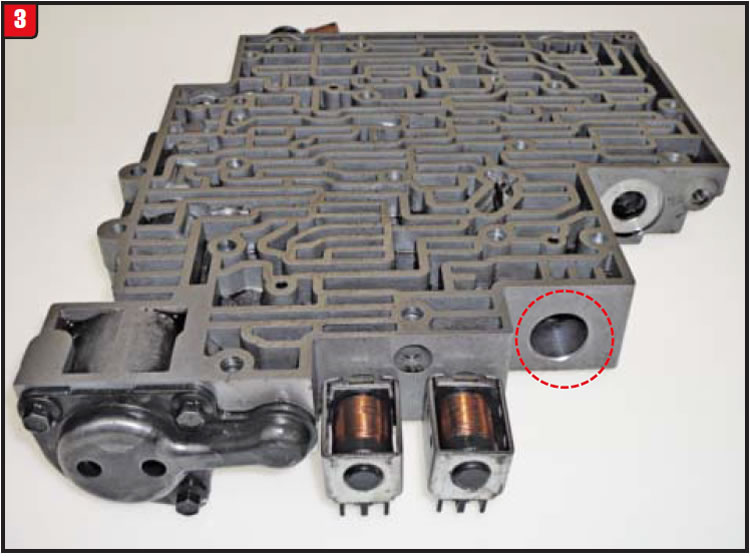
Earlier-model 4L60-E accumulator valves had a sleeve that was completely round at the end where the retaining pin was installed. There was a window (cut-out) in the aluminum sleeve on one side for the pin, which required proper rotation of the sleeve. Things do change, though.
Newer accumulator-valve sleeves are cut differently. The end of the sleeve actually forms a horseshoe but still has the window for the retaining pin (Figure 4). The sleeve can actually be rotated 180° and the pin can be installed incorrectly. The depth of the sleeve in the bore would be the same regardless.
With the sleeve incorrectly installed 180° off, the oil grooves of the sleeve will not match the worm tracks of the valve body, and oil flow to and from the valve would be blocked (Figure 5). Other valve-body sleeves can be installed with any rotated position, providing there are oil grooves cut into the sleeve all the way around.
This is but one example of “building in” a problem that did not exist to start with. A rebuilder with less time in the saddle is more likely to overlook an item like the accumulator-valve sleeve. Itʼs all about training, to ensure that new builders avoid old problems.


Itʼs just the nature of the beast that when certain vehicles roll into the shop, stomachs start to churn. Such is the case with vehicles that show up with the AW55-50/55-51SN family of transmissions. So when a 2005 Nissan Maxima arrived with the subject transmission, there were no tears of joy.
The transmission had 102,000 miles on it and upon disassembly that fact was confirmed by the internal damage. The vehicle was a tow in (no movement) caused by a failed C1 and C3 clutch pack, which generated a fair amount of debris. Overall though, there was not a lot of hard part damage, so it was decided to rebuild the unit.
The unit was rebuilt with the regular amount of soft parts, MOK (master overhaul kit), band, filter, some bushings, etc. Hard parts were prepped and polished and a reman torque converter was used. The valve body was disassembled, cleaned, and inspected. All valves looked to be in good shape (no wear) and using a scope light, all bores were examined for wear. The bores “appeared” to be in good shape.
The on-off shift solenoids were tested; however, the linears were not. Unfortunately, most shops are not equipped to test linear solenoids. The transmission was reinstalled and taken for a test drive.
Initially, the vehicle performed fairly well, but as it warmed up, bad things started to happen. The 2-3 upshift almost became nonexistent, along with increasingly hard downshifts and garage shifts. To say that conditions were erratic would be an understatement.
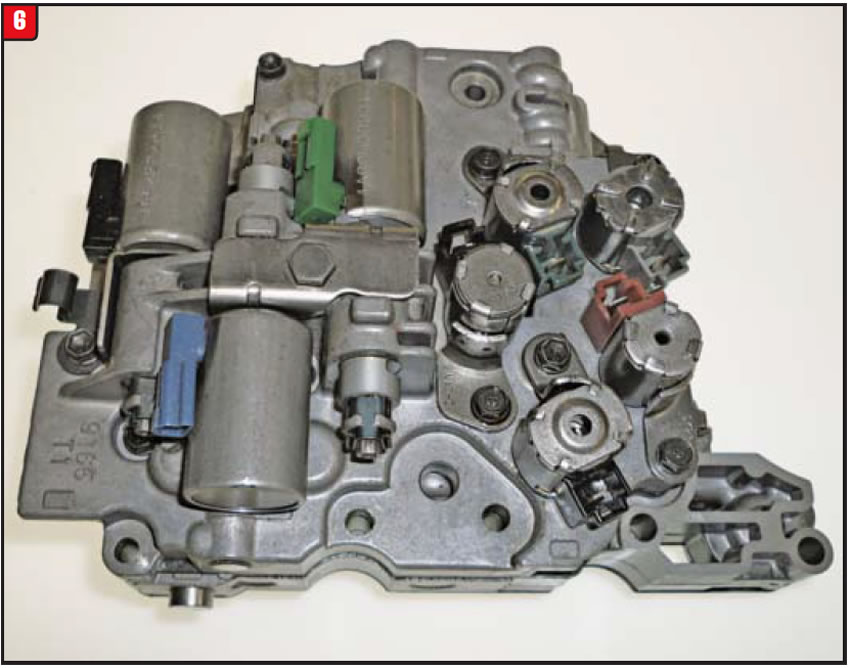
After ruling out external controls and rechecking servo travel, etc., it was decided that the valve body be replaced. A remanufactured valve body was installed and the transmission worked great, cold and hot. Just a few bolts to wrench, however, replaced at a high cost (Figure 6).
Much has been developed and written concerning 55-50SN valve bodies, including the solenoids. There are several valves and sleeves that can wear as well as the associated bores. Even though a valve looks good does not mean the corresponding bore is. A bore can wear smooth (no scratches) and look like itʼs in good shape when in fact it can be worn several thousandths.
If after installing the valve a wiggle test cannot be done or is inconclusive, the only other option is to do a vacuum or wet-air test, which was brought to light and is recommended by Sonnax.
Unfortunately, the 55-50SN valve body could have several valves or sleeves worn, requiring a straight replacement or oversize replacement option. Along with a necessary reamer, the cost to repair a valve body could become noticeable.
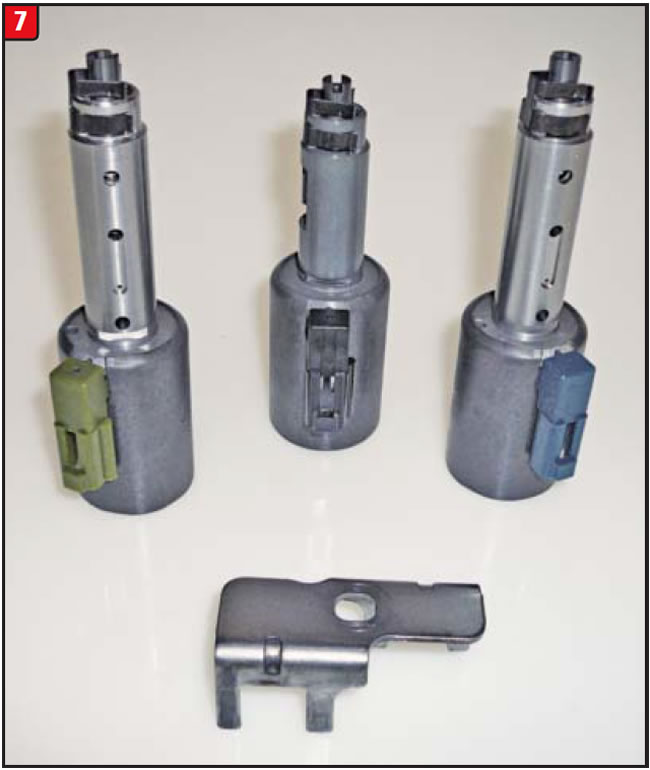
In addition is the question of solenoid condition. There are several that can go bad, the most costly of which are the linears. Currently, OEM linear solenoids are not available: however, they can be rebuilt. There are tool kits and replacement bushings available to enable a shop to do them in-house. Beyond rebuilding is aftermarket new. Rostra has had new linear solenoids for some time now and the solenoids are designed to accommodate first or second designs (Figure 7).
Once valve-body wear and solenoid condition have been determined and priced out, it may be too costly to repair the existing valve body. There are several companies that provide remanufactured valve bodies. The question is cost and content.
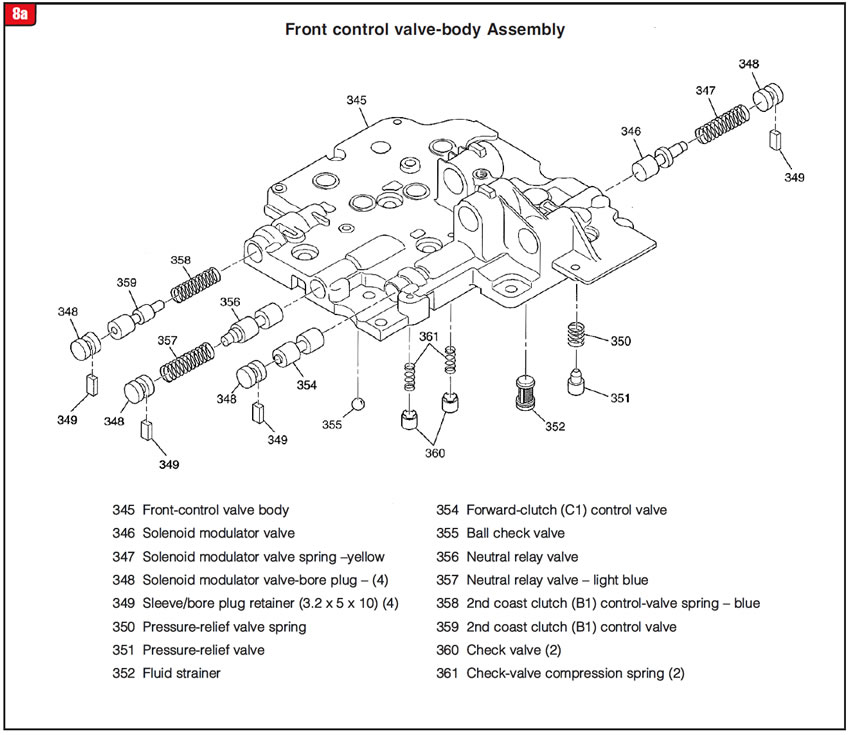
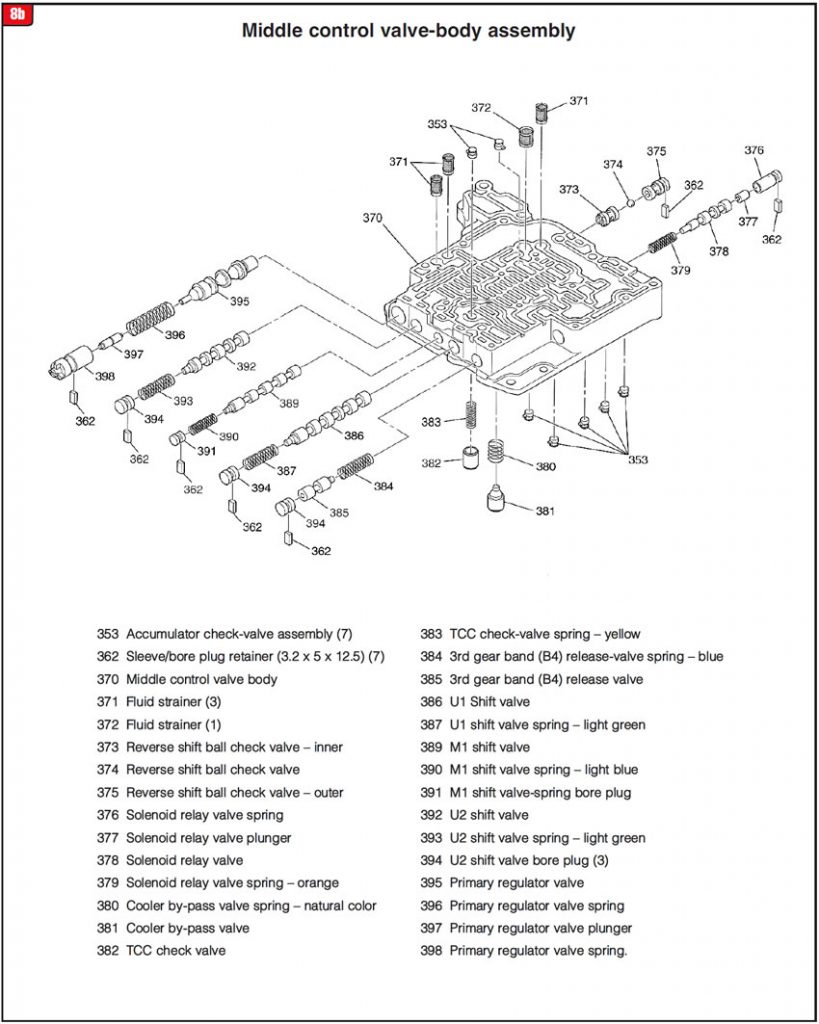
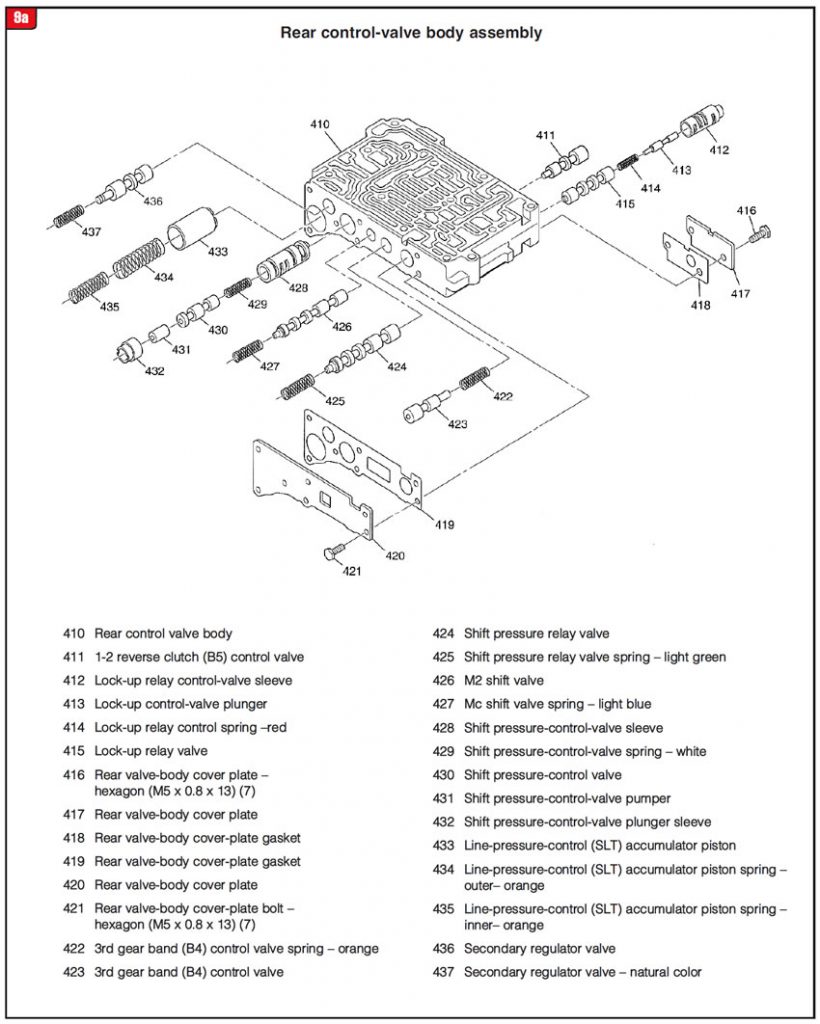
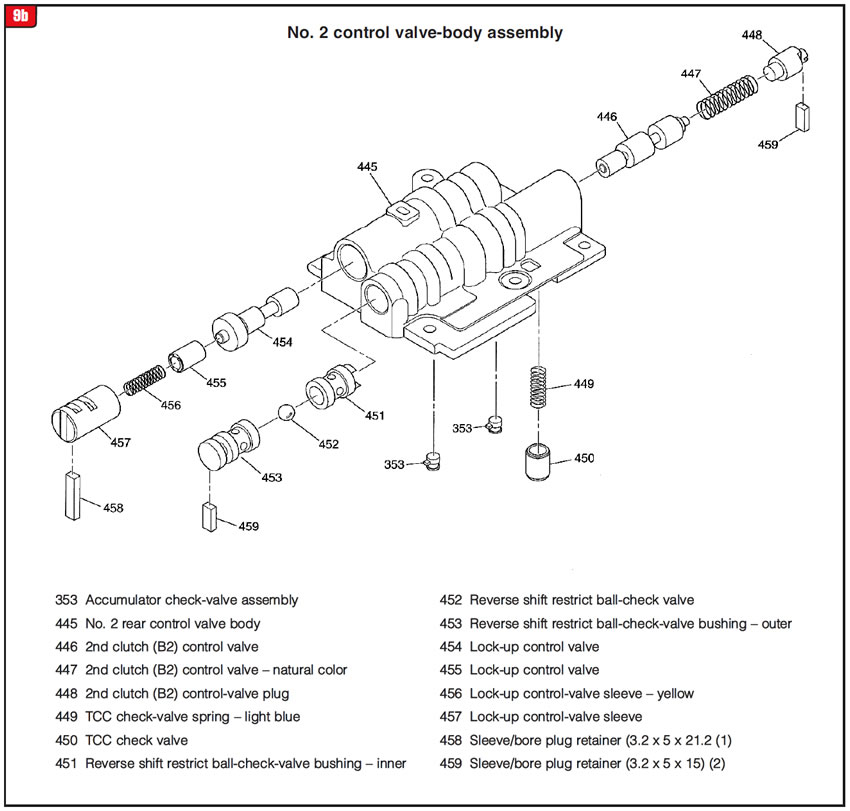
After speaking with the people at VBX, for instance, a great deal of effort goes into revamping a 55-50SN valve body as well as the final testing. A valve body on an AW55-50/51SN transmission is not a piece of cake to do, as shown in figures 8 and 9. Each job must be evaluated to determine the appropriate action.
Ultimately, when a vehicle with a 55-50SN is up for repair and has a fair amount of miles on it, the valve body cost needs to be determined up front and not gambled on afterward. Customers hate surprises.

March 2014 Issue
Volume 31, No. 3
- 6L90 Reverse Delay: Is a Partial Repair Appropriate?
- 4L60E harsh 1-2 shift: New builders, old problems
- AW55-51SN Valve Body Issues: Valve Body – Replace or Gamble?


