When building a reliable transmission for everyday drivers, it’s tempting to skip checking gear set endplay because of the factory tool cost. Often, I hear: “I feel movement, so at least I know it is not going to bind up;” or “This play feels good to the touch, so it is okay;” or “It’s not so important to check this as long as I can turn the shaft;” and “I build them all the same way all the time and never have any issues;” etc. This type of thinking might get the job out the door, but proper plays are important for a durable build. The good news is that there are alternatives to factory tools that are just as accurate and can be simple to use, so you don’t have to skip any checks.
Let’s look at the two endplay settings in Chrysler RFE transmissions: “front” and “rear” (clutch pack tolerances and clearances are topics for another day). When is it important to check these if it appears there is no damage to the needle bearings or wear on the planetary gear sets? All the time.
Trucks and extreme vehicles experience excessive stress and shock loads due to acceleration and deceleration (trailer hitching). This causes parts to move back and forth, increasing internal wear. Splines and bearings really don’t like these loads, so it is best to keep endplays set to the minimum to prevent premature damage. Checks are especially important when changing hard parts, including:
- Planetary gear set (there are three)
- Sun gears
- Drums
- Shafts
- Bearings
- Case
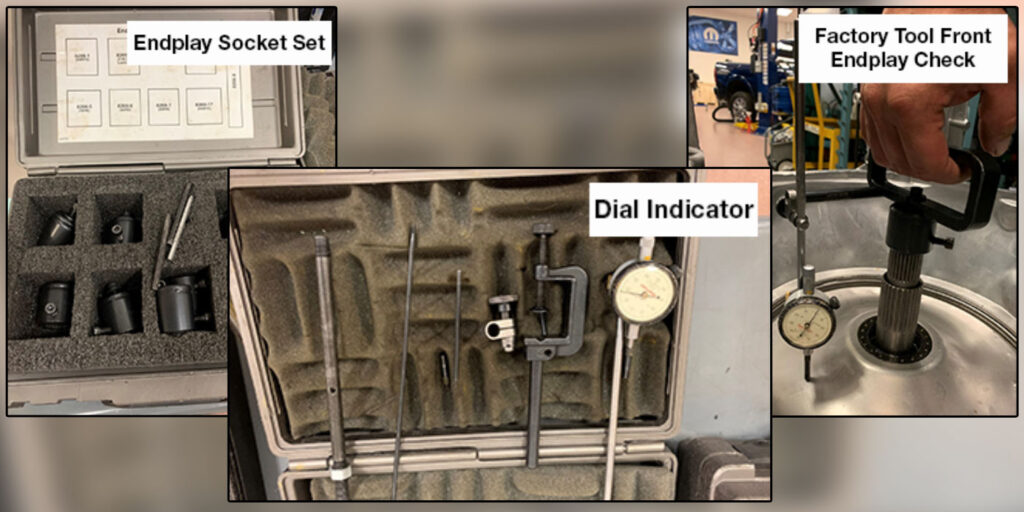
Here is where most draw the line and give excuses for skipping checks, which make sense if you’re only doing one or so builds and don’t have the right tools. Sometimes factory tools can be purchased from outlets such as eBay or swap meets at much-reduced prices, but it typically runs in the hundreds of thousands of dollars for both the Miller Tools 8266-17 endplay socket set and matching C-3339 dial indicator (Figure 1, above). If you don’t have these expensive tools, here’s what to do instead.
The two RFE endplays are separated at the center of the case 2-4 clutch housing, which is held stationary in place with a beveled snap ring. I find it easier to set this play up prior to opening a rebuild kit so that, if I need to round up a correction washer or shim, the parts are clean and oil-free.
Rear Endplay Check
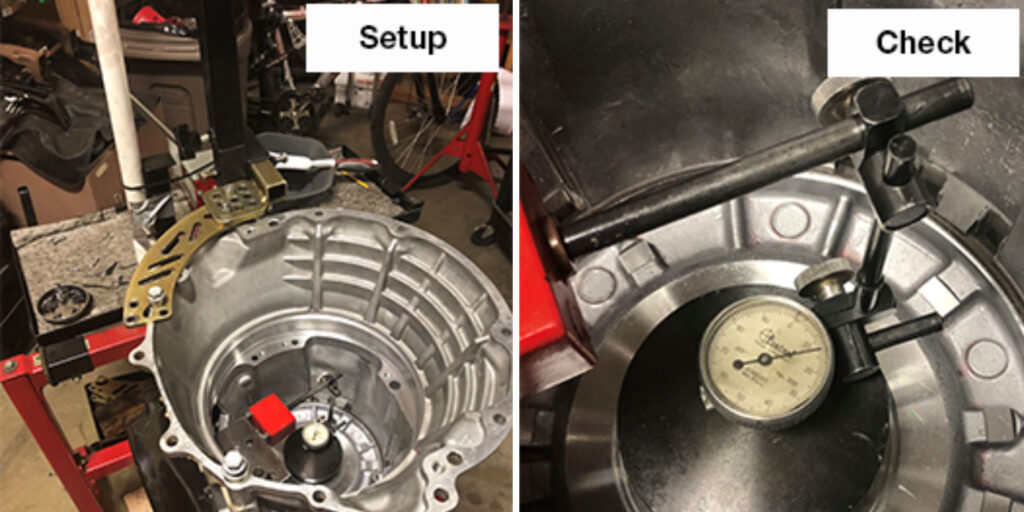
Rear play is set by a selective, three-indexing tab metal plate (OE kit 5013092AB) that fits between thrust bearing #6 and the 4C hub/reaction sun gear. Specification is between 0.010” to 0.020”. There are eight selective plates that come in a kit, ranging from 0.103” up to 0.145” in thickness increments of 0.006” per plate. Plenty of room to get this setting correct.
If you are checking the endplay dry, assemble from the rear Low/Rev drum up to the middle 2-4 clutch housing. Remember, no clutches so this is an easy install. The factory check is to install the Miller socket onto the output shaft and dial indicator and get the reading from the back of the transmission case. Alternatively, use the method shown in Figure 2 with dial indicator set on the inside of the case. Once a reading is on the gauge, you will know exactly how to change this play if needed. For now, just leave this assembled and in the case for the checks on the front.
Front Endplay Check
Front play is set by a selective thrust plate (OE Kit 5013093AB) that snaps onto thrust bearing #5. This bearing rides between the Reverse clutch hub and the center 2-4 clutch housing. The input drum does not need to be assembled and no clutches are used. Components are just the pump (bolted together), input shaft with only drum clutch hub attached (no aluminum clutch housings), UD/OD/Rev hubs and their bearings.
Set the bearings and hubs into place ending at bearing #1 that rides between the pump and input housing hub. Front endplay specification is 0.020” to 0.030”. There are 15 sizes of selective plates that vary from 0.062” to 0.144”. Factory check is to connect the Miller tool onto the input shaft and make the measurement check with the dial indicator. If factory tools are unavailable, make the same check as shown in Figure 3 by using an alternative style of dial indicator and lifting on the input shaft.
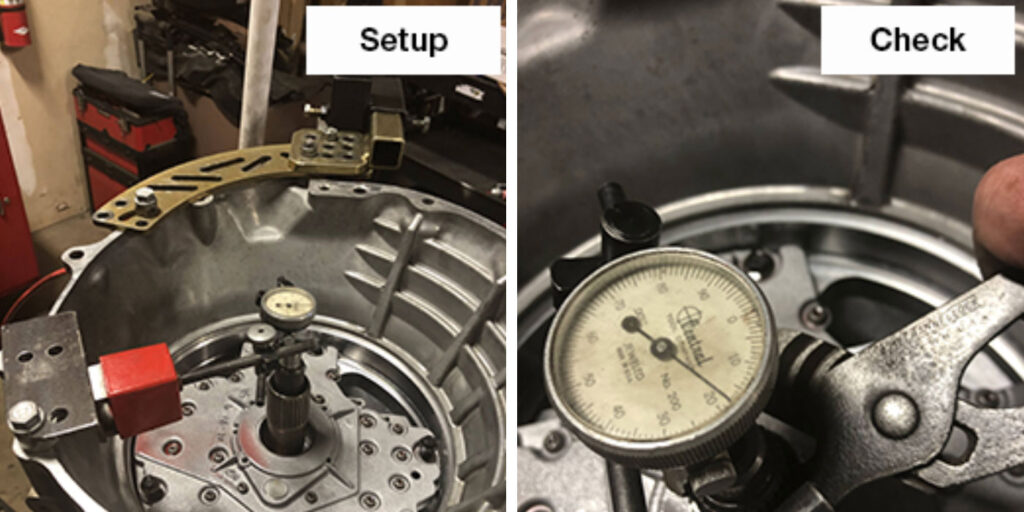
Important: When making this check, verify that the input shaft is held to the input hub with a round retaining ring. This will have a movement that is not part of the play and can give a false reading if not taken into consideration. It is a good idea to measure the looseness play of the shaft to the drum before checking front endplay in the case; typically, the shaft moves 0.005” to 0.010” in the hub.
Always remember: it is not what you “can’t do” because of not having the “proper” tooling, it is “How will I get this done to achieve the same result with alternative tooling?”
Read the full archive of TD’s TASC Force Tips column here.
Randall Schroeder is a Sonnax technical support specialist. He is a member of the Sonnax TASC Force (Technical Automotive Specialties Committee), a group of recognized industry technical specialists, transmission rebuilders and Sonnax technicians.
Special thanks to Alan McAvoy, an area technical training manager from the Stellantis Performance Institute, for factory tool photos and illustrations.