
Body of Evidence
- Subject: Valve-body installation
- Unit: JF506E
- Vehicle Applications: Mazda, Jaguar, Land Rover, Volkswagen
- Essential Reading: Rebuilder, Diagnostician
- Author: Jeff Parlee
Installing the JF506E valve body can be a challenge with the unit on the bench. Trying to install the valve body with the unit in the car is difficult not only because you cannot see the manual valve where it fits into the linkage but also because any sideways movement can damage the gasket.
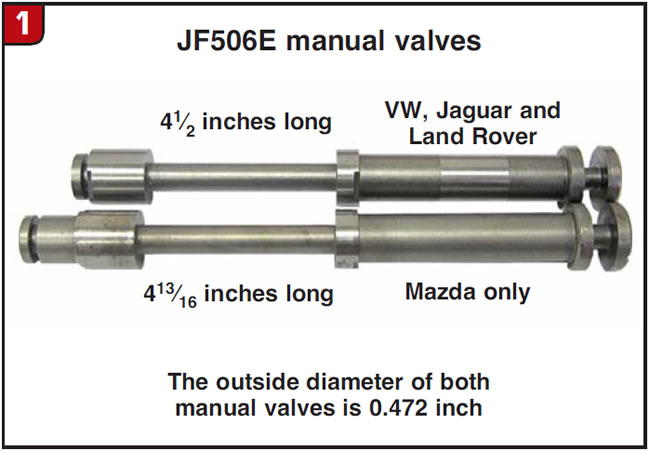
There are two different manual valves, one for Mazda only and a shorter manual valve for Jaguar, Land Rover and Volkswagen. The valves are the same except the end is longer after the last land on the Mazda valve (Figure 1).
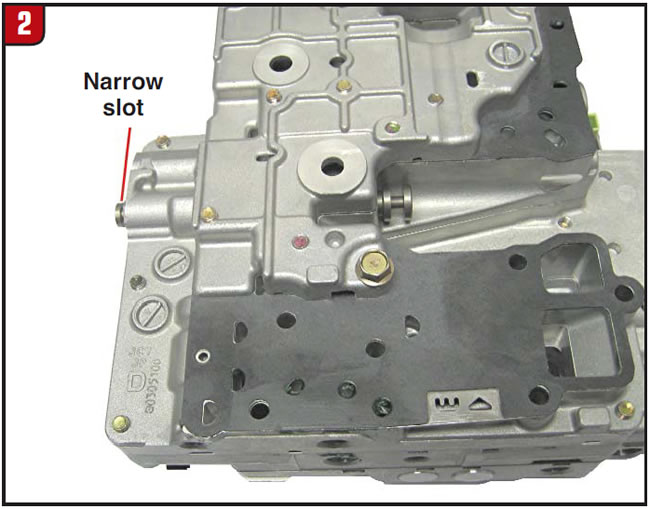
The manual valve should be installed so that the end of the valve with the narrow slot (0.060 inch wide) is toward the outer edge of the valve body (Figure 2).
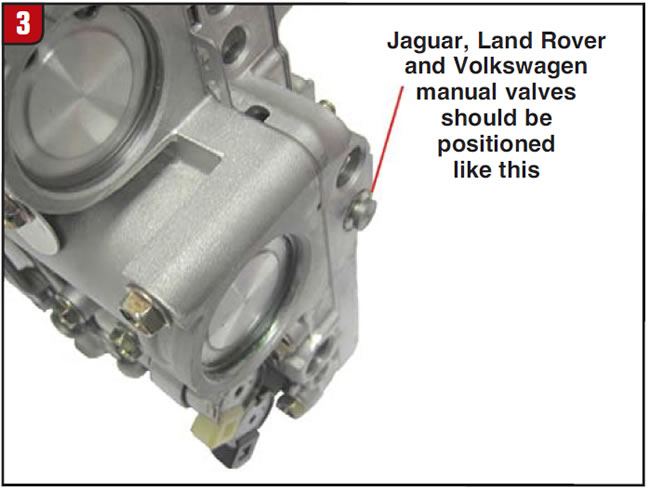
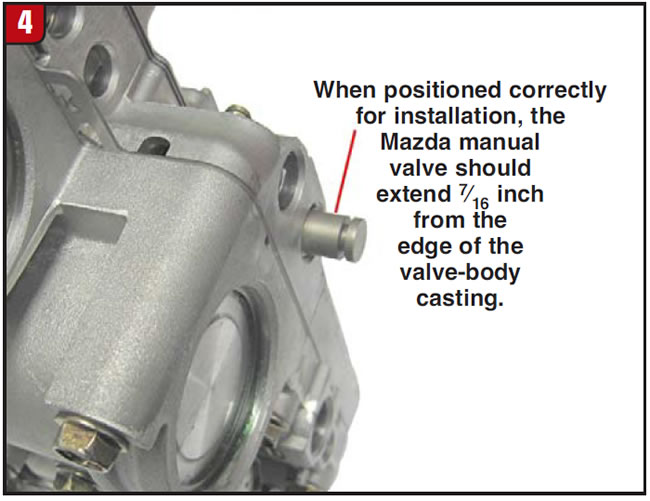
Next, place the manual linkage into low range and position the manual valve as shown in figures 3 and 4.
Install the valve body with two bolts just finger tight, then move the manual linkage to see whether the manual valve moves too. If the manual valve is moving with the linkage, install the rest of the valve-body-to-case bolts and tighten to 71-78 lb.-in.
To make this job even easier you can make a tool to hold the manual valve in place. You can make the tool from plumber’s pipe-hanging strap or from an old valve-body separator plate. The advantages and disadvantages are:
- Made from separator plate, is 0.040 inch thick, which is sturdy and holds the manual valve in place well but is harder to bend.
- Made from plumber’s strap, is 0.23 inch thick, which is easy to bend when you’re forming the tool but is not as sturdy when holding the manual valve.

To make the tool:
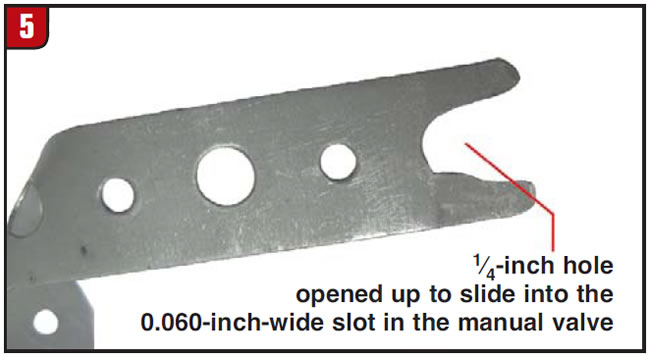
Cut a 41/2-inch length of plumber’s hanging strap, then at one end open the last 1/4-inch hole to make it a slot (Figure 5).
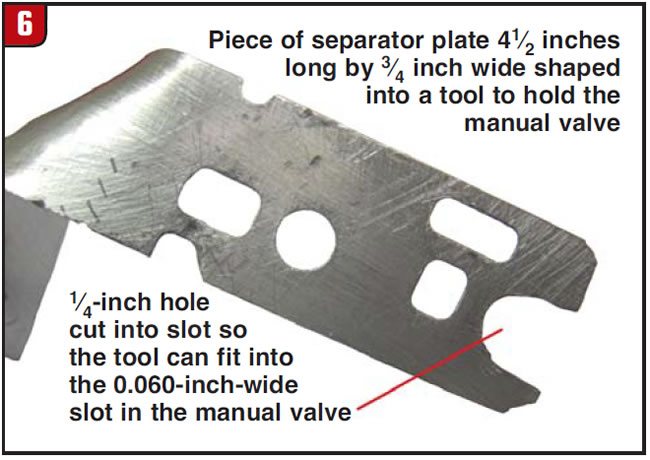
To make the tool from a separator plate, just find a 1/4-inch hole and cut out a piece 41/2 inches long by 3/4 inch wide with the 1/4-inch hole about 3/8 inch from one end. Open up the hole so that it is a slot as shown in Figure 6.
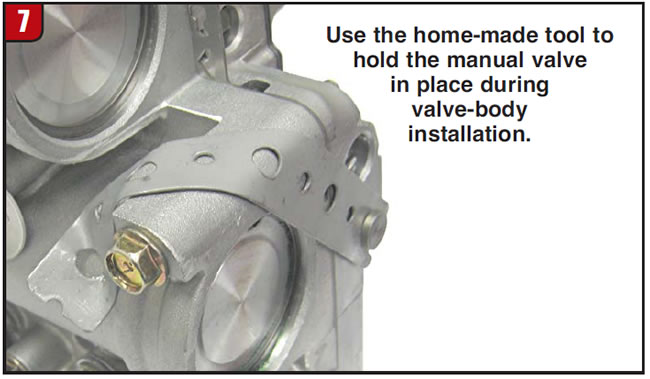
Next, slide the slotted end of the tool into the 0.060-inch slot in the manual valve. On the shorter manual valves used in Jaguar, Land Rover and Volkswagen, push the manual valve in so that the tool is flat against the valve body, and bend the tool so that it looks like Figure 7. When the tool is formed like this, gravity will hold it in place.
On the longer, Mazda manual valve, first bend the slotted end of the tool so that the manual valve extends past the casting by 7/16 inch. Stack 3/8-inch flat washers to make a pile 7/16 inch tall, put the washers on the end of the valve, then slide the slotted end of the tool onto the manual valve. Push the manual valve into the valve body, then bend the tool to fit around the washers so that it is flush with the side of the valve body. Continue to form the tool up and around the accumulator. Once the tool is formed, remove the flat washers from the manual valve. The tool should now hold the Mazda manual valve in the correct position for installation.
Now that we have the tool made, let’s recap the valve-body installation procedure:
- Put the manual linkage into low range.
- Install the manual valve into the valve body.
- Slide the tool into the slot on the manual valve. A dab of assembly lube between the tool and the valve body will help hold the tool against the valve body.
- Attach the valve body to the case with two bolts, finger tight.
- Remove the tool and check that the valve is engaged into the manual linkage.
- Install the remaining valve-body-to-case bolts and torque to 71-78 lb.-in.
Jeff Parlee is director of product support at ValveBody Xpress.


