Technically Speaking
- Author: Mike Riley, Technical Editor
- Subject Matter: 2005 Acura MDX
- Issue: No movement to wrong gear starts

Little did the owner of a 2005 Acura MDX know that at the time the transmission in his vehicle was being repaired that it was the start of a long uphill battle. The vehicle initially was towed into a shop for inspection due to a no-movement condition. In addition, the check-engine light was on indicating the presence of trouble codes, several of which were verified on a scanner.
The MDX was equipped with a 3.5L engine and 5-speed automatic transmission and had 118,000 miles on it. Despite the trouble codes, the engine ran well and the vehicle was still in pretty good shape so it was decided to peel down the transmission to determine the extent of damage. As expected, there was substantial damage internally that require replacement of several hard parts. Due to the debris that was generated, several electrical components were replaced as well. The transmission was rebuilt and reinstalled with the hope that everything would work great. Unfortunately, such was not the case.
The situation started to deteriorate the instant that the transmission was placed into gear since it did not perform as expected. Regardless whether the transmission was placed into drive or reverse, as soon as the wheels started to turn the engine would lug down as if the lockup torque converter was starting to apply. Beyond that, in drive the transmission did not take off in first gear but rather a higher gear such as 4th or 5th and of course the check engine light came back on. The symptoms seemed to be erratic to boot. Although the initial rebuild took a fair amount of time to complete due to parts availability, etc., it was only the beginning of a long journey.
After assessing what the symptoms were the diagnostic process began and various systems and components for either checked or changed but, to no avail. Finally, the focus turned to the PCM and although it was re-flashed previously, the decision was made to try another. Replacing the PCM only made matters worse, and by this time shop personnel were running out of gas, so the vehicle was sent to a Honda dealership.
Once there, a Honda technician went through their diagnostic procedures and decided to put the original PCM back into the vehicle in order to return to square one, as bad as that was. With the original PCM back in the vehicle, the technician reevaluated the situation and determined that the transmission was bad and needed to be replaced. By this time not only were the costs mounting up but so was the time that the customer was on shoe leather. Finally, a command decision had to be made, and the owner of the vehicle was the one that made it, which was to take it to a second repair facility and start from scratch.

Due to the vehicle’s history, shop No. 2 decided to remove the transmission and completely disassemble it in order to inspect each component. Aside from replacing a couple of items with marginal wear, the new technician decided to install a valve body kit to address the potential lockup issue which is predominant on many Honda transmissions, just as a precaution. All components were either changed or tested and the unit was reassembled. Electrical components were not changed at the time since all of them were accessible externally, in the event one was found to be defective after the road test. With the transmission back in the vehicle, the engine was fired up to see if the latest repair attempt was successful or not.
Initially, things were looking up since the engine did not chug with the transmission in drive or reverse nor were there any check engine lights on; however, when the technician tried to drive down the road he noticed that the unit was not in first gear. The transmission did have a first gear start manually.
At this point a scanner was hooked up to verify the correct computer signal as well as to individually test solenoid function and everything seemed to be OK. After reviewing the solenoid firing order, the shift solenoids were removed to determine if there was an issue with operation or design. After a closer examination, two of the four solenoids were found to be incorrect.

Unfortunately, when the rebuilder at the original shop was replacing the array of bad parts, he chose to purchase replacement shift solenoids from a reman facility instead of getting new ones from a distributor. The replacement solenoids were actually from a later model MDX, which look almost identical to previous models which of course is no shock when it comes to Honda transmission components. This situation illustrates the importance of “look before you leap” when replacing stuff in Honda transmissions.
When Honda redesigned the MDX transmission in 2003, the shift solenoids were relocated internally however they were accessible externally, which was a plus (Figure 1).
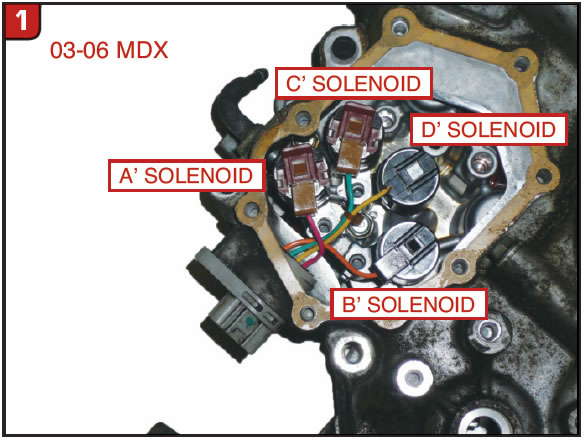
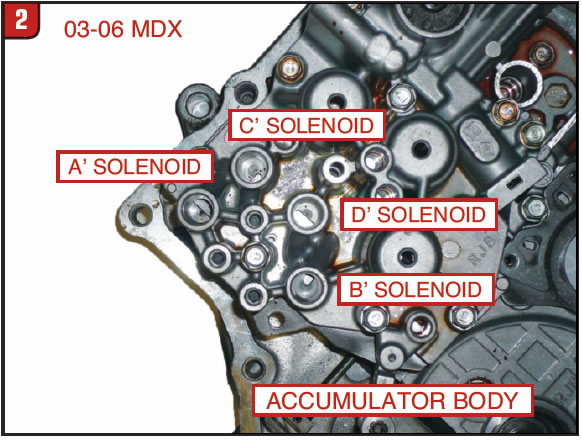
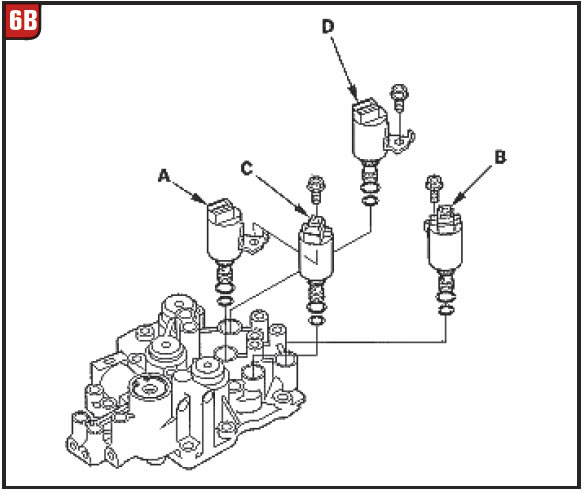
With the linear A/B solenoids and support plate removed, all four shift solenoids are exposed, two brown connector and two black connector designs. The solenoids are bolted to the accumulator valve body, which is attached to the bell housing, (Figure 2). The brown connector solenoids are toward the top of the valve body with the black connector solenoids toward the bottom. The case connector wire terminals are also brown and black accordingly.
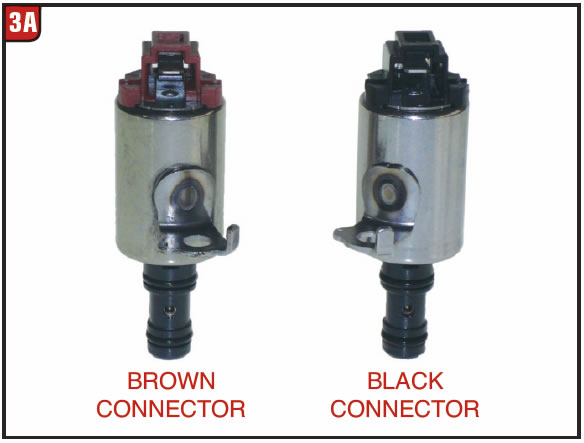
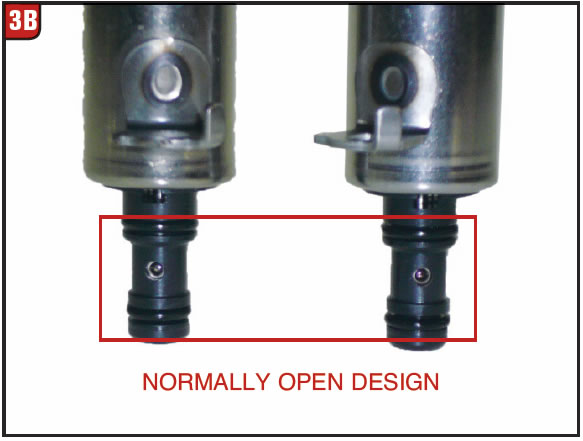
The brown and black connector solenoids used for MDX from ’03 to ’06 were basically the same in appearance and operation (Figure 3A). All four solenoids are NO (normally open) with silver colored housings and a comparable barrel design. A close-up of the orifice holes is one way to determine if the solenoid is normally open (Figure 3B). The color of the harness wire should always be recorded during disassembly to avoid problems down the road.

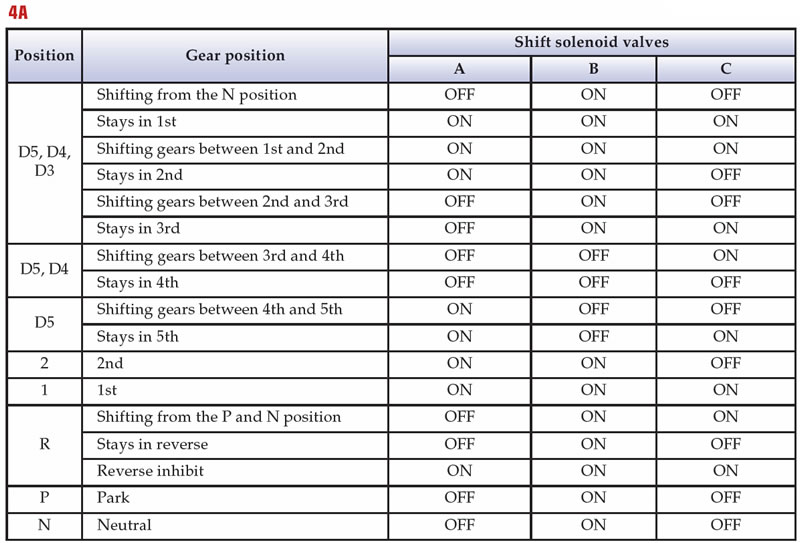
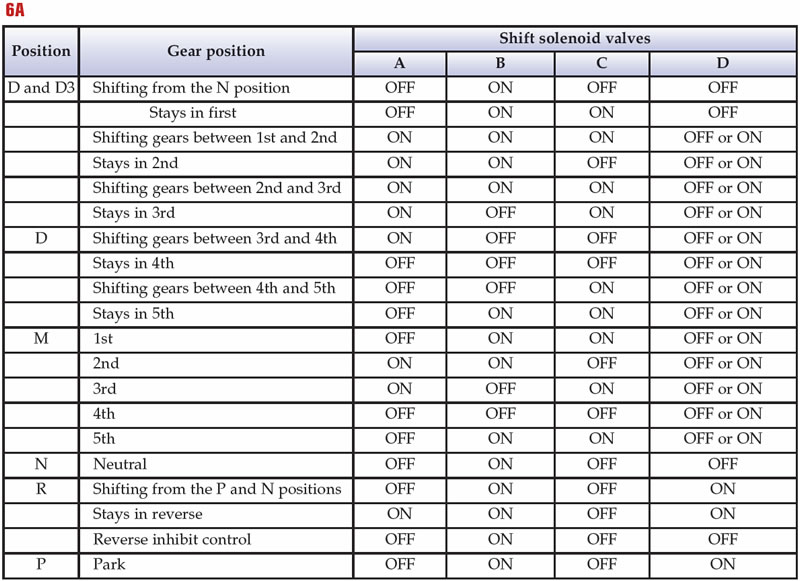
The solenoid firing order for a ’03 to ’06 MDX is unique to those models (Figure 4A). The actual shift solenoids are coded as A, B &C with the lockup solenoid coded as D, although it is omitted from the solenoid operation chart. The lockup solenoid can be operated under various conditions.
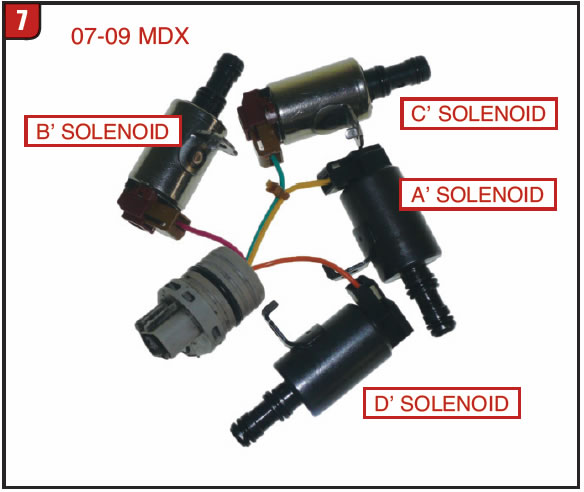
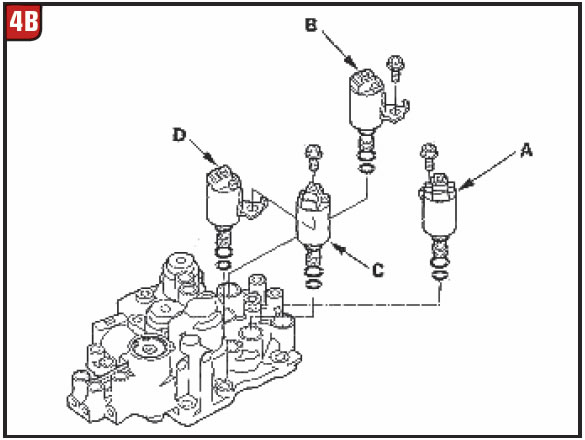
It is also important to not only know where a brown or black connector solenoid should be but, to know which letter that the solenoid is for diagnostic purposes because all models are not created equal (Figure 4B). The accumulator body illustrated is somewhat upside down resulting in the two brown solenoids (A & C) being below the two black solenoids (B & D) therefore, verify all positions before replacing any solenoid.
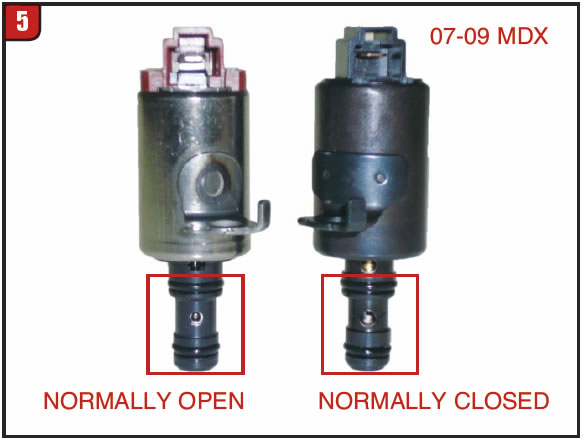
The main culprit in this scenario was the black connector solenoids that the first rebuilder received from the reman facility. The builder did not realize that the solenoids he received were for ’07-up MDX models. For some reason Honda decided to change only the black connector solenoids in 2007 to a NC (normally closed) design without drastically changing the physical appearance. The brown solenoid part number remained the same for later models (Figure 5). One way to tell the difference in design is by the orifice hole in the barrel. The brown solenoid on the left has a slightly smaller orifice hole than the NC black connector solenoid on the right and the O-ring positions are slightly different. In addition, the new design solenoids have a black body, not silver.
Part numbers:
- Brown connector (’03-09) 28400-RDK-003
- Black connector (’03-06) 28500-RDK-003
- Black connector (’07-09) 28500-RJB-004
Beyond the physical differences and to make matters worse, the solenoid firing order was changed in 2007 (Figure 6A). When doing diagnosis on MDX or for that matter any Honda, always refer to the appropriate charts to avoid chasing ghost. At least the later model chart includes the lockup (D) solenoid operation unlike the chart for previous models.
Another slight wrinkle that occurred between models had to do with terminology. Although early and late models all use two brown and two black solenoids, the letter designation was changed in relation to solenoid position (Figure 6B). When dealing with ’03-06 MDX models refer to solenoid position chart in Figure 4B and use the chart in Figure 6B for ’07-09 MDX models.
Lastly, regardless of application make sure to connect the correct harness wire to each solenoid to avoid any issues (Figure 7). The electrical case connector and harness wire colors are the same for 2003 up MDX models; just the names were changed to protect the innocent.