Up To Standards
- Author: Mike Weinberg, Contributing Editor
You Can’t Fix It If You Don’t Understand How It Works
I try to write about the most-common problems that we encounter in the field from tech-line calls, with the idea that those units that generate the most-frequent calls for help will affect a great number of shops. This month’s candidate is the New Venture 246 transfer case, which is found in GM full-size four-wheel-drive vehicles, from 1998 to present.
This transfer case is one of the so-called “automatic transfer cases,” or “active transfer cases.” This description results from the fact that the 246 has an “automatic 4WD function,” a 2WD position, a 4WD High function, neutral and 4WD Low position. Driving the vehicle in 2WD has all torque flowing through the transfer case to the rear driveshaft, and the vehicle operates just like a 2WD vehicle.
If the driver engages the automatic 4WD mode, the ATCM (automatic transfer-case module, or control module) will lock the front differential just like the older manual locking hubs, and an encoder/motor will shift the transfer case to a 4-wheel-drive high range. The encoder also contains a pulse-width-modulated motor that will apply an internal clutch pack to distribute power to the front driveshaft as needed. The encoder motor also contains a motor brake that will lock the encoder in the shift range that was selected.
Three vehicle-speed sensors monitor the road speed of the vehicle and the rotating speed of the front and rear propshafts. If the ATCM detects a difference of 15 rpm or more between the propshafts, the ATCM will increase the duty cycle of the clutch pack to send maximum torque to the front axle and then will back down the duty cycle to achieve equal shaft speeds. This is a very critical issue overlooked by most technicians when they begin a diagnostic routine on this type of transfer case.
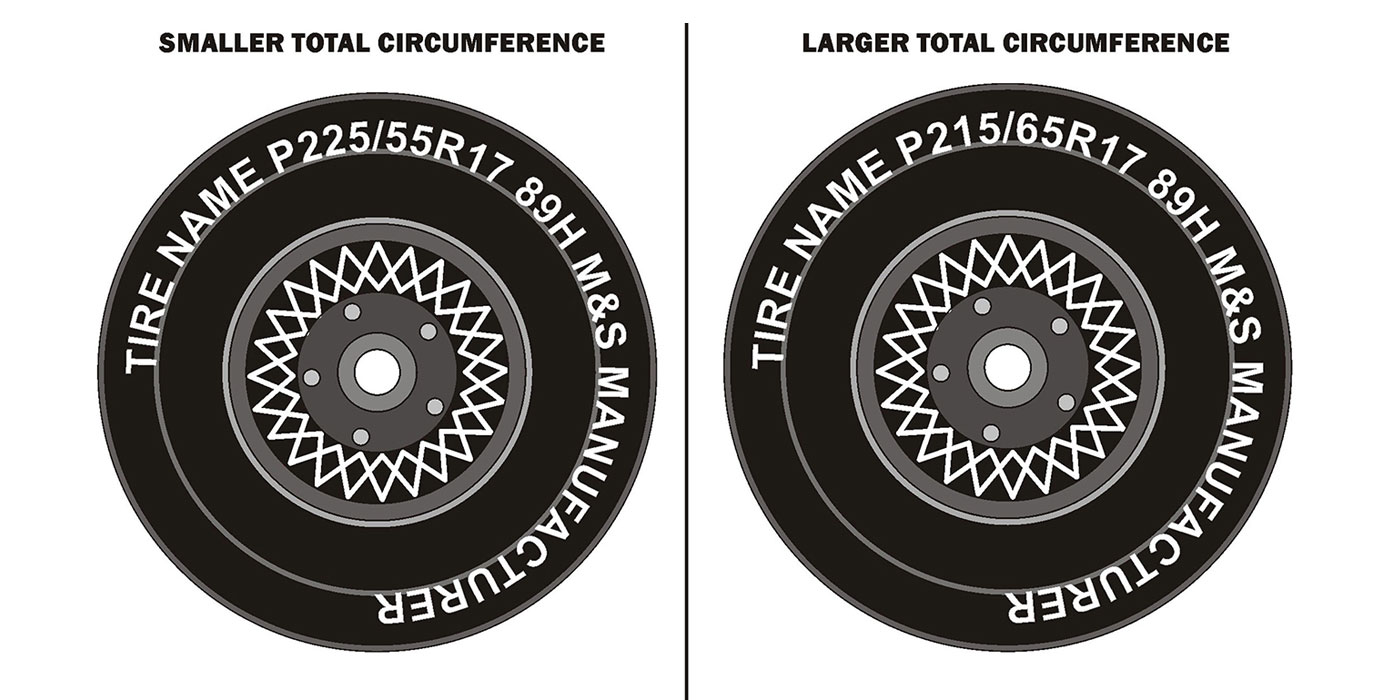
Tire size is critical to proper performance and operation. Many complaints and trouble codes will be set because of mismatched tire sizes or pressures. A 15-rpm difference in driveshaft speeds is equal to 1⁄16 inch of tire wear. It does not matter that the sidewall labels are read the same. You must measure tire circumference with a stagger gauge or a tape measure around the center of the tire tread and equalize all tire pressures before doing anything else. If the tires do not match in circumference all around, change the tires before proceeding and measure the new tires for equal size.
When the driver engages the 4WD High function, the encoder motor shifts the transfer case to the 4-high range and applies the clutch pack to split the torque to the propshafts 50/50. This range applies constant power to both axles and should be used only in snow or ice conditions, off road, but never on dry pavement. If the customer wants the use of 4WD in the rain or on dry pavement they should select the automatic 4WD mode.
The 4WD low functions the same as the 4WD high mode except that the transfer case will go into an approximate 2-1 gear reduction through an internal planetary assembly. This mode also is never to be used on dry pavement and should be used only for off-road driving at very slow speeds.
There is no dashboard control for a neutral position. Neutral is engaged by holding in the 2 High and 4 High buttons simultaneously for at least 10 seconds. To shift to neutral or 4WD Low, the vehicle must be in the 2 High range, with a road speed of under 3 miles per hour, and the transmission in neutral or the clutch depressed, and there must be a working engine-speed signal.
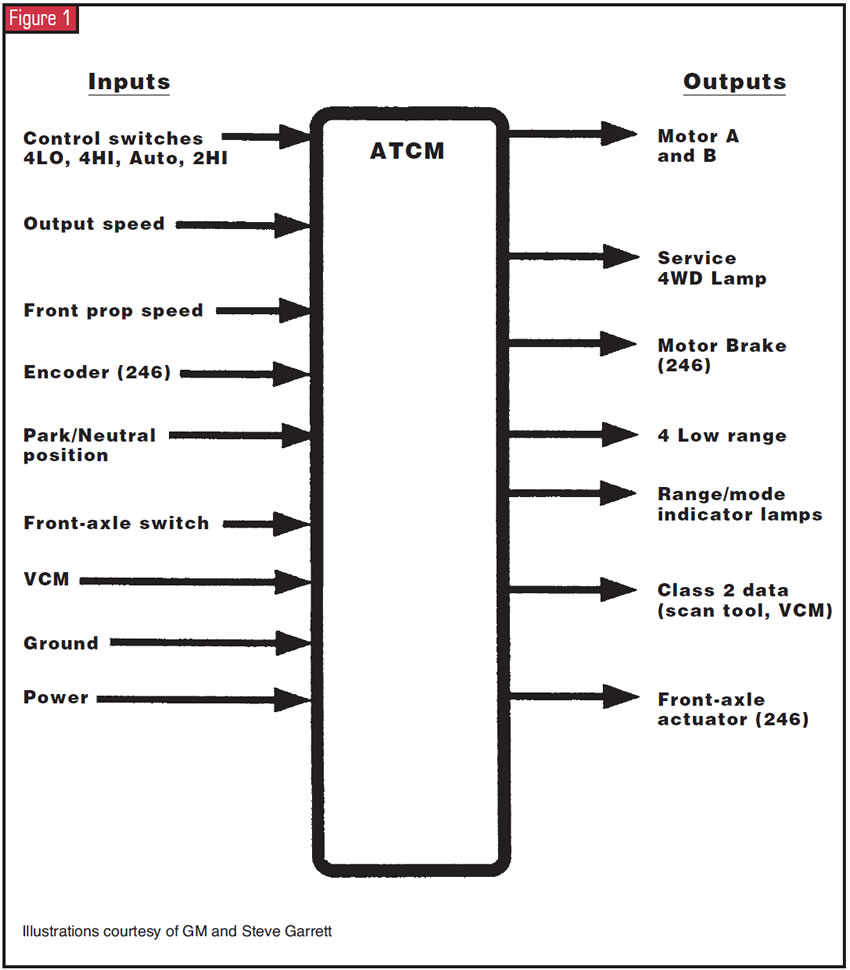
Although the NV 246 transfer case and subsystems are extremely sophisticated and appear complex, they are more easily understood if you examine the components in regard to their functions and the relationship between their actions. The ATCM is a computer that works with other computers in the vehicle. It receives inputs and then, on the basis of the program, makes decisions to output commands to other components. The illustration will show you the data that it receives (inputs) and the commands it can make to other components (outputs). It is important to examine this, as you will see that besides receiving power and ground, the control module is receiving data from the VCM (vehicle control module), dashboard control switches, front and rear output-speed sensors, the manual-lever-position sensor on the transmission, the front-axle switch and the encoder, which informs it of the range the transfer-case shift lever is in. On the output side you see Motor A and B, which is clockwise and counterclockwise rotation of the shift motor; the motor brake, which must be released to change ranges; a class 2 data port; and the front-axle actuator.

The dashboard switches are momentary switches that send a signal to the ATCM only when the button is depressed. This switch assembly is really a group of resistors of differing values. The ATCM provides an 8-volt signal to the switch at all times. By varying the resistance of each switch, the ATCM input knows what the driver wants it to do. In the Auto mode, the switch has a 65-ohm resistor that sends a 7.5-volt signal to the module. 4 High will send 4.8 volts, 2 High will send 3.2 volts and 4 Low will send 2.4 volts.
Now that the ATCM has received the signal from the dashboard switches, it will command the motor circuit to make the change requested. Two relays on the motor circuit board control motor direction. The ATCM sends 12 volts to the shift motor while pulse-width-modulating the ground side of the shift motor, controlling the amount of current flow and regulating the position of the motor and shift fork.
The amount of current applied to the shift fork controls the clamping force of the clutch pack and determines the amount of torque transferred to the front driveshaft. The duty cycle will go from 0 amp, which equals 0% on the clutch pack, to 20 amps, which is 100% of the clutch duty cycle. At this point the ATCM controls the amperage by inputs from the vehicle-speed sensors, which monitor the driveshaft speeds.

If the speeds of the shafts are matched, no current is present at the motor. The greater the difference in shaft speeds, the more amperage is applied for maximum clutch capacity. This happens very quickly, in about 0.072 second. The computer will re-evaluate the duty cycle after 0.048 second and control the clutch accordingly.
In the 4 High and 4 Low ranges, the computer also needs to know the position of the transfer-case linkage. This is the input it gets from the encoder. After the motor moves the linkage, the ATCM gets a 5-volt reference signal from the encoder on four channels – A, B, C and P. The encoder grounds each of the four channels in a specific sequence based on the position requested. When the ATCM sees the right values it will turn off the motor and apply the motor brake to keep the motor and linkage aligned in the selected range.
Any incorrect voltage sequence to the ATCM will set a diagnostic code. If you are trying to use a scan tool to diagnose the codes, a 5-volt signal on the scan tool is OFF and a zero-voltage signal will be regarded as ON.
Operation of the motor on the NV 246 requires the release of the motor brake, which is always receiving power through the transfer-case fuse. The module controls the motor brake by grounding the brake through a circuit driver that limits the current.
If you are replacing or testing a motor, heed this warning: Never put 12 volts to the motor unless you wish to buy a new one. Do not apply voltage to a motor that is disconnected, as it will over-travel and be damaged. When you are replacing a motor, you must release the motor brake for the motor to be positioned correctly. This can be done with a 9-volt radio battery by attaching the leads to the terminals of the brake motor, which will cause it to release. A special alignment tool is available to prevent the motor from over-travel and damage during this process.
This system will set a number of diagnostic codes, a complete description of which would require another magazine. This is info you can get online or through the service manual, but please note that there are different codes, which if not understood will lead you down the wrong path.
These will not be powertrain codes but will fall into three categories. “C” codes are chassis codes, “B” codes are TBCM (truck body-control module) codes showing body-circuit problems, and “U” codes mean that there is a malfunction in the data-transmission circuits between these computers that needs to be addressed. Too many technicians try to find these code descriptions and pinpoint tests under powertrain codes and become frustrated when they can’t locate the information.
If you understand the theory of operation, it is much simpler to follow the diagnostic routines and cure the faults. The various voltages, resistance readings, codes and other important information are available but will be of little use unless you know what is supposed to be happening when.
The modern vehicle involves many computers and circuits, and the relationship of one to another forms the big picture you need to see. Simple issues such as tire sizes and pressures should be addressed before anything else. The slogan for the present and future is, “The rebuild was easy, but the diagnosis took some know-how.”