Many of you may have already experienced various shortcomings from Chrysler’s Totally Integrated Power Module (TIPM). The TIPM contains fuses/relays and integrated circuits that allow for programmed control and distribution of power to components on Chrysler vehicles. The TIPM does not have processing power; it’s mainly a delivery and storage device with vehicle data stored according to VIN and personal preferences.
The TIPM and the grinding transfer case motor are the point of our discussion today, which you may encounter sooner or later when working on the very popular ’06–‘10 Dodge Ram 4×4 gas/diesel trucks with both manual and automatic transmissions. The component that is typically affected by a TIPM failure in those vehicles is the NV273 electronic transfer case.
Scenario No. 1
The first complaint is when a truck is parked with no key in the ignition. It can happen at any time or anywhere—your truck could be in the garage at home or in a parking lot of the local Walmart. Suddenly, the transfer case motor starts grinding and churning; for example, changing from 2HI to 4HI or 4LO range with the transfer case switch in the dash.
Yes, the stories are true. People at their residences with trucks in their garages have woken up in the middle of the night to this noise with guns ablaze thinking someone is stealing their truck. Children out late at night roaming the streets come home screaming, thinking ghosts abound.
Scenario No. 2
The secondary complaint can be an extension of the first. It occurs with the engine running while parked or driving. It usually starts with the 4LO light blinking, until suddenly you may hear the transfer case motor churning like it’s trying to change ranges. In extreme cases, it may shift into 4LO suddenly. This is, of course, quite a shock when it happens.
All of this is usually caused by what we call “ghost” or unwanted errant voltage travelling from the TIPM to the transfer case in both scenarios. But don’t let all this drama scare you. Let’s discover the ins and outs of Chrysler’s TIPM and how to handle these stressful events that are happening to that family Dodge Ram truck.
Quick field test and diagnosis
It’s a good idea to do a full vehicle scan report for all modules, including transfer case and instrument cluster module codes specifically. It is not uncommon to have this condition occurring without any codes. If you have codes, record them, clear them and drive the vehicle. If codes have returned, follow diagnostic procedures for codes in factory service manual data; it’s possible you have other T-case issues that need attention.
If codes have not returned, then we will start a basic function test. Choose a parking lot that will allow 50 to 100 feet of movement, parking brake on with transmission in Neutral (automatic transmission) or the clutch pedal pressed (manual transmission). During 4W switch selections, place transmission in Drive range and move 20 to 30 feet to verify proper T-case operation.
- Move dash 4W switch to 4LO and verify operation.
- Move dash 4W switch to 2HI and verify operation.
- Move dash 4W switch to 4HI and verify operation.
If for any reason these basic tests are not passed successfully, you may have a bigger problem than a faulty TIPM. It’s also possible that the TIPM is in a highly deteriorated state. In these cases, a code is usually in the system or it has been previously erased. Alternate diagnostics may be necessary.
The TIPM issue may occur at any time spaced days apart, not hours. That brings us to the next part of the field test. Place dash 4W switch in the 2HI position and unplug electrical connector from T-case motor, then drive for a couple of days, which is usually enough time for the problem to occur if it’s going to. It will, of course, have codes when you unplug, but they are not relevant to our test. If the T-case errant grinding goes away, it’s usually reasonable to say the TIPM is most likely at fault. If necessary, follow the factory service manual to further verify failing TIPM or T-case components.
Please note: This quick field test is not intended to replace the factory service manual procedures.
Location, removal and installation
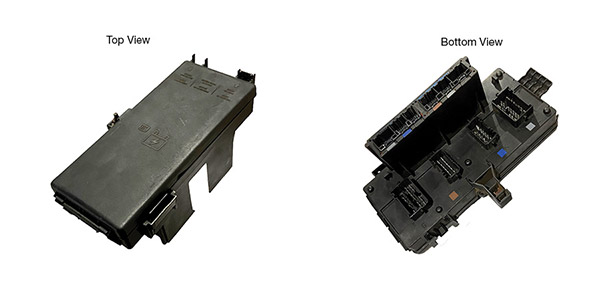
In Dodge Ram trucks, TIPMs are usually located on the driver’s left side attached to the fender well and will have a large power wire straight from the battery attached to them. Before removing the TIPM, disconnect both vehicle positive battery cables and secure.
To remove the TIPM, you first must remove the large external power wire, then push the two or three attaching clips inwards and pull straight up. You are then able to disconnect the electrical harness connectors on the bottom side. There is no need to mark connectors, as they are different and will only fit one way when reattached.
When replacing TIPMs, there are a few choices: remanufactured/rebuilt or new OE. Each choice may have a slightly different installation requirement or procedure.
For a new OE TIPM, it is recommended to load VIN and “Restore Vehicle Configuration” with J2534 from the Chrysler website.
If you are replacing a TIPM with one of the many remanufactured/rebuilt units, then you should follow their directions for installation and initialization, which is usually relatively easy. Occasionally during a remanufactured/rebuilt TIPM replacement, you may have to re-input tire and axle ratios and, in some cases, security features stored in TIPM may have to be addressed. If you have further questions, please contact the Sonnax Tech Support Group.
Jim Mobley is the technical communications specialist with Sonnax. He is a member of the Sonnax TASC Force (Technical Automotive Specialties Committee), a group of recognized industry technical specialists, transmission rebuilders and Sonnax Transmission Co. technicians. Thanks and appreciation to Steven Abdoo at South Run Auto Diesel for TIPM images.