An Easier Way to Install the JF506E Valve Body - Transmission Digest

An Easier Way to Install the JF506E Valve Body

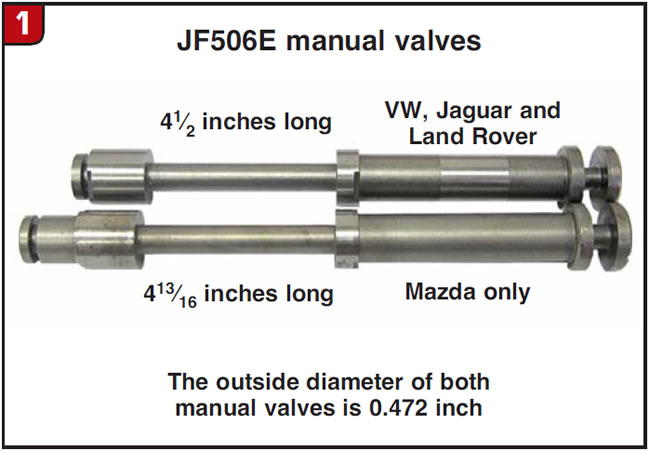
Installing the JF506E valve body can be a challenge with the unit on the bench. Trying to install the valve body with the unit in the car is difficult not only because you cannot see the manual valve where it fits into the linkage but also because any sideways movement can damage the gasket. There are two different manual valves, one for Mazda only and a shorter manual valve for Jaguar, Land Rover and Volkswagen. The valves are the same except the end is longer after the last land on the Mazda valve (Figure 1).
An Easier Way to Install the JF506E Valve Body

Body of Evidence

Subject: Valve-body installation
Unit: JF506E
Vehicle Applications: Mazda, Jaguar, Land Rover, Volkswagen
Essential Reading: Rebuilder, Diagnostician
Author: Jeff Parlee

Body of Evidence

  • Subject: Valve-body installation
  • Unit: JF506E
  • Vehicle Applications: Mazda, Jaguar, Land Rover, Volkswagen
  • Essential Reading: Rebuilder, Diagnostician
  • Author: Jeff Parlee

Installing the JF506E valve body can be a challenge with the unit on the bench. Trying to install the valve body with the unit in the car is difficult not only because you cannot see the manual valve where it fits into the linkage but also because any sideways movement can damage the gasket.

There are two different manual valves, one for Mazda only and a shorter manual valve for Jaguar, Land Rover and Volkswagen. The valves are the same except the end is longer after the last land on the Mazda valve (Figure 1).

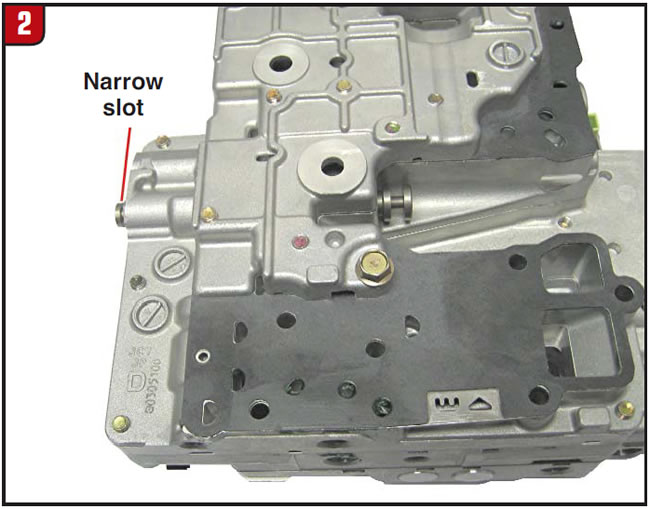
The manual valve should be installed so that the end of the valve with the narrow slot (0.060 inch wide) is toward the outer edge of the valve body (Figure 2).
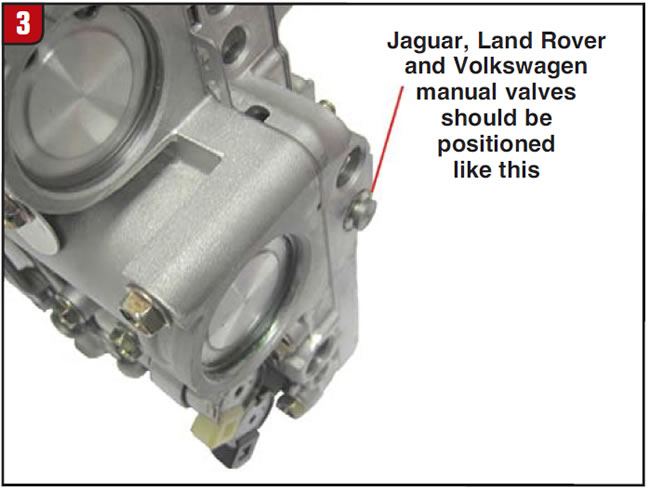
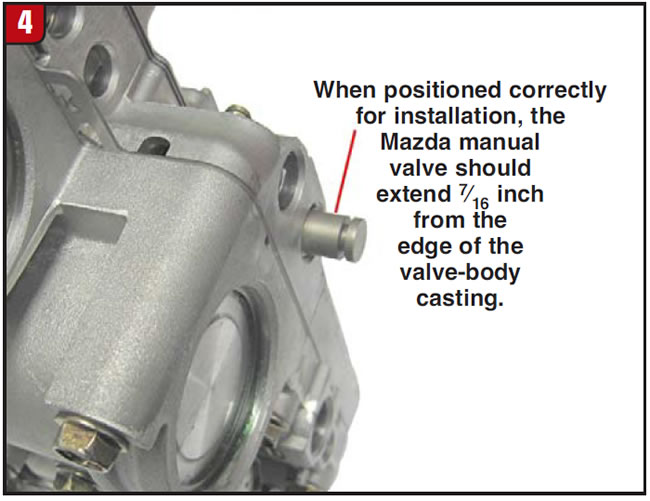
Next, place the manual linkage into low range and position the manual valve as shown in figures 3 and 4.
Install the valve body with two bolts just finger tight, then move the manual linkage to see whether the manual valve moves too. If the manual valve is moving with the linkage, install the rest of the valve-body-to-case bolts and tighten to 71-78 lb.-in.

To make this job even easier you can make a tool to hold the manual valve in place. You can make the tool from plumber’s pipe-hanging strap or from an old valve-body separator plate. The advantages and disadvantages are:

  • Made from separator plate, is 0.040 inch thick, which is sturdy and holds the manual valve in place well but is harder to bend.
  • Made from plumber’s strap, is 0.23 inch thick, which is easy to bend when you’re forming the tool but is not as sturdy when holding the manual valve.

To make the tool:

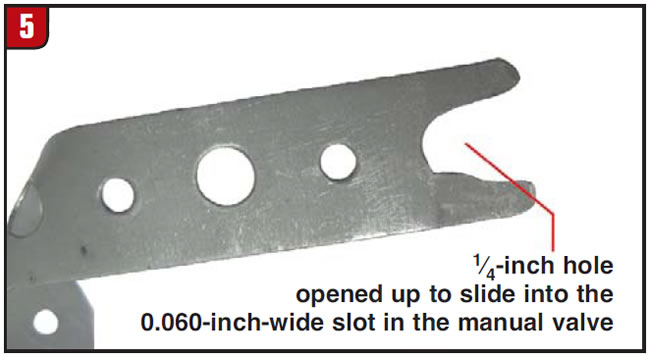
Cut a 41/2-inch length of plumber’s hanging strap, then at one end open the last 1/4-inch hole to make it a slot (Figure 5).
To make the tool from a separator plate, just find a 1/4-inch hole and cut out a piece 41/2 inches long by 3/4 inch wide with the 1/4-inch hole about 3/8 inch from one end. Open up the hole so that it is a slot as shown in Figure 6.
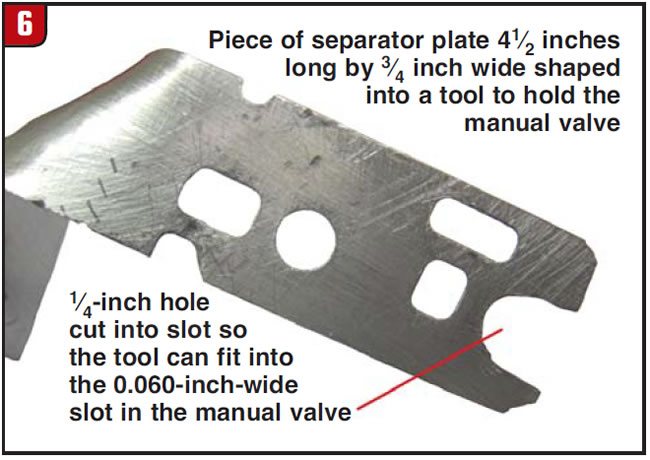
Next, slide the slotted end of the tool into the 0.060-inch slot in the manual valve. On the shorter manual valves used in Jaguar, Land Rover and Volkswagen, push the manual valve in so that the tool is flat against the valve body, and bend the tool so that it looks like Figure 7. When the tool is formed like this, gravity will hold it in place.
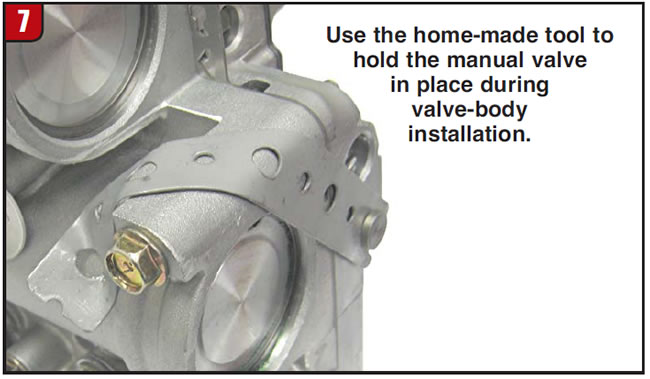
On the longer, Mazda manual valve, first bend the slotted end of the tool so that the manual valve extends past the casting by 7/16 inch. Stack 3/8-inch flat washers to make a pile 7/16 inch tall, put the washers on the end of the valve, then slide the slotted end of the tool onto the manual valve. Push the manual valve into the valve body, then bend the tool to fit around the washers so that it is flush with the side of the valve body. Continue to form the tool up and around the accumulator. Once the tool is formed, remove the flat washers from the manual valve. The tool should now hold the Mazda manual valve in the correct position for installation.

Now that we have the tool made, let’s recap the valve-body installation procedure:

  1. Put the manual linkage into low range.
  2. Install the manual valve into the valve body.
  3. Slide the tool into the slot on the manual valve. A dab of assembly lube between the tool and the valve body will help hold the tool against the valve body.
  4. Attach the valve body to the case with two bolts, finger tight.
  5. Remove the tool and check that the valve is engaged into the manual linkage.
  6. Install the remaining valve-body-to-case bolts and torque to 71-78 lb.-in.

Jeff Parlee is director of product support at ValveBody Xpress.

You May Also Like

Don’t fear customer complaints about CVTs

Continuously Variable Transmissions, or CVTs, are more common than you think. Audi, Subaru, Nissan, Ford, GM and many other automakers use CVT transmissions in cars and SUVs. There is no way to avoid them. Chances are there is one in your shop right now. What does CVT mean for technicians? On the maintenance side, a

CVT-Transmission-2

Continuously Variable Transmissions, or CVTs, are more common than you think. Audi, Subaru, Nissan, Ford, GM and many other automakers use CVT transmissions in cars and SUVs. There is no way to avoid them. Chances are there is one in your shop right now.

What does CVT mean for technicians? On the maintenance side, a CVT requires more or the same frequency of fluid and filter changes as a conventional automatic transmission, and many of the basic procedures are the same. On the diagnostic side, a CVT is less complicated internally than a six- or nine-speed transmission. Diagnostics with a scan tool are about the same. On the service side, while you may never pull a variator or belt out of a CVT, you can service components like sensors, pumps and valve bodies. The point here is not to fear a customer complaint about a CVT. 

Shift Pointers: A Chrysler 300 no-shift complaint

The case study has to do with a 2009 Chrysler 300 C 5.7L Nag1 RWD with 71,923 miles on it (see Figure 1, above). Related Articles – 2024 State of the Powertrain Industry – Powertrain industry directory and buyer’s guide 2024 – A guide to common GM, Ford and Nissan programming issues It is based

A guide to common GM, Ford and Nissan programming issues

One of the most common complaints I hear from shops when trying to install a new GM TCM is, “The module will not communicate.” While that might be partially true, by design they won’t communicate until they are programmed. If programming fails, there will be an “E” code set which will help you get to

Shift of the shaft: Diagnosing Chrysler 48RE manual shaft issues

The TorqueFlite transmission has been around since mid-to-late 1950s. There have been many changes surrounding the manual shaft and rooster comb through the years. This transmission shaft controls the position of the manual valve that directs oil for the gear ranges, but it also is used for a Reverse light control as well as Park/Neutral

Sometimes, a diagnostic code is all you need

With ATSG having the opportunity to help shops solve problems, sometimes we get faced with some real doozies. A shop will call and give us a laundry list of DTCs, leaving us to think someone must have a bulkhead connector unplugged. We then go through the arduous task of deciding which codes prompted other codes

Other Posts

Easy TH400, 4L80-E reverse servo setup: Craft your own tool

While not as sensitive as some shifting bands, the Reverse band adjustment on a TH400 or 4L80-E transmission is critical, and failure to get it right has tripped up even the best builders. There is nothing worse than getting the transmission installed, putting it in Reverse and then not going anywhere or having no engine

Spotting different 68RFE designs through the years to avoid issues

The Chrysler 68RFE has had several changes through the years. Its four-speed predecessor began with a noisy solenoid pack identified by a black colored pass-through case connector (seen in Figure 1).  Related Articles – Outgrowing the walls: The story of EVT Transmission Parts – Valve body and component suppliers: A comprehensive list – Shift Pointers:

Shift Pointers: Failures caused by incorrect tire sizes

For years ATSG has produced a wide range of issues related to improper tire sizes on vehicles. Even under-inflated tires have been known to cause issues. Problems such as premature failure with an active 4WD transfer case will occur with incorrect tire sizes. Related Articles – Understanding lube flow control valves in Toyota/Lexus UA/UB80 transmissions

Shift-Pointers-Jan-Figure-1-1400
Understanding lube flow control valves in Toyota/Lexus UA/UB80 transmissions

The Toyota/Lexus UA80 and UB80 transmissions first came out in 2017 in Highlanders and Siennas. The UA80 is used in V6 applications, and the UB80 is paired with four-cylinder versions. They have been called Toyota New Global Architecture type transmissions, and alternately referred to as the “Direct Shift 8AT” eight-speed automatic transmission. This transmission was

Tasc-Tip-December-Figure-1---LFC-Valve-OE-Partial-Circuit-Diagram-1400