Tech to Tech
- Subject: P0344 code
- Vehicle Application: 2002 Dodge Caravan
- Essential Reading: Diagnostician
- Author: Jeff Bach
Slight difference in parts makes for a big challenge
I got a call recently from a friend of mine who runs a car shop, asking for help on a code for a cam sensor.
He had changed the sensor twice and double-checked the circuitry and even replaced the crank sensor. The powertrain control module (PCM) was the next stop, and it was a rather expensive one, so he asked me to take a look at the vehicle before he got a PCM to see if I could verify his diagnosis.
When I got it to the shop, I checked the codes and got the cam-sensor code immediately as a hard code. I figured I was lucky. A lot of the vehicles I get are intermittent problems that have been around the horn and given up on.
This looked like a fairly simple, straightforward trouble-code chart if you have a lab scope and a DRB 3.
The vehicle was a 2002 Dodge Caravan with a P0344 code.
The factory manual has you checking the wiring for shorts to ground and shorts to voltage, the terminals of the connector, the reference voltage and the tone wheel/ pulse ring, and even lab-scoping the signal for intermittent glitches or dropouts.
I took a look at the iATN fix database to see if there were any common issues with this code. There were a lot of instances of it setting with this particular 2.4 engine. The fixes were a wide range from melted wiring to oil in the connector, cracked flywheel, magnets shifted or cracked on the camshaft. Many said to replace both sensors and use OEM sensors only. Timing off a tooth was also mentioned a time or two.

I figured it was time to get a look at the actual signal so I grabbed my scope and got the image in Figure 1.
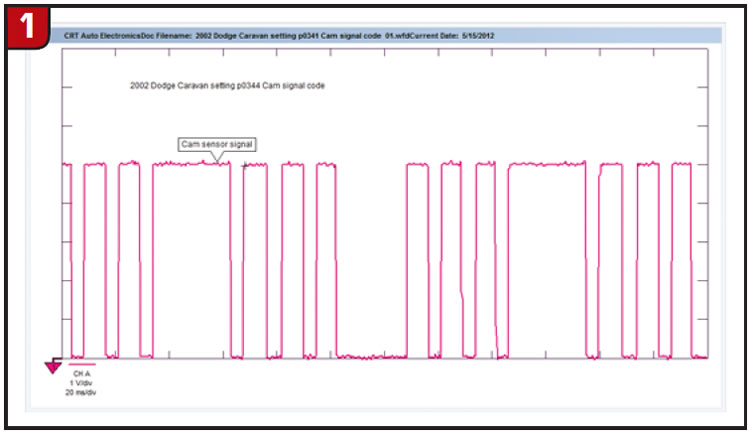
It looked like a pretty clean straight five-volt Hall-effect square-wave with no glitches, but it set the code every time as soon as the engine got past cranking speed. The sensor was an aftermarket unit, but I couldn’t see anything in it that the PCM shouldn’t like.
I called my friend and asked him if he had checked the timing marks, and he assured me that they were checked and double checked. I felt the cam magnet, and it was OK. I tested the circuits pertaining to the sensor’s reference, signal and ground. They all checked out.
After reading many posts saying to use only OEM sensors, I decided to order a new one from the dealer to see if possibly there could be an issue with the signal that I wasn’t seeing.
I installed the new sensor and cleared the code and started the vehicle. The light stayed off and didn’t reset the code.
I got the image in Figure 2 from the new sensor.
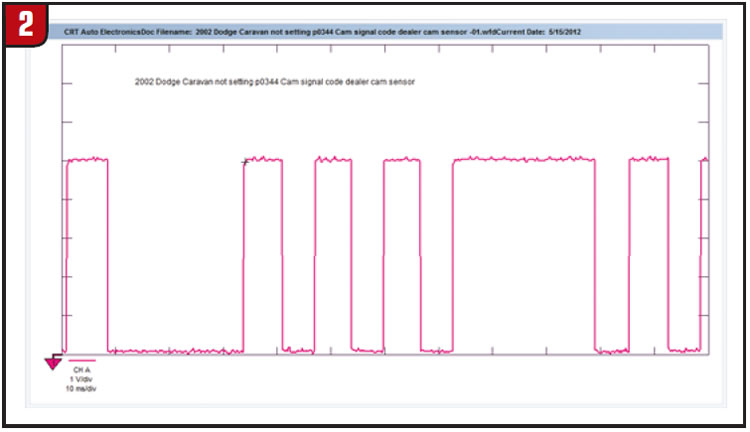
Now I was confused. The signal looked identical to that of the aftermarket sensor. Same five volts, same square wave.
I started thinking maybe the problem was intermittent and was just not showing up now. I went ahead and reinstalled the other sensor to be sure, and the code came right back.
I thought I should get a look at the crank-sensor signal, since I had what looked like a flawless cam-position (CMP) signal, but as soon as the vehicle started with the aftermarket sensor, the light came on and set the P0344.
I wanted to know how the PCM could tell the difference between the two, so I thought possibly it wasn’t looking at the CMP waveform but maybe the relationship to the CKP sensor.
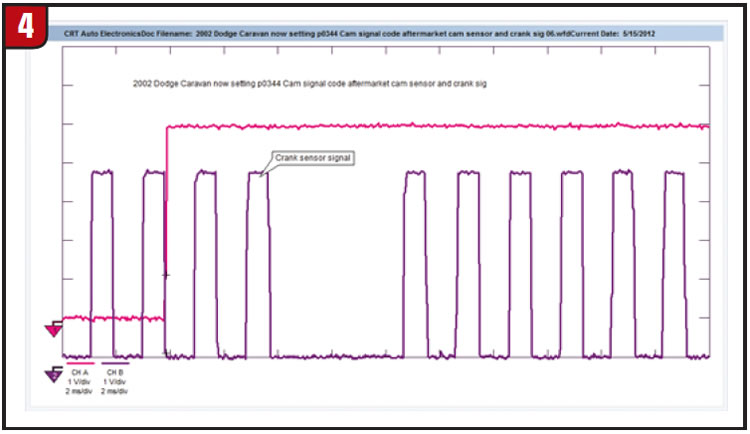
I hooked the other channel of the scope to the crankshaft-position (CKP) signal and got the comparison in Figure 3 while I still had the aftermarket CMP sensor in it.
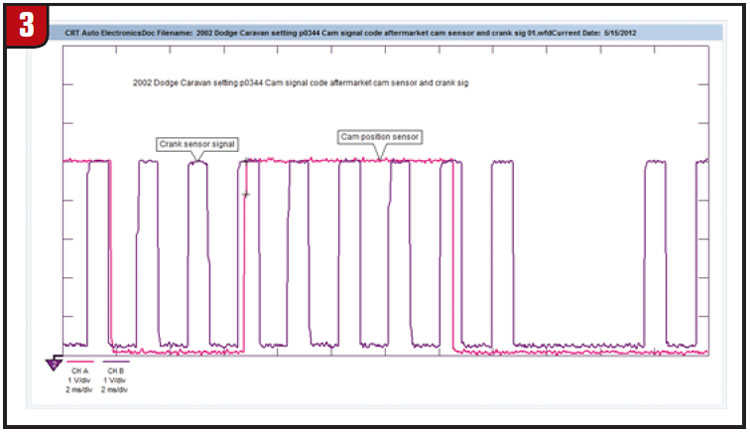
Still not seeing a problem with this signal, I looked at it several times trying to catch a shift in the relationship or a glitch, but it stayed rock steady. I settled on the image in Figure 4 as the mark for No. 1 cylinder. It seems pretty far back from the CKP signal compared to other vehicles I’ve seen. Usually some part of the CMP signal is in the wide gap on the CKP signal.
Next, I put the OEM sensor in and compared the signals again in Figure 5.
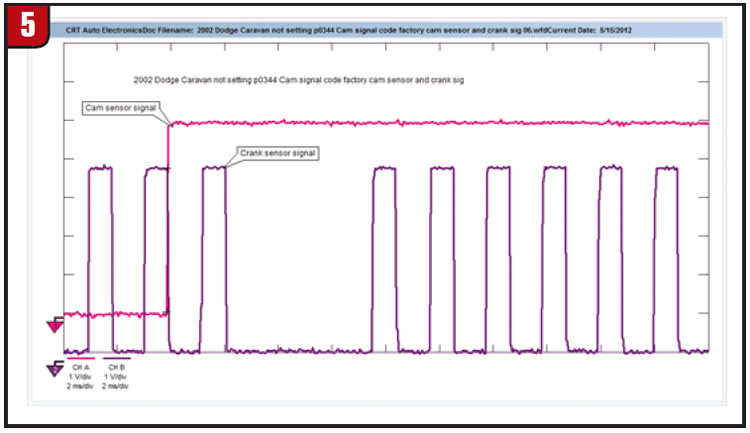
I saw the same square wave from both sensors, but looking closely I saw that the dealer CMP sensor goes up the second tooth back from the CKP-sensor gap. The other CMP sensor goes up on the third tooth back from the CKP-sensor gap (Figure 6).
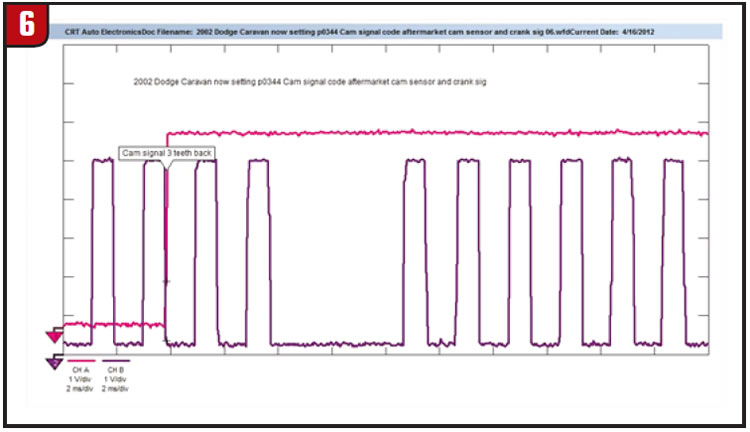
The description for setting the code says that it sets when the camshaft-sensor signal is intermittent. The timing of the signals is not listed as a possible cause. Clearly, though, the timing of the signal is critical and can set the code in one trip and even during cranking.
Now the whole thing made sense. The aftermarket sensor appears to be manufactured with the trigger clocked one tooth off from the factory sensor.
I can see where this is causing lots of problems for technicians trying to work on these vehicles. With this code setting from such a small difference in signals, I’m sure it sets with the least bit of timing-belt stretch. I can see a vehicle coming in with this code and getting a new sensor according to the trouble-code chart. When that doesn’t solve the problem and nothing else checks bad, a technician looks at the timing-belt alignment and sees that the marks show some stretch, then maybe changes the timing belt and still can’t get rid of the code because of the difference in the offset from the aftermarket sensor, and then the chase is on.
When I told the technician who sent me the vehicle what the problem was, he was relieved that it wasn’t easy to find the problem and wasn’t happy with the parts supplier who sent him the problem part. I gave him copies of the images that show the timing problem, and he is hoping to get some help from the supplier on the labor.
I’m hoping the right people get the message about the problem with the part and they get it straightened out before too many more technicians get into trouble trying to diagnose this code.
Of course, if they don’t, it won’t be as much fun figuring out the next one.
Jeff Bach is the owner of CRT Auto Electronics in Batavia, Ohio. You can reach him at [email protected].
This copyrighted article is reprinted with the permission of AutoInc., the official publication of the Automotive Service Association (ASA). To learn more about ASA and its commitment to independent automotive-service and repair professionals, visit www.ASAshop.org or call 800-272-7467.