Shift Pointers
- Subject: Shift adaptation
- Unit: 09G
- Vehicle Application: 2005 VW Jetta
- Essential Reading: Rebuilder, Diagnostician
- Author: Jesse Zacarias
Adaptation: One dictionary defines it as “the act of adapting or fitting one thing to another.” That very well describes what we have to do sometimes when we repair today’s modern transmissions. We have to adapt them or “fit them” to their new environment.
I was doing some testing for the research-and-development department of Valve Body Pro that required me to install different 09G valve bodies in a 2005 VW Jetta. Each valve body had different criteria to be tested, so I expected the transmission to engage and shift differently every time it had a different valve body.
What surprised me was that previously tested valve bodies that had shifted and engaged well on this vehicle were not doing so when I re-installed them to run other tests. Some had hard engagements or harsh downshifts. I was doing some research on adaptations and basic settings, so this problem appeared at the right time.
In a condensed version, here is what I found. The vehicle’s PCM had adapted itself to the different valve body even though neither the “Basic” setting nor the “Adaptation” had been reset. The reason is that the PCM uses a feedback control and a self-learn control system to compensate for transmission wear. I had read some information previously on “learning” the PCM so I decided to try something, and since all the pressure gauges were connected (Figure 1) this would be a perfect time.

I did the following steps to “learn” the PCM. Please note that the following steps must be followed exactly to have a successful PCM “learn.”
First, make sure there are no codes in any of the vehicle’s modules and that the transmission temperature is between 66° C (150° F) and 110° C (230° F). Don’t stall the engine with the converter to get to this temperature; the vehicle must be driven or left to idle until the transmission reaches this temperature.
To “learn” the initial engagements follow these steps: Keep your foot on the brake pedal so the vehicle can’t move. Put the transmission in Neutral, leave there for three seconds, then engage to Drive and leave there for three seconds. Do this at least five times. When finished do the same for the Neutral-to-Reverse engagement.
To “learn” the upshifts and downshifts, follow these steps: Place the transmission in D and drive the vehicle at 25%-30% throttle until you obtain sixth gear and exceed 50 mph (80km/h). Remove your foot from the accelerator and apply the brakes to bring the vehicle to a gradual stop in less than 60 seconds. Do this until downshifts are not hard. You may need to perform this procedure up to 10 times in some vehicles.
At the beginning I mentioned that this was the perfect time to find this because I had the gauges and scope hooked up already, which would allow me to record the “learning” process. As you can see from figures 2-4, the PCM is actually “learning” to the new valve body. This valve body was one that had previously felt excellent in the most-recent test but now had a hard N-D engagement and harsh 3-2 downshift. I zoomed out 2 times so that I could fit two wave forms into one screen, but the original time sweep was 5 seconds.

In Figure 2 you can see the first two N-D engagements, and the waves you see are the erratic pressure rise, which in turn caused a harsh K1-clutch engagement.

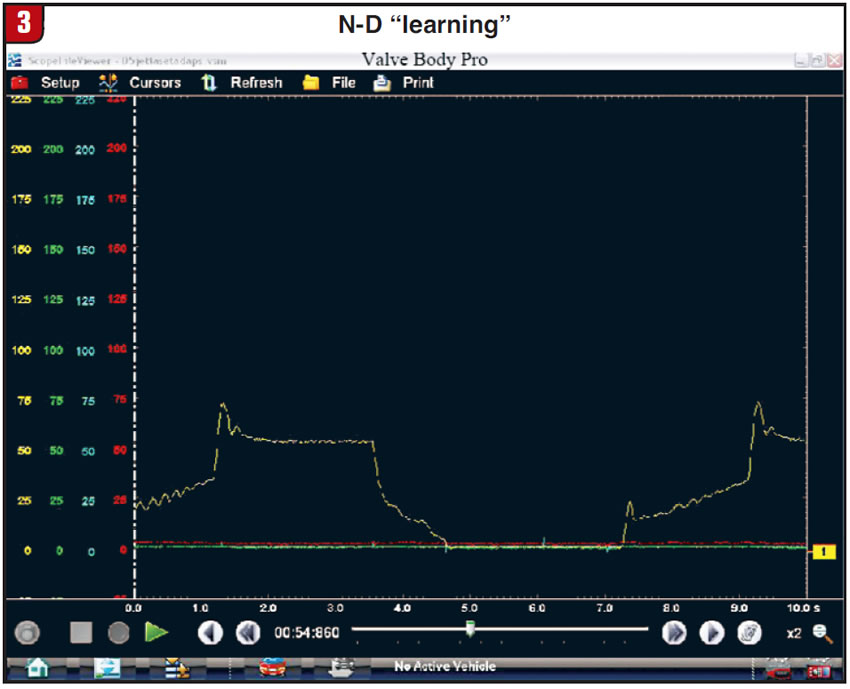
Figure 3 shows the next two N-D engagements, and the waves are diminishing gradually.
Finally, Figure 4 shows the last N-D, and as you can see the waves are gone and the K1-clutch engagement is almost unfelt.

The pressure-control solenoids in the 09G transmission change the pressure in proportion to current. That is, as the amperage changes so does the pressure the solenoids produce. In figures 5 and 6, we are looking at the N92 solenoid, which controls the engagement and release of the K1 clutches.

In the case of the N92 solenoid its pressure is inversely proportional to its amperage; that is, as amps rise pressure is lower, and as amps decrease pressure increases. Although figures 5 and 6 show two readings taken on different occasions, they still are pretty close in the time it took to engage the K1 clutches. I put cursor 1 at the same time in relation to one another so that what you see between cursors 1 and 2 on both figures 5 and 6 is the same. In Figure 5 you see the amperage decreasing, and in Figure 6 you see the pressure rising in inverse proportion to the amperage.

You can see in Figure 5 that the amperage between cursors 1 and 2 starts at 0.74 at cursor 1 and gradually decreases in increments of 0.01 amp until we end up at 0.67 amp at cursor 2. After that the solenoid shuts off although it’s still drawing about 0.1 amp.
Meanwhile, in Figure 6 we can see the solenoid’s effects on the pressure; as amperage is decreasing, pressure is rising. In Figure 6 we start at cursor 1 with 10.8 psi, and the pressure gradually and smoothly increases until we end up with 30.45 psi. After that the solenoid shuts off and K1 is connected to main line pressure.
As you can see, this PCM is able to control the amperage and pressure quite precisely, which shows us the importance of “learning” or adapting the PCM to the replaced valve body or repairs done to the transmission. In the process of this test we ran across an individual who had replaced three transmissions, three valve bodies and two PCMs in an attempt to cure a harsh N-D engagement. When this “learning” procedure was given to him, his problem was solved.
Incidentally, I have found this to work also on the 09D transmission. Have fun teaching.
Special thanks to Bob Sanghera from Valve Body Pro for his contributions that made this article possible.
Jesse Zacarias is the owner of Elec-Tran Diagnostics (www.electrandiagnostics.com) in Gilroy, Calif.


