Tech to Tech
- Subject: Engine running rich, poor fuel mileage
- Vehicle Application: 1990 Lincoln Continental
- Essential Reading: Diagnostician
- Author: Jeff Bach
Troubleshooting a ’90 Lincoln requires pulling out the big ‘guns’
“Would you like to try your luck at fixing my car? I’m told you like the hard ones.”
This challenge came from the owner of a clean, old 1990 Lincoln Continental.
The owner was an older fellow who purchased the car new. He had a history book that told of the places the car had been, all the repairs ever done and the parts that had been replaced. He wanted me to be clear on everything that had already been tried and all the parts he had paid for so that I wouldn’t be duplicating anything. He had also informed me that he was not willing to pay for any more guessing. When he finished explaining his rules, he had one question:
“Still think you’re interested?”
I began to explain to him that I had a few rules of my own.
“No. 1, I don’t guess; No. 2, I don’t do free diagnosis; No. 3, I can’t give you a final estimate until I spend some time figuring out the problem and make a determination.
“I have my own way of diagnosing problems, and I don’t start by eliminating testing that someone else has done. I treat the car as though I just got it fresh. I don’t know the people who did the testing, and I can’t account for the quality of the parts they used. I will figure out the problem for you if you allow me to work my way.
“Still want me to work on it?”
“If you’re sure you can figure it out, have at it,” he said.
He left the car with me and went home to wait for a phone call. He told me he was retired and could come back as soon as I knew something.

The complaint on the car was that it ran terribly rich and the fuel mileage had gone down to about 8 mpg. The car had been to two independent shops and, last, at the Ford dealer. It had had both O2 sensors replaced and two electronic control units (ECUs) installed. The dealer told the owner that the car was getting as good a gas mileage as it was going to get. They had installed a new ECU because they said the one that was in it was an aftermarket part and wouldn’t work properly. The car was not setting any codes, but the sooty exhaust made it obvious that it was running pig rich. A scan check revealed that the engine was reaching operating temperature, the manifold-air-pressure (MAP) sensor was working, the engine was in closed loop, and the O2 readings were showing lean. I got the image in Figure 1 by connecting one channel of my scope to one of the O2 sensors and the other channel to the injector signal at the ECU.
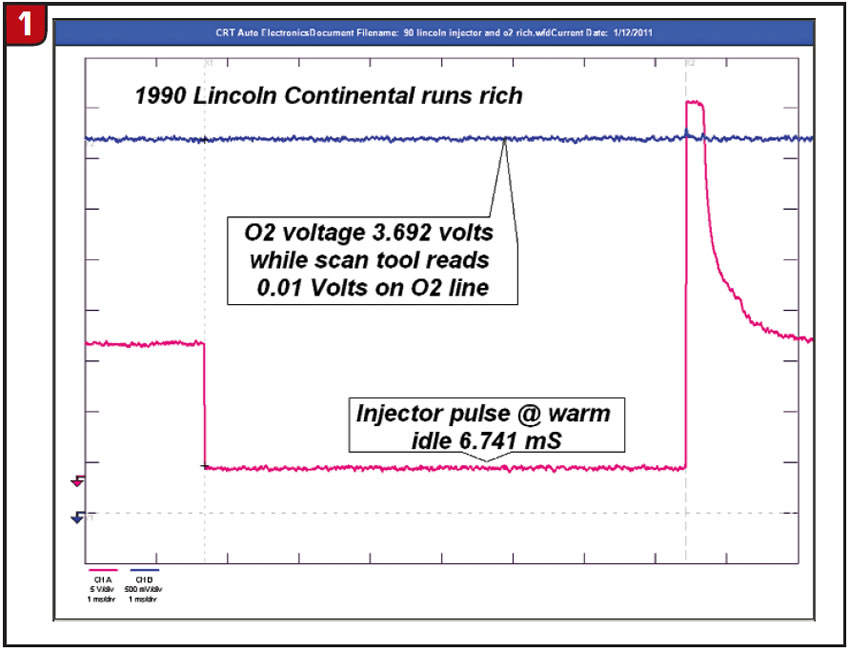
The O2 sensor at more than 3.5 volts stood out as a jumping-off point to begin testing, especially with the scan tool showing 0.01 volt. I pulled the connector cover off the ECU to access the wire terminals and printed a pin-out chart. Comparing my readings, I found all to be within the normal range except for the O2 signal.
I suspected there was an external voltage source shorted to the O2-sensor circuit, so I disconnected the ECU connector and the front O2 sensor and measured resistance of the O2 circuit to all the voltage sources with the battery disconnected and the key on. Nothing showed continuity. I surmised there could be an internal problem with the ECU, but what were the odds of having that problem on three of them?
The thought occurred to me that there could be a solenoid or relay shorted that was taking out the ECU ground circuit as fast as they were being plugged in. This wouldn’t be the first one of those I’ve run into. I did a pin-out resistance check on every ECU-controlled circuit and came up empty again. I pulled the ECU and gave it a “smell check,” which it passed. I began to see where this problem could have earned its place as one of those stumpers that stick in the mind of all those who’ve crossed its path.
I figured it was time to break out the “breakout box” and do some in situ pin-out testing. I noticed while testing the O2 signals this time that the O2-sensor ground – which I hadn’t realized before was separate from the ECU heavy-gauge black/green grounds – was orange and of a light-gauge wire. The pin for the ground on the breakout box was showing the same voltage as the O2-signal wire while the orange wire at the ECU connector was showing 0 volt.
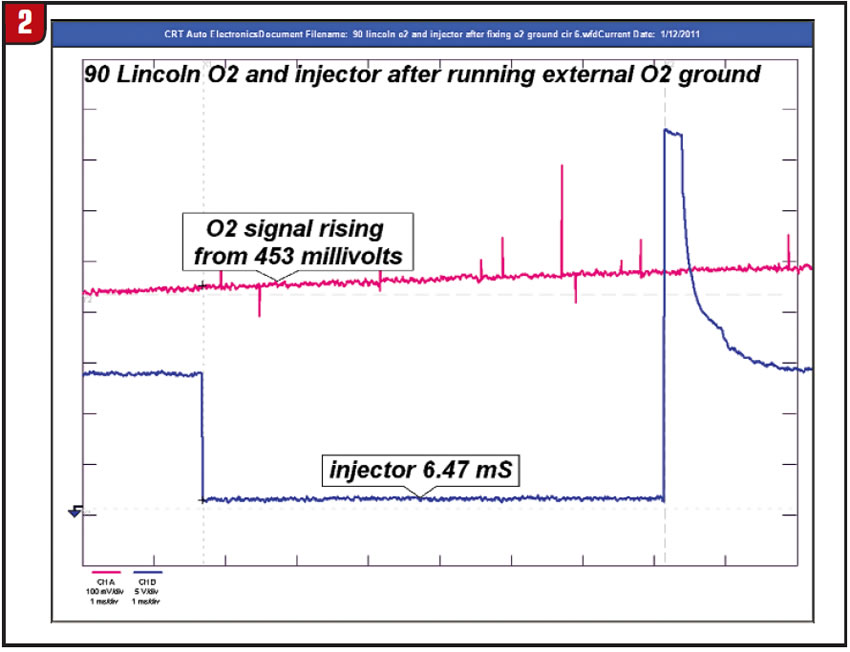
I ran an external ground to the pin on the box, and the car started to smooth out. I saved the scope readings from the injector and O2 sensor. Their signals are shown in Figure 2.
It’s amazing to me how watching a waveform on my scope can make me feel like my whole body is smiling.
I switched the time base on the scope to see the O2-sensor frequency and got Figure 3 on my scope.
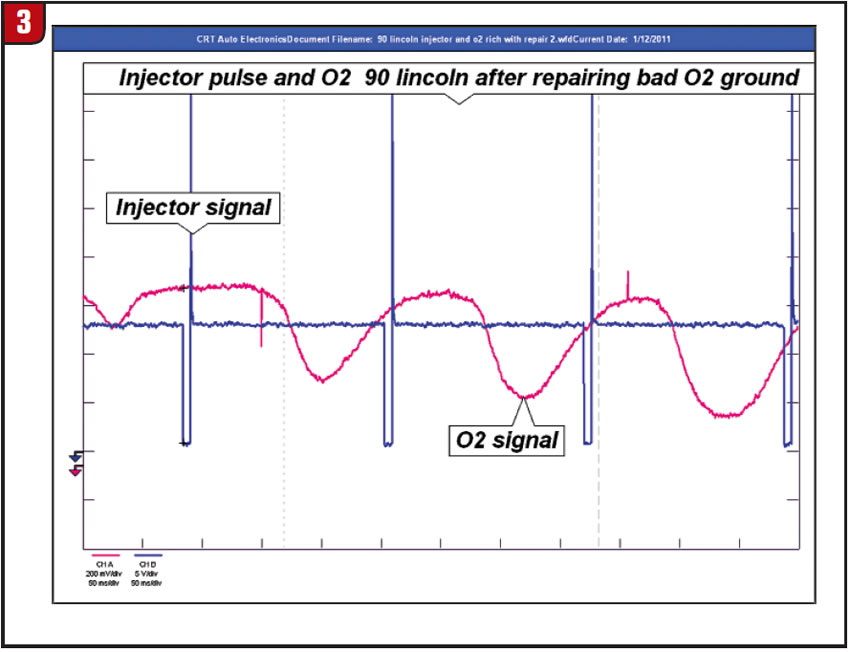
The O2 frequency was good, and the longer it ran the deeper the voltage swings were getting. I figured it would take a little while to burn the soot off of it.
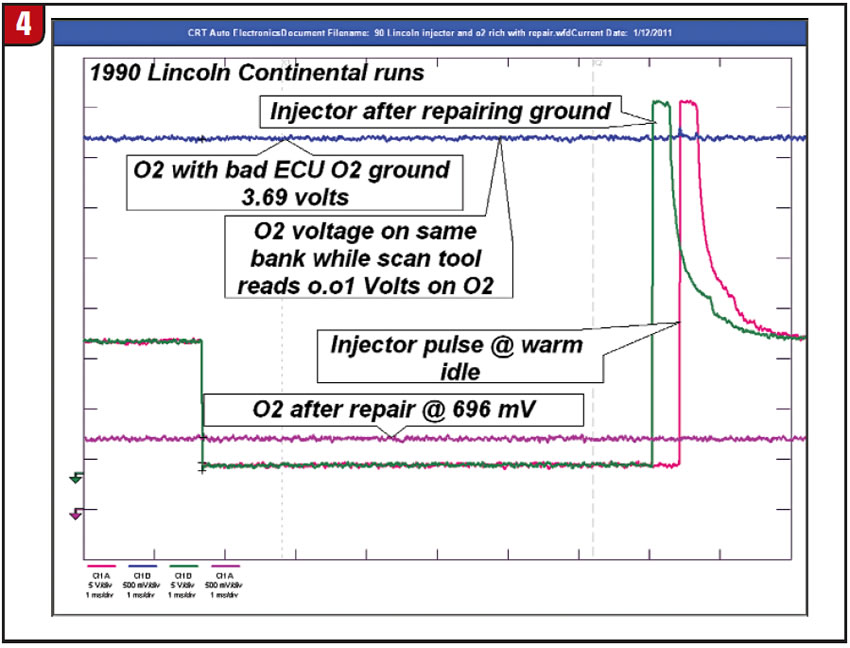
I rechecked the resistance reading at the ECU plug and figured out that the wire was not making good contact with the pin right at the connector. Once I repaired the terminal I retested the signals and saved the readings of my “before and after” to show the owner (Figure 4).
I contacted the owner and related the results of my testing and recommended an oil change, and another new set of plugs. He was so skeptical that I had found the problem that he wanted to come down to the shop to see what I was telling him so he could better understand I was sure that this would fix his problem.
When he got here, I explained to him that the odd nature of the problem he had could account for the difficulty in diagnosis that he had encountered. I told him that I had to pull out the big guns to find it. I then showed him the scope readings I got in progression and explained what they meant.
I saved the before-and-after shot ’til last. He left grinning like a Grinch and gave me the OK for the other work.
When he came to pick up the car, I went with him on a short test drive so that he could watch his fuel-mileage numbers climb. I could feel him smiling as he asked for copies of the scope readings.
I like to think they made for a happy end to this chapter of his Lincoln history book.
Jeff Bach is the owner of CRT Auto Electronics, an ASA-member shop in Batavia, Ohio. For more information on this topic, contact Bach at (515) 732-3965. His e-mail address is [email protected] and his website is www.currentprobe.com.
This copyrighted article is reprinted with the permission of AutoInc., the official publication of the Automotive Service Association (ASA). To learn more about ASA and its commitment to independent automotive-service and repair professionals, visit www.ASAshop.org or call 800-272-7467.