Walking the Thin Line - Transmission Digest

Walking the Thin Line

The late-model 518 is a prime example of this statement. When we get OE cores, the covers measure 0.160 to 0.165 inch thick if they are undamaged. The front covers can normally be cleaned up by machining off 0.005 inch of material. The challenge comes when we get a cover that was galled or damaged by a major lockup failure. In these instances, you may have to machine off as much as 0.015 inch, and at this point you end up with a cover that is only 0.145 inch to 0.150 inch thick. The question is, how far can you go? Where is the line between thick enough and no longer thick enough?

Walking the Thin Line

Torque Converter Tech Tips

Subjects: Minimum thicknesses for cover and lockup piston; matching piston and cover 
Unit: Chrysler 518
Essential Reading: Rebuilder, Diagnostician
Author: Dave Roe

Torque Converter Tech Tips

  • Subjects: Minimum thicknesses for cover and lockup piston; matching piston and cover
  • Unit: Chrysler 518
  • Essential Reading: Rebuilder, Diagnostician
  • Author: Dave Roe

The toughest part of rebuilding any torque converter is not building a heavy-duty converter but building the best converter possible for a price that is both competitive and profitable.

The late-model 518 is a prime example of this statement. When we get OE cores, the covers measure 0.160 to 0.165 inch thick if they are undamaged. The front covers can normally be cleaned up by machining off 0.005 inch of material. The challenge comes when we get a cover that was galled or damaged by a major lockup failure. In these instances, you may have to machine off as much as 0.015 inch, and at this point you end up with a cover that is only 0.145 inch to 0.150 inch thick. The question is, how far can you go? Where is the line between thick enough and no longer thick enough?

TCRA recommends 0.140 inch as a minimum thickness for the lockup surface. I have talked with other builders about this and they draw the line at 0.140 inch, but I draw the line at 0.150 inch thick. Below that, we part out another core in search of a cover. We all know that the cover can balloon slightly in some conditions. This problem becomes worse if the cover thickness has been reduced by machining. For sheer strength and resistance to ballooning, the billet cover is the best way to go, but the cost of a billet cover raises the overall cost of the converter considerably. Cores are cheaper than billet covers, especially when you add a new ring gear.

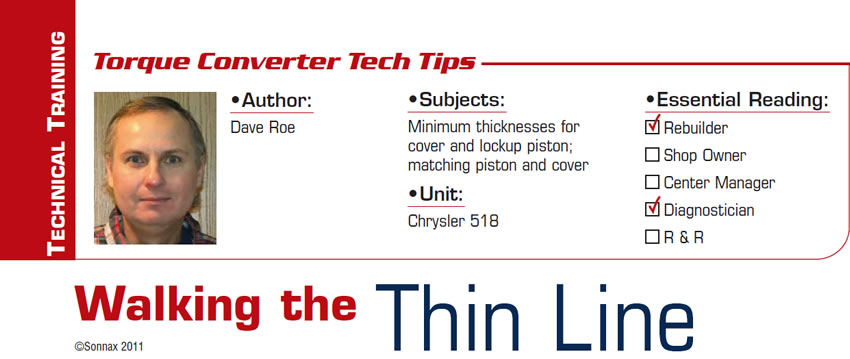
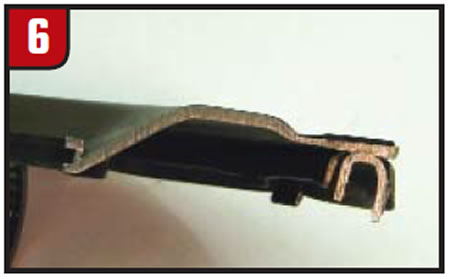
Another area where we must walk the line is the converter lockup piston. In Figure 1, the cross-sectioned piston and cover have an interference problem. The thin cover and over-machined piston do not like to live together. To help identify the problem, you can use some simple tools and tests.

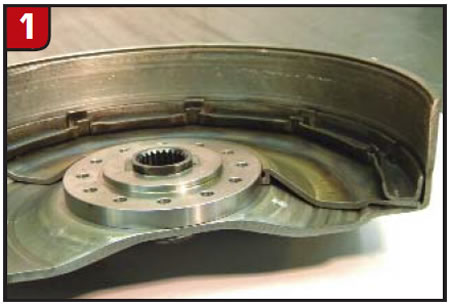
First, not all pistons are the same. The piston in earlier models can have a higher profile – I call these “high humps.” We measure the difference from clutch surface to the highest point on the flywheel side of the piston (figures 2 and 3). A normal, post-bonded piston with a 0.070-inch lining has a height of 0.105 inch to 0.115 inch. This is a normal measurement for 1996-up models.

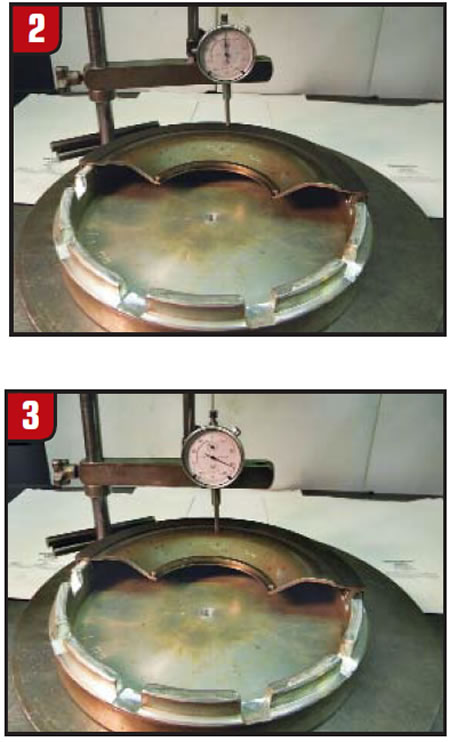
Pistons that measure 0.125 or higher are the high-hump variety commonly found in early converters. These pistons can be used only in early units or late ones with deep wells in the cover (figures 4 and 5). You can use a cross-sectioned piston (Figure 1) to help find the shallow-well covers or do a measurement.

In Figure 6, notice how the piston surface tapers thinner from the outside to the inside. The thinnest point, where the piston transitions from surface to hump, is where ballooning will occur. This problem is made worse when the piston surfaces are over-machined or cut too far into the hump.

Piston surface thickness can be measured with a bonding die, height gauge and dial indicator (figures 7 and 8).

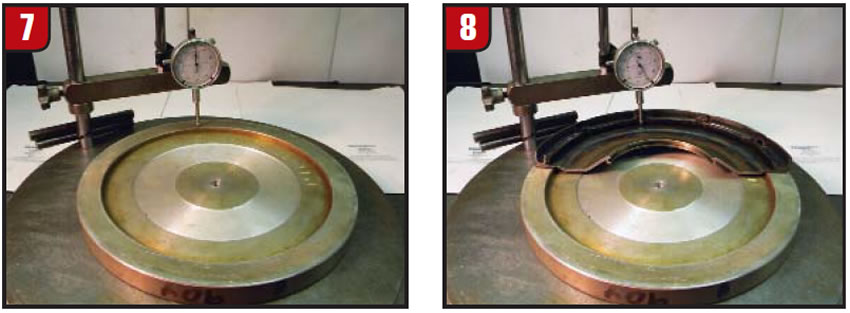
You must measure the piston in two or three places, because the thickness can vary. Use an average of your findings or the lowest measurement. The thickness of an un-machined piston, measured at the thinnest point on the inside of the spring retainer, should range from 0.098 inch to 0.115 inch. TCRA recommends a minimum thickness of 0.060 inch after machining for either regular or high-hump-style pistons. I draw the line at 0.075 inch.

Remember that with this unit, we all walk the thin line.

Dave Roe is the manager of the torque-converter-rebuilding department at Fort Dodge Transmission, a transmission-rebuilding company and full-service repair shop with 35 employees in Fort Dodge, Iowa. Roe has been with the shop since 1987, taking pride along with his co-workers in keeping in step with change and producing a quality product.

©Sonnax2011

You May Also Like

Sherlock Holmes Approach to an AB60 No-Move Situation

The effectiveness in diagnosing automatic transmission malfunctions is an art form. Although there are similarities among the wide varieties of transmissions on the road, each transmission has its own peculiarities. Aside from having mechanical, hydraulic, and electrical hardware systems to contend with, software/programming issues and various vehicle platforms make diagnostics much more difficult.  Using scopes provides

ab60

The effectiveness in diagnosing automatic transmission malfunctions is an art form. Although there are similarities among the wide varieties of transmissions on the road, each transmission has its own peculiarities. Aside from having mechanical, hydraulic, and electrical hardware systems to contend with, software/programming issues and various vehicle platforms make diagnostics much more difficult. 

GM 6T40 Pump Identification Guide

The 6T40 was introduced in 2008 for General Motors front-wheel-drive cars in the Chevrolet Malibu and has gone through several changes throughout its three generations, specifically in the pump area. The 6T40 is closely related to the more lightweight 6T30 and the heavier duty 6T45 and 6T50. Generation one started phasing out during the 2012

Seeing the Forest AND the Trees

They say that the proverbial phrase “I couldn’t see the forest for the trees” means that a person or organization cannot see the big picture because it focuses too much on the details. Related Articles – 4L60E Harsh 1-2 Shift – TASC Force Tips: Diagnosing 8L45 & 8L90 Shift Complaints – TASC Force Tips: Hydraulics

The Manifold Pipeway

The Honda six-speed transmission has been on the bench of many specialty shops for one reason or another (figure 1). But, for those of you who have yet to lay your hands on one, mounted on the upper side of the unit is one of the largest, if not the largest solenoid and pressure switch

8L90 Vacuum Testing

Below are the diagrams for vacuum testing GM 8L90 transmissions. Note: OE valves are shown in rest position and should be tested in rest position unless otherwise indicated. Test locations are pointed to with an arrow. Springs are not shown for visual clarity. A low vacuum reading indicates wear. For specific vacuum test information, refer

Other Posts

Critical Wear Areas & Vacuum Test Locations for FORD 6R80/6R100

Note: OE valves are shown in rest position and should be tested in rest position unless otherwise indicated. Test locations are noted with an arrow. Springs are not shown for visual clarity. Low vacuum reading indicates wear. For specific vacuum test information, visit www.sonnax.com. Related Articles – Hydraulics Fundamentals: Shift & Relay Valves – Another

Hydraulics Fundamentals: Shift & Relay Valves

Shift valves and relay valves share a lot of the same duties. This article is one of a series by Sonnax exploring how valves and hydraulic circuits work and what results when they quit functioning correctly.

Another 62TE ‘No-Move’ Possibility

Most seasoned techs have several quick diagnostic steps they take when faced with a transmission malfunction. The type of problem and transmission determines which steps to take. For example, a “no-move” condition. Related Articles – Ford 8F35 maintenance tips: Planetary failure and no-pressure conditions – Don’t fear customer complaints about CVTs – Shift Pointers: A Chrysler

Hydraulics Fundamentals: Clutch Regulator Valves

Knowing how these circuits work and the slightly different variations that the manufacturers utilize should pinpoint any valve body-related issues