Up to Standards
- Subject: Performing differential repairs profitably
- Essential Reading: Rebuilder, Diagnostician, R & R
- Author: Mike Weinberg, Rockland Standard Gear, Contributing Editor
One of the simplest and most-profitable repairs a shop can perform is to the differential or third member. Yet many shops do not understand the fine points of this work and turn it away.
I have written several articles pertaining to this subject, and what we will go over here are methods to ensure a quality outcome and answer a lot of the problems that come through our tech line. I will divide this article into topics that should give the reader a solid blueprint to be successful.
To begin with, understanding how the differential works is a basic need before starting any job. In the simplest terms the differential performs several distinct functions. The most basic of these is it takes torque coming from the transmission through the driveshaft and allows it to make a 90° turn to the driving wheels.
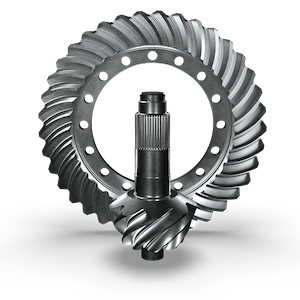
The ring-and-pinion set is manufactured in many ratios to suit many applications. To find a ratio divide the number of teeth on the pinion gear into the number of teeth on the ring gear. Be especially careful when working on 4WD or all-wheel-drive systems, as the front and rear differentials must have the same ratio.
The pinion gear is attached to the driveshaft and is mounted on bearings in the differential case. The pinion depth is set by the manufacturer during production, and a good rule of thumb is to start your setup by reusing the original pinion-depth shims whenever possible.
The ring gear is bolted to a differential carrier that also contains the side gears into which the axles are splined and a set of pinion gears with a cross shaft that is bolted or pinned to the carrier. The differential allows the drive wheels to turn at different speeds when the vehicle is turning to prevent wheel slip and crow hop, which is unpleasant to the driver. The differential carrier with the ring gear rides on bearings that also will have shims or threaded adjusters in the differential case to allow a proper mesh pattern with the pinion gear.
Ring-and-pinion sets are manufactured as a matched set, with the gears being lapped together for an optimal operation that is quiet and has the lowest coefficient of friction between the gears. The carrier bearings are retained in the differential case by bearing caps. Setting up the differential properly may require adding or decreasing shims to achieve the proper pinion depth and carrier position to achieve the proper backlash between the gears, at which point using a marking compound on the gear set will let you see whether the mesh pattern is correct for the type of gear set you are working with.

Now we go to the question-and-answer part of this discussion.
Lubrication
Always use the correct type of lubricant for the differential (the one specified by the manufacturer). Remember that some differential carriers are limited-slip, positraction or lockers, which transmit power to both wheels at once for better traction. The units will have some form of clutches on the side gears or another set of gears to achieve this and require use of a limited-slip additive to achieve the coefficient of friction the clutches require. There will be many different specified lube-change intervals from all the different manufacturers, but a safe bet is to have your customer come in once a year or every 15,000 miles for a lube change. It keeps your business active with the customer and increases your profits while preventing warranty failures.
Pay attention to any customer who has oversized tires or goes off road, as they may need you to recommend a change in ratio to bring the vehicle and transmission performance back to where it should be, or have you run some lines from the differential vent to a point where air can exit and water cannot get in. Either of these events will destroy the differential or differentials in short order.
Bearing caps
Each bearing cap must be reinstalled on the side of the carrier it came from. Match-mark the caps with a punch before disassembly to make sure they return to their correct places. On differentials equipped with threaded adjusters to set the backlash, there will be locks that hold the threaded adjuster in the proper position. A common error made in rebuilding a differential is to reuse those adjuster locks, particularly on GM front differentials. The locks are bolted on at the factory and the lock is peened between tabs on the threaded adjuster to lock it in place. To dismantle the differential you must pry up the lock tabs to get the adjuster unthreaded. The tabs tend to crack when they move up and down and can break in the differential, which permits the adjuster to come out of position and destroy the differential. Always use new locking tabs (they are relatively cheap) to ensure that the carrier position cannot change.
Crush sleeves
Don’t ask; you cannot reuse a crush sleeve, which puts the proper amount of preload on the pinion bearing. It will take a lot of torque to make the sleeve crush, somewhere between 250 and 400 lb.-ft. A good move is to lightly grease the threads on the pinion gear before tightening the pinion nut to crush the sleeve. The locking nut will take the required amount of torque to crush the sleeve, but you have now reduced the friction between the threads, which brings the required torque to a lower level. If you get carried away and overtighten a crush sleeve, you will need to use a new one. Trying to reuse a crush sleeve that has been torqued will result in too little preload on the pinion bearing.
Bearings
Carrier and pinion bearings are tapered roller bearings. People are tempted to grease the bearings before installing them. This may feel good on the bench but will prevent the differential oil from getting to the bearings and shorten their life. Lubricate the bearings with fresh, clean lube that is specified for the differential you are working on.
“I hate doing differentials because when I have to remove the bearings to change shim thickness, I always break the cage or hurt the bearing.” The answer to making shim changes a snap is to make yourself a set of slip-on bearings for your setup. Bearings and engine lifters are the most-precisely machined parts in an automobile. Buy a set of bearings for the differential you are working on. Using a brake hone or other tool, remove the press fit on the inside of the bearing race (usually a few thousandths of an inch) so they slide on and off by hand. You now have a set of bearings to use when setting up the differential for proper pinion depth and backlash, and once that is achieved you can put the new bearings on once and never have to take them off again. Box the slip-fit bearings for your next job; the cost savings will quickly pay for the tool you just made.
Open or locking differentials
A quick way to check whether the differential has an open or locking carrier without taking the cover off or pulling the axles and the ham is to jack the driving wheels off the floor and spin one tire. With an open differential, one wheel will spin forward and the other backward. If both wheels turn forward while you’re spinning one, the differential is limited-slip or locking. Remember that there will be more slop in the driveline with a locking differential; as much as 33% is usual.
Torque loads for threaded side adjusters
Measuring preload on carrier bearings of any type is difficult if the pinion is in place. Many builders are scared of really cranking down threaded adjusters, but they can be cranked to 150-200 lb.-ft. with no ill effects during your setup.
Pattern measurements
This is where many mysteries start. If you are not already aware, there are two common ways to manufacture a ring-and-pinion set. Figures 1, 2 and 3 show you the differences, and examples of patterns vary between the two types. The point of running a pattern is to know exactly where your setup places the ring gear into the pinion. Using a light-colored marking compound, which is usually included in the gear set when you buy it, paint up the drive and coast sides of the gears and turn the pinion. As the gears ride in mesh, they will leave a pattern you can use to achieve the proper backlash.
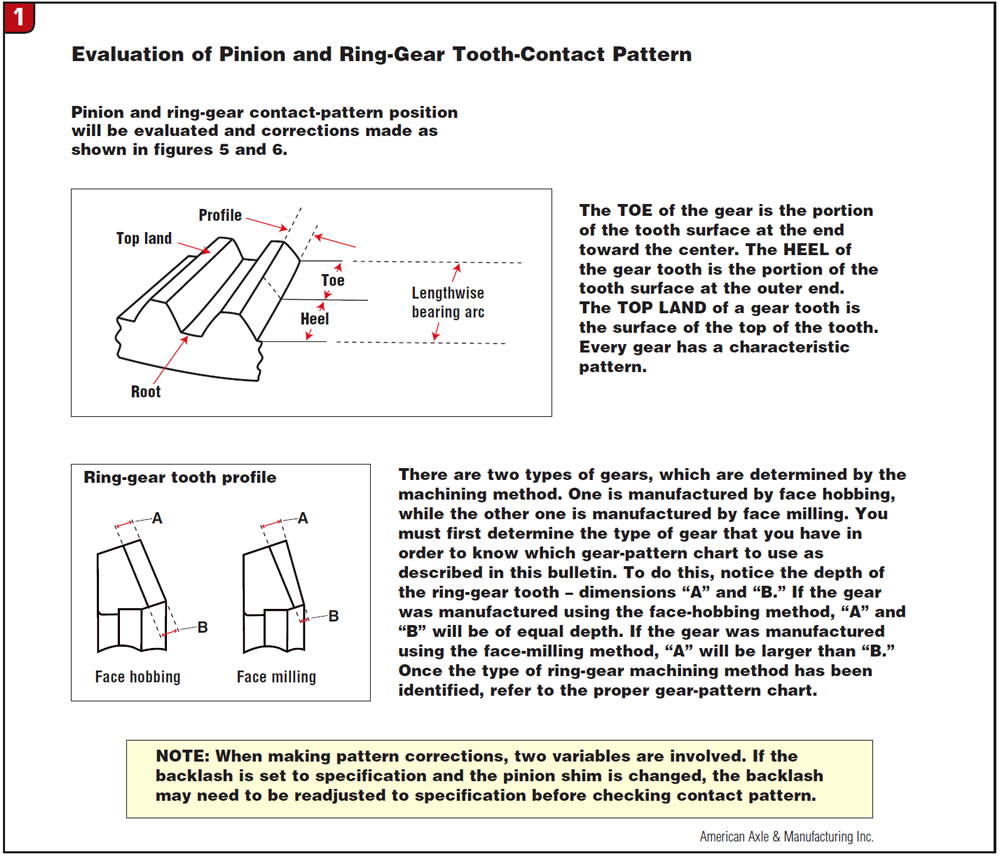
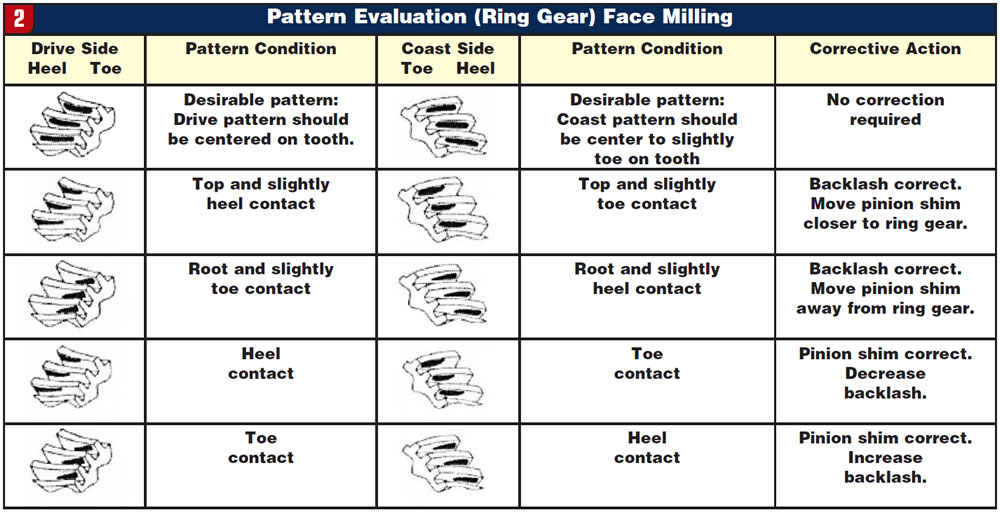
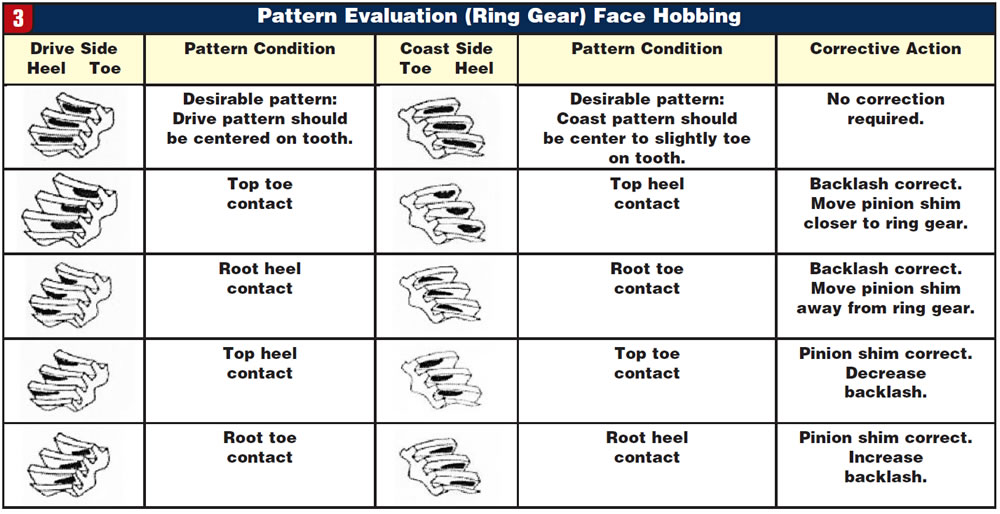
If you do not have access to marking compound you can always run to the drugstore and buy a tube of zinc oxide, which is white and will work fine. The problem that occurs if you don’t know whether you have a face-hobbed or face-milled gear set is the big difference in backlash (measured with a dial indicator in the gear train). On a face-hobbed gear the backlash required will be 0.004-0.008 inch; a face-milled gear will generally will require 0.008-0.012 inch.
Here is where lack of knowledge makes for a long day. The included illustrations also will show you which corrections you need to make to achieve the proper backlash. We get a few phone calls from people trying to mark up a pattern on a differential that has used gears and all that was changed was the bearings. It is very hard to get a proper pattern to read on a used gear on both the coast and drive sides, although you can usually get the pattern to show up on the coast side.
Cross pins
Finding a cross pin that is scored or shows some transferred metal welded to it by the pinion or spider gear is all too common. This may be accompanied by an elongation of the bore in the carrier that holds the cross pin in place. This is caused by several factors: get a stagger gauge and measure the tire circumferences, making sure they are within 1/4 inch of each other. The pinion or spider gears should never be engaged when the vehicle is being driven in a straight line; they work only on turns, when the outside wheel is rotating faster than the inside wheel. If the tire sizes are mismatched, the differential is working all the time.
Another cause is a vehicle that is stuck in snow or mud or is being drag-raced and one wheel is slipping at high speeds. Whatever the wheel speed is, the speed of travel of the spider gear will be much greater. This wears the oil film off the spider gear and cross pin, and they can get welded together or badly scored. You will find big damage on cross pins from shock load caused by the driver going at max throttle trying to get traction on snow or ice. The driver never looks at the speedometer, which is now over 60 mph, and the tire comes up on a patch of dry pavement and hooks up. This shock load puts unbelievable force onto the differential, and the cross pin takes it on the chin. You will see this type of damage on front-wheel-drive vehicles, particularly Hondas and VWs, where when they hook up the cross pin will go right through the case, becoming a threat to innocent bystanders.
A clunk noise during turns will be caused by a spider gear that is missing a tooth or is broken.
Gear-set break-in
The new gear set will require a break-in procedure. The reason is that although the gears were precision lapped at the factory, because of ring-gear deflection under load in the vehicle and excess friction of new parts wearing in, the gears get hot. This breaks down even new oil and shortens the life of the gear train.
Drive the vehicle at light throttle for 15 to 20 miles and then park it and let the gears cool. Drive it again for 15-20 miles at light and medium throttle and let it cool. Ask the customer to refrain from hard driving or towing for the first 500 miles and to come back after the 500 miles to have the fluid changed; otherwise, the metallic debris generated as the gears break in will shorten the bearing life. This is value-added service for the customer and protects you against a premature failure under warranty. Some will say that they never had to do this, but they have been lucky. It is your dollar and your reputation on the line; be smart.