Technically Speaking
- Author: Mike Riley, Technical Editor
- Subject Matter: Automatic transmission
- Issue: Removal & replacement
For decades, the transmission-repair industry has dealt with unrelenting vehicle design changes and has been subjected to increasing cost of doing business. Handling the realities of today is much more difficult than before, although each decade had its own challenges.
For the most part, the focus of technical services, trade publications, technical and product articles, and other published information has been biased toward transmission rebuilding and diagnostic issues, due to the increasing complexity of transmission systems.
With more than 250 different models of transmissions, ranging from older three-speeds to cutting-edge nine-speeds – with advanced electronics – rebuilders have had to ratchet up the learning curve as well as adopt different practices. Change, however, has not been limited to just transmissions. What about the vehicle that they’re attached to?
Before any transmission can be rebuilt or have major repairs done, in general, it has to be removed from the vehicle and, regardless whether the unit is rebuilt, exchanged or converted to something else, at some point is reinstalled. This is where the “R&R man” comes up to bat.
Transmission installers (technicians) had been part of the landscape in transmission shops from the beginning and have always played an important role in shop operation. Good installers have always contributed to the success of any transmission facility, aftermarket or OEM.
As with transmission rebuilders, the job of the installer technician has changed substantially over decades. Back when, many installers performed their jobs on creepers with the vehicle being on jack stands. Even then a good installer could enhance the bottom line by not breaking stuff, spotting additional work that needed done and getting the job done quickly. In addition to doing the basic remove-and-replace activity, most installers would do the minor adjustments like the shift linkage or throttle cable, take the vehicle for the initial road test, perform a leak check and verify fluid level.

Today, the role of an installation technician has certainly changed in most respects. In many shops, the person who does the initial road test and diagnostics is the installer technician, which means that over the years they have also had to adapt to change and not just because of electronics or computers.
If transmission proliferation today is somewhat excessive, imagine all the different vehicles that they fit into. How can anyone become proficient with so many variables? Even seasoned installers, like rebuilders, have their work cut out, just to stay on top of the model changes.
Following are just a few of the R&R aspects that make up what is involved to round-trip a gearbox:
Raise that vehicle
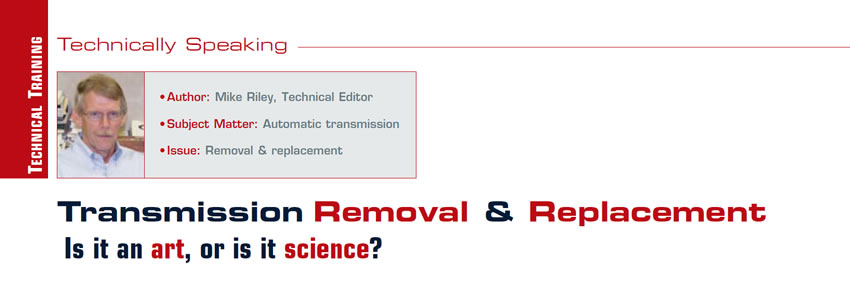
Then: An installer would either drive the vehicle over an open pit or grab a floor jack to put the vehicle on jack stands. Some shops would have the luxury of an in-ground center-post lift or front-to-back lift, to raise a vehicle all the way up. As side-by-side lifts became more popular, little changed because most vehicles had “for-real” frames (Figure 1).
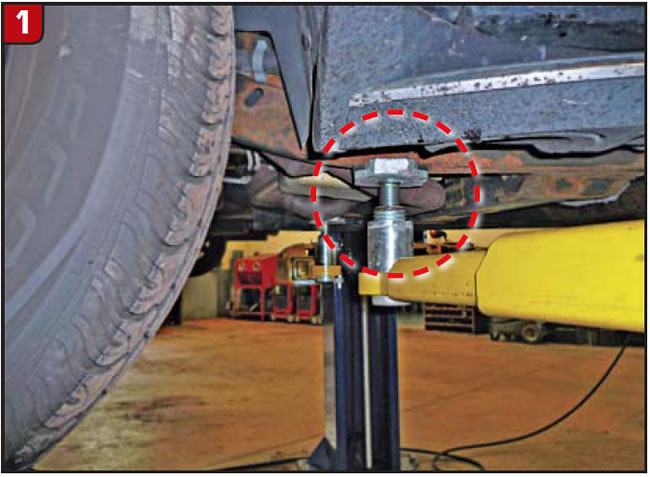
Now: The current array of vehicle unibody designs has made raising a car an experience. The technician must ensure proper contact to avoid body distortion and maintain correct weight distribution. In addition, knowing which systems to disable is imperative, such as ride height or level control, to avoid damage. To help identify lifting variations, ALI (Automotive Lift Institute) has available a quick-reference guide, full of great information (Figure 2). The guide can supplement the owner-manual content. ALI has additional lift recommendations etc. at www.autolift.org, or call 607–756–7775.
Knowing specific issues about a certain vehicle is also very important, such as which models may have struts, which after being in the air for a while might not contract back to normal once the vehicle is lowered.
Remove the transmission
Then: Comparatively speaking, transmissions of old would literally fall from the sky, although there were exceptions. Most vehicles were RWD, which meant pop the driveshaft and cross member, unbolt the converter and disconnect some lines and linkage. Remove the bellhousing bolts and out it came.
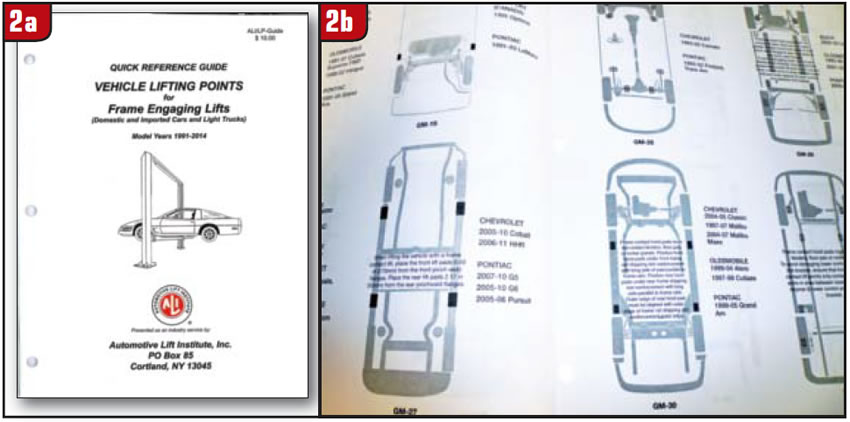
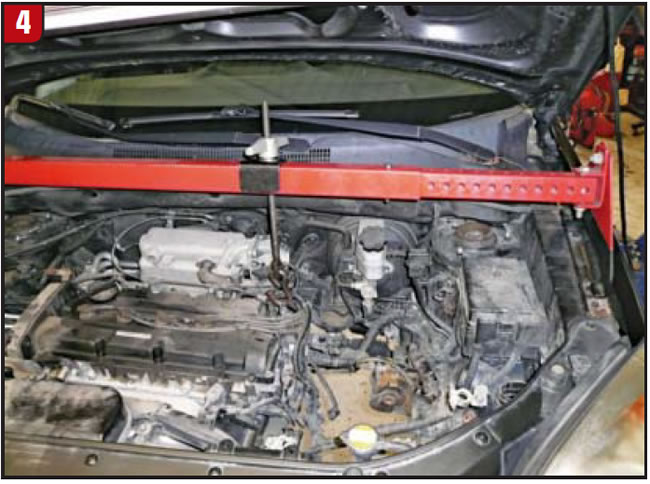
Now: With the changeover to FWD vehicles, doing even minor repairs such as a valve body can be difficult, let alone doing a major job. On top of dealing with two halfshafts, some of which are a bear to pop out, is the issue of the subframe (cradle). Removing a big chunk of undercarriage to drop a transmission makes no one happy (Figure 3). In addition to all the cradle nuts and bolts is the issue of the engine dangling by a thread; hence, the need for a “skyhook.”
Initially, a shop could get by with a hunk of pipe and a couple of phone books sitting on the fenders with a chain wrapped around the engine. As time went on more-sophisticated engine hangers were needed, from a two-point to a three-point design along with several adapters (Figure 4). Today, there are engines that are not even equipped with lifting rings, which means wrap the chain around anything that won’t break. Supporting an engine has become pretty costly, but what is the alternative? An up-to-date engine-support guide would be extremely valuable.
The increase in 4WD and especially AWD vehicles has also added to the grief. Regular 4WDs today tend to have more stuff to deal with than before, and AWDs have their own idiosyncrasies as well. Even rotating the engine in the proper direction to remove converter bolts is important, to avoid issues later on.

Preparation
Then: Once the transmission was removed, specific items needed to be checked and tasks performed. Items like mounts, U-joints, flywheel, linkage etc. required inspection. Other items needed to be sealed, such as speedometer and throttle cables as well as the filler tube. Certain tasks needed be done, such as fixing or replacing broken parts as well as flushing the cooler lines. Converter hubs would be greased for break-in and rust prevention.
Now: In addition to what had always been done are a couple more wrinkles. Due to the crush of electrical and computer do-dads, external sensors and harnesses have become really important. They must be inspected closely, at times tested and sealed or greased properly. Good grounds are imperative today whether they be simple straps, specific bolts or even gaskets with a ground eyelet like Ford uses between the transfer case and transmission.
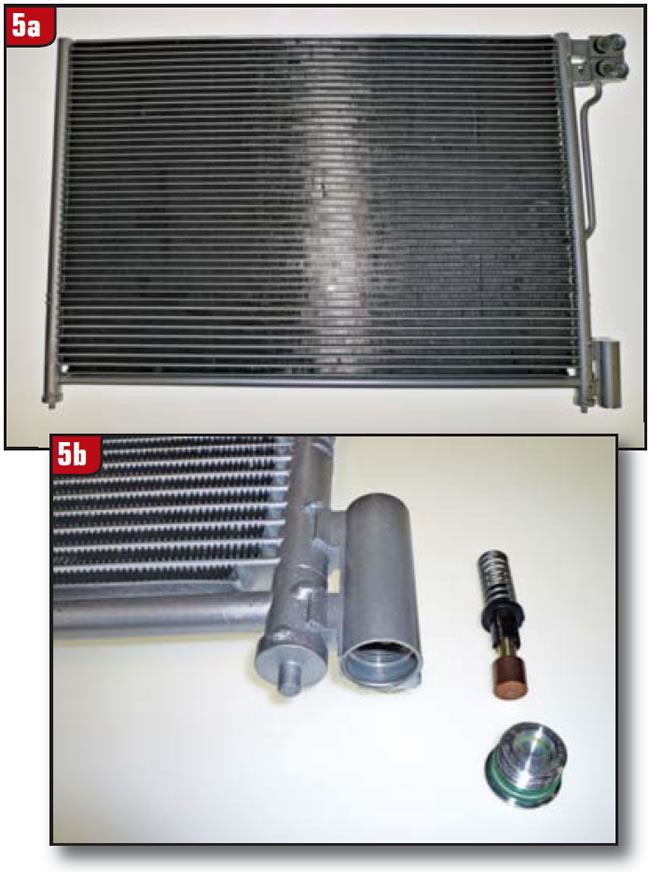
Even cooler-line flushing requires a different approach, in some cases, due to the cooler unit having a thermal element (Figure 5). The element must be in the correct position to avoid flushing only the lines themselves. Other flushing concerns involve transmission-mounted coolers like those certain models of Honda or VW use. Flow rates must be validated.
If water/antifreeze intrusion is suspected, the technician must do a proper glycol test on the fluid and determine radiator-tank integrity or other intrusion areas. Test kits can be obtained via various sources.
Cooler-line rusting seems to be more prevalent than ever, and in many instances replacing the line with OE is better than bending straight sticks, due to cost and time. New cooler-line material, such as PolyArmor, is also a good choice and is used by OEMs.
Installation
Then: Once a transmission was rebuilt, the technician would then reinstall it. Key areas that needed to be addressed would be the engine/transmission alignment, by making sure surfaces were flat and lineup pins were installed and not worn. The torque-converter pilot and crankshaft bore had to be a good fit, and once installed, mounting pad to flywheel clearance had to be checked and adjusted, if necessary.
With all adjacent connections made (fill tube, linkage, cooler lines, cables etc.) and the transmission in position, overall alignment would be checked, such as centerline and height.
Once done, final adjustments would be made, fluid added and checked, the vehicle driven and leaked checked, all prior to a final road test.
Now: All the basics are still performed along with a few more. Just installing the converter on certain models, like the 6T70, may require the unit to be vertical to avoid turbine-seal damage. Alignment is not limited to engine/transmission. Because of the cradle design, frame/body alignment must be checked to avoid steering problems and tire wear.
Beyond traditional connections, technicians today must contend with an array of electrical components such as speed sensors and harnesses to ensure that the items are connected correctly.
Adding fluid is no longer a simple task, either. Many transmissions don’t have a regular filler tube, but rather threaded oil-fill holes all over the place (Figure 6). Even checking fluid on some models requires a scan tool to verify temperature.

Last, the technician may even be required to road-test the vehicle with a scan tool hooked up to check for glitches or reflash.
The purpose of this article is not only to provide information but also to act as a forum relating to R&R issues. Transmission Digest welcomes any comments or suggestions that will aid technicians in dealing with today’s challenges. Send inquiries to [email protected].
Special thanks to Brian Winograd of Broadway Transmission for recommending that this topic be addressed.


