Shift Pointers
- Subject: Waving clutch plates to cushion shifts
- Essential Reading: Rebuilder, Diagnostician
- Author: Russ Sylvis
Ever rebuilt a Toyota transmission that then shifted hard into drive and reverse and on light-throttle upshifts, and everything you tried – adjusting the linkage, messing with line pressure – didn’t fix it?
The answer is to wave the clutches. In the case of Toyota, it came with waved clutches from the factory but your supplier sold you flat ones. If you call him back he will tell you that either he has only flat clutches or there is no such thing as waved clutches. Either way, you will never fix it unless you put waved clutches in it.
There are other instances where waved clutches will fix problems even when the transmission came with flat clutches from the factory.
One such instance is an AOD with a shift-correction kit. It can have a harsh 1-2 shift at light throttle. If you wave the intermediate clutches it will take out the clunk. I wave at least one intermediate friction on every AOD rebuild.
So you don’t do too many AODs any more. I had an AX4N that shifted hard on the 2-3 shift the first time in the morning. I couldn’t find anything wrong, so I waved the direct clutches and it fixed the problem.
On every E4OD and 4R100 that I do, I throw away the wave plate in the forward-clutch pack and put back the friction that Ford has left out since C6. Waving the clutches keeps it from banging on the neutral-to-drive engagement. If you remember, at one time Ford used waved steels in the forward-clutch drum.
I have gotten reports from other people that they have fixed clunks in Hondas by waving clutches. Anytime you have a light-throttle upshift that is too hard, a closed-throttle downshift clunk or a harsh garage shift, if the line pressure is right waving the clutches will fix the problem, provided that the rest of the transmission is in good shape. There is no end to the possibilities.
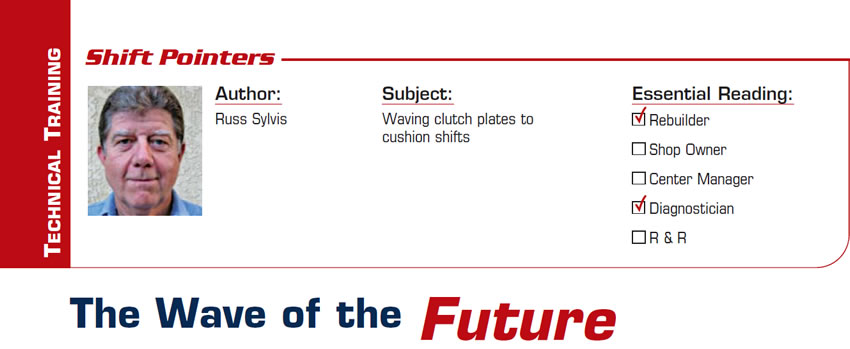
The clutch waver is two round pieces of aluminum with ribs on one side (figures 1 and 2). There are alignment dowels that put the ribs into proper alignment with each other. When a clutch plate is put between the two pieces of aluminum and put into a press, the ribs will wave the clutch.
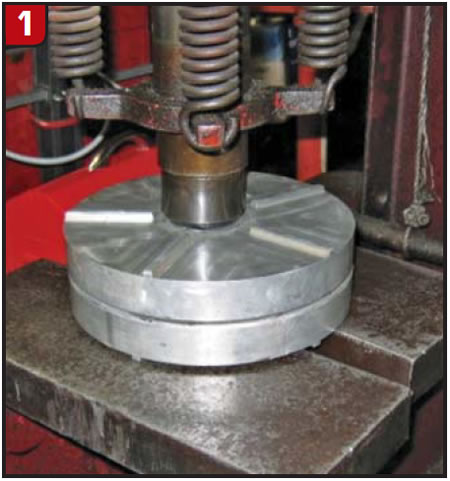

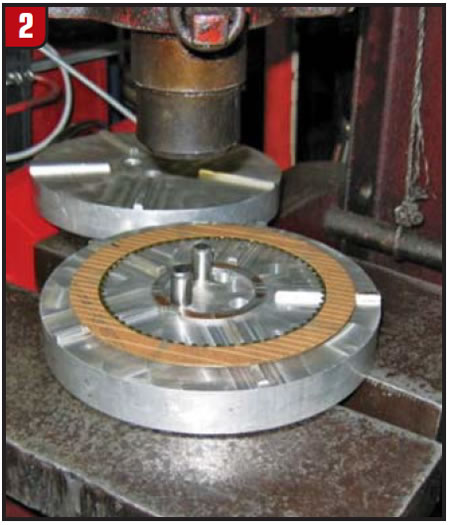
The amount the clutch is waved is controlled by the number of shims you put between the two pieces of aluminum. The shims control how close the two halves get to each other. Friction or steel clutch plates can be waved (Figure 3).
The procedure is to first mark the clutch to be waved with a felt pen. If a steel is to be waved, put a grind mark on the side of one of the lugs. Put the clutch on the waver with the mark up, and over a rib. The mark will be a reference point if you need to wave the clutch some more, or to turn it over to take out some of the wave. Make sure the clutch and shims are centered. The upper half is then put on top and pressed with a shop press.
For shims, I like to use the old brass 350 pump washers, which come in three sizes. Break off the tangs. Also, use some of the newer, thin 350 pump shims that go behind the later Torrington bearing on the pump, or the brass washer at the bottom of the gear train from a 400. Use combinations of these shims to get the wave you want. In general, the fewer shims you use, the more you will wave the clutch.
The larger the diameter of the clutch, the closer the halves need to come together, because the ribs are farther apart as you move to the outer diameter. Start with more shim thickness than you think you need and start taking away until you achieve the desired wave. After putting the wave into the clutch, turn the two halves of the waver over so that the flat sides face each other. Put the clutch in and press it again. This will take out any wave that is going to come out. If the clutch is then too flat, put more initial wave in it. Repeat with flat side. Once you get the routine, it will go like an assembly line.
To measure wave, put the clutch between two flat steels and measure all three. After waving the clutch, put it between the two steels again and measure. The difference is the wave. I like about 0.005 to 0.008 inch.
Before you start waving clutches, stack up the pack and check clearance. Remember, the piston travel is going to be this distance, even though it will seem less after the clutches are waved.
After the clutches are waved, the pack still needs clearance, so don’t get it too tight. As long as you can turn them, it’s probably OK. You may not be able to wave all the clutches in a pack, but that’s OK. Just one waved clutch in a pack can be enough. But wave all you can.
I think this could be the wave of the future.
Russ Sylvis is the owner of Russell Sylvis Inc., Simi Valley, Calif., maker of the Solenoid Dyno and clutch waver. He does technical consulting for various shops in his area and has written a Volkswagen troubleshooting manual and a book on wave forms.


