
Metal clad seals have changed over the years, affecting every aspect of design, material and manufacturing. Overall, a metal clad (or rubberized) seal presses into a bore or onto a shoulder and the seal lip rides against a rotating journal.
The basic design of metal clads have changed somewhat over decades, whether it be flanged or non-flanged, booted or non-booted, with a variety of lip profiles. Normally the lip has a standard profile, but in certain cases a deviation may be required such as the Chrysler A670/A604 axle seal. Due to excessive axle shaft movement, a regular lip design would tend to leak; therefore, the seal manufacturer developed a seal that allowed the lip to float up and down, moving with the actual shaft. The result was no leaks. Lip helix also helps to prevent leakers. Certain metal clads may also have a stone guard or baffle to protect the lip.
Materials have changed as much as designs. Metal-clad seal manufacturers used Nitrile (Buna N) rubber early on, but then switch to other materials such as silicone and fluoroelastomers such as Viton or ethylene acrylic elastomers like Vamac. The newer blends were more heat resistant as well as being more durable against abrasives. The OD of the seal can have a paint coating (bore coat) or a bead of silicone to prevent leaks. Seal OD could be rubberized and even have a raised ribbed, which fits into a pump bore groove, to prevent pop out.
After seals are received at the transmission assembly plants, they have to be unpackaged and loaded onto the installation equipment correctly, so that component installation can be done quickly and without error. Fixtures used by the OEMs are special high-volume tools designed for speed and accuracy as well as longevity. Seal installation for service is a different matter altogether.
Rebuilders have installed metal-clad seals over the years in a variety of ways and with a variety of tools. Many seals have been hammered in while others were pressed in. Drivers could vary from sockets to bushing drivers to a “for real” metal-clad seal installer. Many rebuilders did learn, however, that pounding in a seal with a regular driver could result in problems, like the garter spring popping out on an AX4S. The final blow actually shocks the spring out of position, which is why the seal should be pressed in and with the correct tool.
Not using a proper seal driver can cause other issues as well, such as the front output seal on a NP246 transfer case. The seal is constructed in a manner that requires a stepped driver for installation. Not using the driver could cause damage to the seal.
The 6R140 was designed to accommodate big engines and heavy loads. The pump assembly is made in three sections, the cast iron pump body, aluminum cover and steel stator support. This was done to enable the addition of a PTO drive gear, if required. There can also be a steel separator plate between the cover and stator support. The pump body uses a caged bearing instead of a bushing.
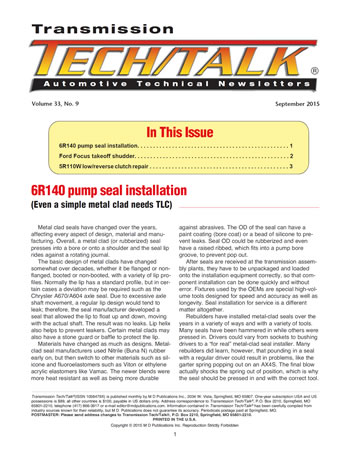
At first glance the pump seal looks like a regular metal clad (Figure 1). Take note, however, that the ID of the seal is not a lip, but rather a rubberized bore with support ribs and two circular ribs that act to seal fluid. The OD of the seal has a silicone bead for sealing the pump bore.
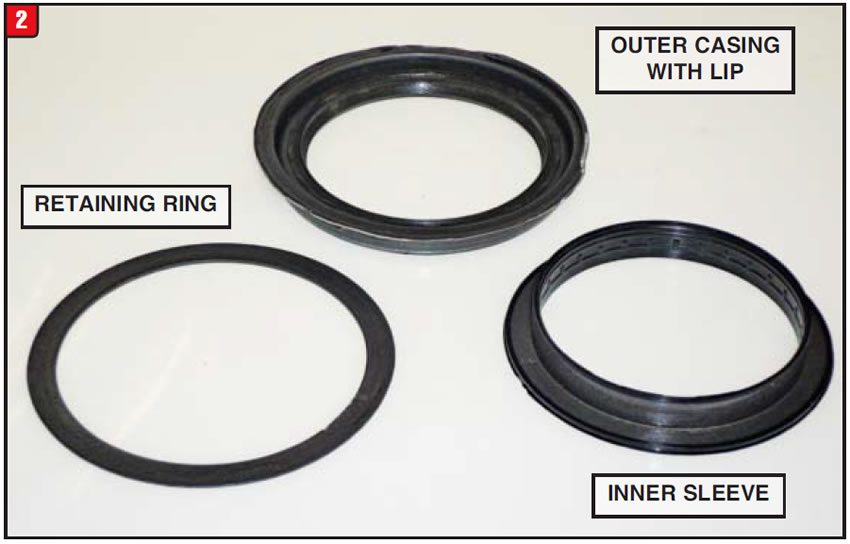
The seal is actually a two-piece design. The outer casing looks like a normal metal clad, lip seal and all. The inner part is a flanged sleeve, which is the rubberized bore that rides on the converter hub (Figure 2). The rounded part of the sleeve is what the lip of the assembly rides on. The sleeve and outer casing are held together by a retaining ring that is crimped into the outer casing. Why the elaborate design?
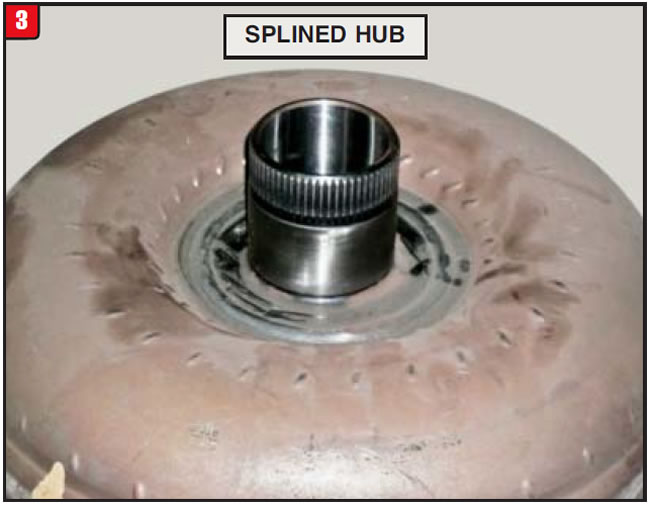
The 6R140 torque converter, most likely, is the cause. The hub of the converter is not the norm. The pump-gear driver area has splines instead of flats or lugs (Figure 3). The pump drive gear has corresponding splines.
Installing the seal into the pump body can be done like any other application; just make sure to use a press and keep it straight. The issue is with installing the converter, which weighs a ton. Make sure that the converter is well supported and remains straight during installation so that the splines do not damage the seal. Excess tilting of the converter could dislodge the seal, causing a leak as well.
Proper handling of all components is always a good rule to follow.


When a customer purchased his brand-new 2014 Ford Focus, he was unaware of the transmission that the vehicle was equipped with since transmissions are not a big selling point compared to other features. The Ford Focus has been around for many years now, in Europe and in the United States, and can come with a variety of engine and transmission options. What the customer did not realize when he bought the vehicle was that, although automatic, the transmission was not traditional.
The transmission in question is actually a DPS6 (DCT250), which is a 6-speed FWD; however, it is a new breed of transmission referred to as a Dry Dual Clutch Transmission (DDCT). There are basically two types of dual clutch transmissions, wet or dry. The VW 02E, which was launched in 2003, is a wet-type DCT.
A DCT, wet or dry, is essentially a standard transmission that has been automated. Internal components are comprised of external tooth gears, synchronizer assemblies, shafts and shifting forks. A DCT is basically two separate transmissions merged into one with each side providing certain gear ratios. For instance one side would be responsible for 1st, 3rd & 5th gears, while the other side would be responsible for 2nd, 4th & 6th gears. Each one of the dual clutches is responsible for applying one of the input shafts. The dual clutch assembly of a wet DCT resembles two regular automatic transmission clutch packs, whereas the dual clutch assembly of a dry DCT is like two standard transmission clutches, made into one.
What car owners are unaware of is that Ford has been having a couple of problems with the DPS6 transmission, involving potential front end leaks and clutch apply feel. The problems started early on, almost from the beginning in 2011, and recalls have already been issued in many cases. As a result of these issues, warranties have been extended to seven years or 100,000 miles for certain vehicles. Consumers need to check with Ford to see if their vehicles qualify.
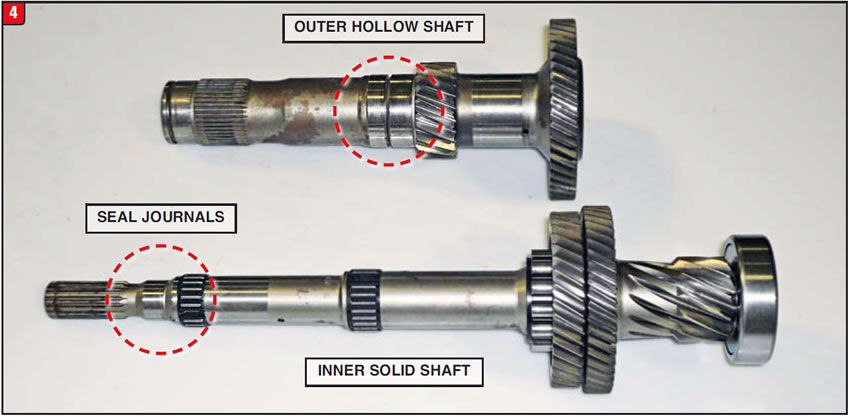
Although the obvious drivability problem has been a shudder condition, taking off in drive or reverse, there has been more than just one cause. As with any manual-shift vehicle, if engine or transmission oil would leak onto the clutch disc, a shudder could be felt during apply of the clutch, especially on takeoff, as is the case with the DPS6. What is unique about the DPS6 is that there are two input seals to contend with instead of one (Figure 4). Of the two input shafts illustrated, the smaller solid shaft rides inside of the larger outer shaft. The small diameter shaft seal is pressed into the hollow outer shaft, and the hollow shaft seal presses into the bell housing. If either of the seals leaks, transmission oil can contaminate either clutch disc and create shudder.
The leak can be so subtle that oil spots under the car may not exist. If the input seals are leaking, Ford has a special tool to help with replacement of the seals.
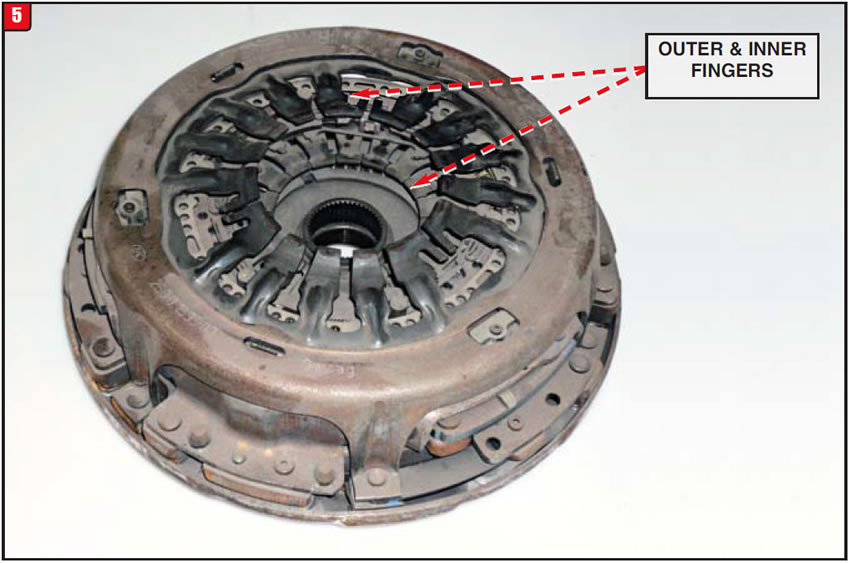
The dual clutch assembly, manufactured by LuK, is a modular design that has had a great amount of engineering put into it (Figure 5). Currently, the clutch assembly is not rebuildable and must be purchased from the dealer.
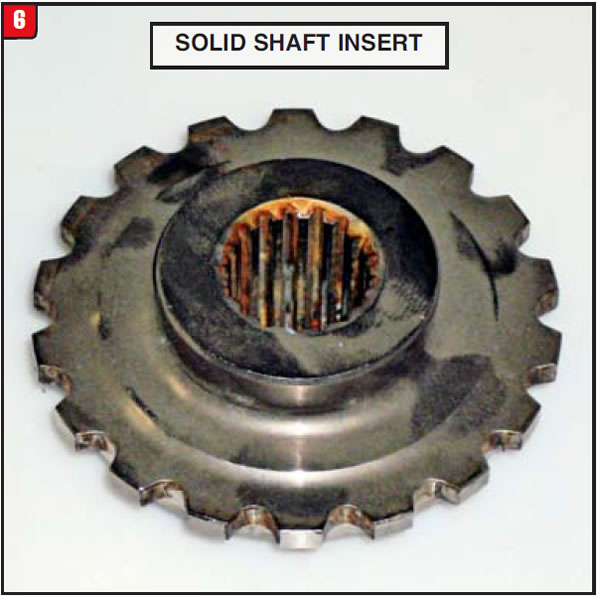
From the throw-out bearing side of the assembly, the hollow input shaft splines are visible. The solid input shaft splines mesh with an insert that installs from the front side of the clutch (Figure 6).
Apply and release of the clutch assembly is even more unique, in that there is no third or fourth pedal. On this application there are two of everything, which is needed to engage and disengage either input shaft. All manual shifting clutches use a throw-out bearing to push against the clutch fingers, although on this setup there are two, one inner and one outer (Figure 7).
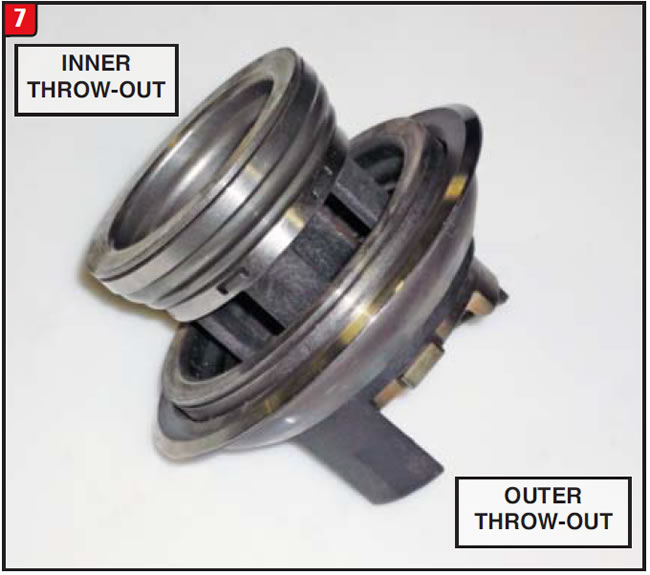
The small diameter throw-out bearing contacts the inner fingers of the clutch assembly, whereas the large diameter throw-out bearing contacts the outer set of fingers. To limit wear, there are two support plates that go in between the throw-out bearing assembly and clutch assembly. There is a relatively small step on both support plates to align with the throw-out bearings (Figure 8).
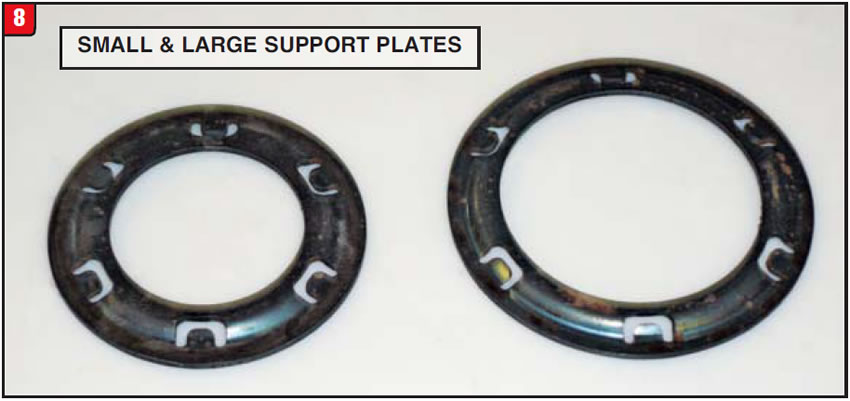
If excessive free travel exists, the support plates could fall off the end of the bearings.
As with the other components, there are two apply forks, large and small, which contact the end of both throw-out bearings (Figure 9). The fork frames are anchored to the bell housing by special connectors to maintain proper alignment and permit movement.

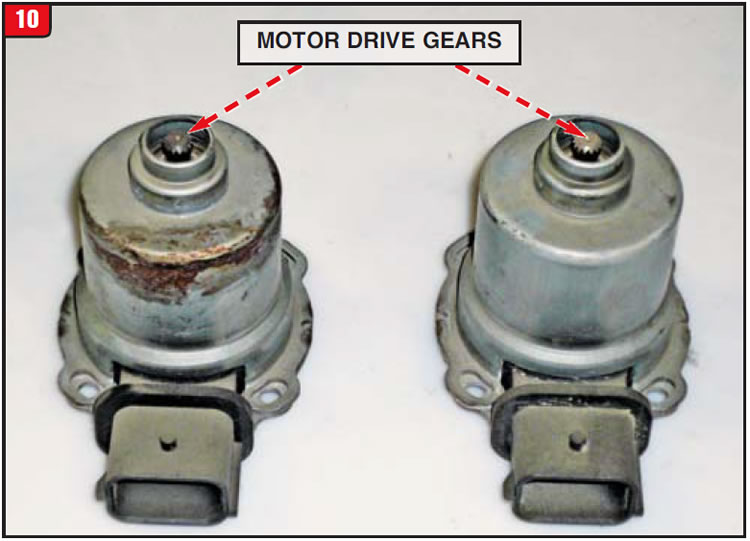
The forks have small gearing that must be closely inspected for damage. What moves the forks are two small electric motors that contain drive gears at the end that mesh with the fork gears (Figure 10). The small electric motors are controlled by the PCM/ TCM, which not only move the forks, but also move the forks quickly and maintain a proper position.
Beyond the oil leak issue, there have also been calibration challenges to contend with. Before any calibration changes are made, the vehicle must be driven at least 1,000 miles, which is considered the break-in period. Car owners have received notices stating these conditions and procedures. If after the break-in period is met and there is no evidence of oil leaks, then the vehicle can be recalibrated to minimize takeoff shudder.
It remains to be seen how much dealer participation will be required in the future and what the aftermarket will be able to contribute to address these issues. At least for now consumers will have to conform to the OE directives.


Who knew that in 2003, when Ford released the new 5-speed 5R110W, that there would be so much activity from one transmission type. From the beginning, there were substantial drivability issues along with countless component fixes and upgrades. One of the first concerns to occur was planetary pin walk out that resulted in some major breakage. The problem was addressed quickly with a new design carrier. There were other subtle changes early on as well.
The first major upgrade occurred in 2005 with the release of a new front planetary package. The package included a new forward clutch assembly and complete front planet set (planet, sun gear, ring gear, etc.). It even included the updated rear planet for good measure. The package cost a bunch but would retro to 2003.
The next substantial change to the 5R110W had to do with the front end. Although the coast clutch drum and OD diode had been beefed up previously, a similar upgrade occurred in 2007. Not only was the coast drum and diode modified into a gas or diesel version, the drum splines for the sun gear were changed to mesh with a new sun gear tooth count. The overdrive planet and ring gear teeth were changed as well to provide a slightly different ratio. Although the coast drum is stamped gas or diesel, the drum is the same. The stamp denotes a gas or diesel diode design.
From a simple rebuilding procedure standpoint, the most troubling change to the 5R110W happened in 2009. Ford decided to make the low OWC diode and rear planetary one assembly. This was done for a couple of reasons. To start with, having one assembly makes it easier to assemble at the manufacturing plant.
Beyond that, by having the planet attached to the diode, which doubles as a center support, both thrust washers can be eliminated, saving the cost. Thatʼs great for OE production, that is, but not so for service and repair, since the low reverse clutch is sandwiched in between.
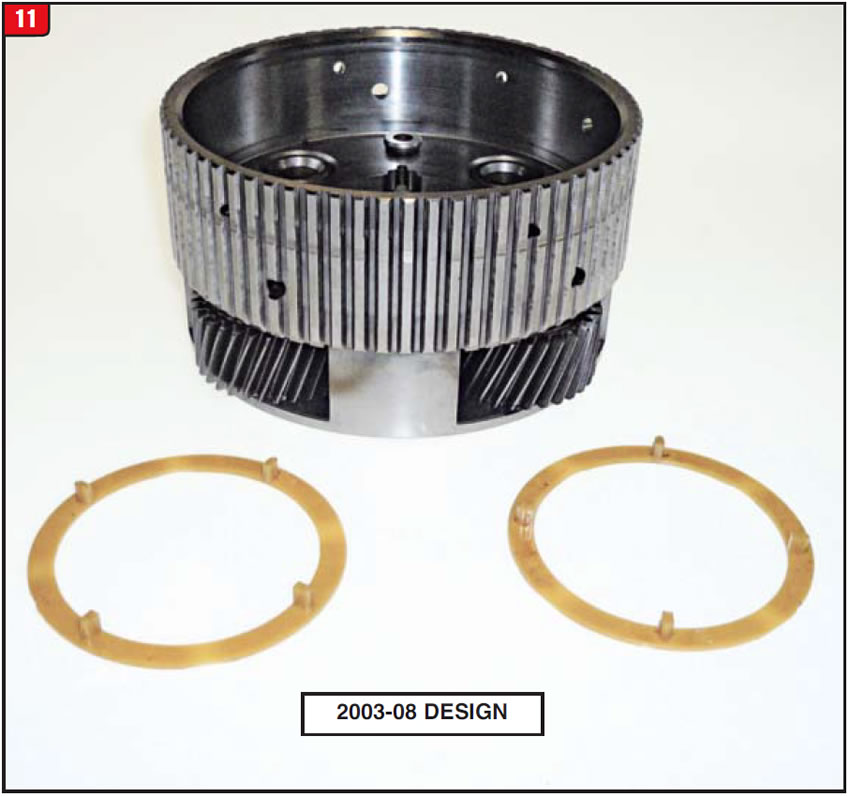
The previous design rear planets had notches cut in to accommodate the thrust washers (Figure 11). With the installed washers, the planet will float between the sun gear shell and rear ring gear. Donʼt use the 2003 long-spline design planet unless the pinion pins are secured.
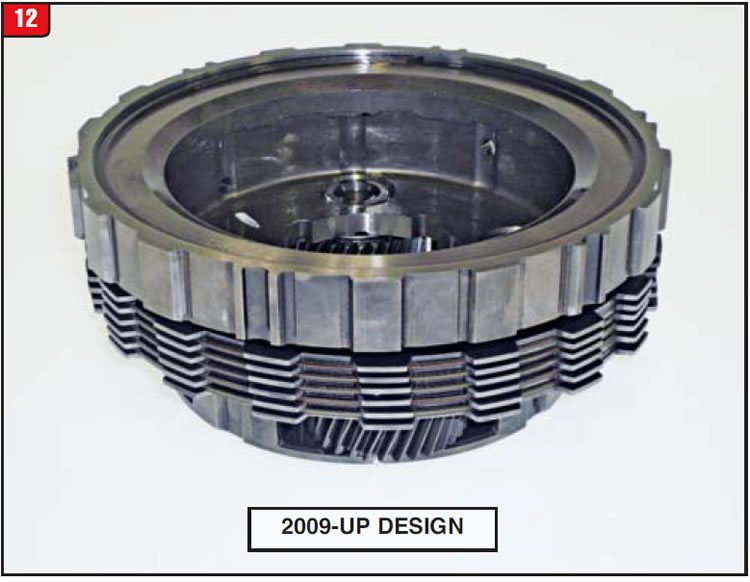
The new design planet/diode assembly drops into the case as one piece, without washers, with the planet held in position by the diode (Figure 12). The clutches drop in with the unit. There are two versions available of the new design, based upon engine. The 5.4L is a 5-friction pack and the 6.8L or diesel is a 6-friction pack.
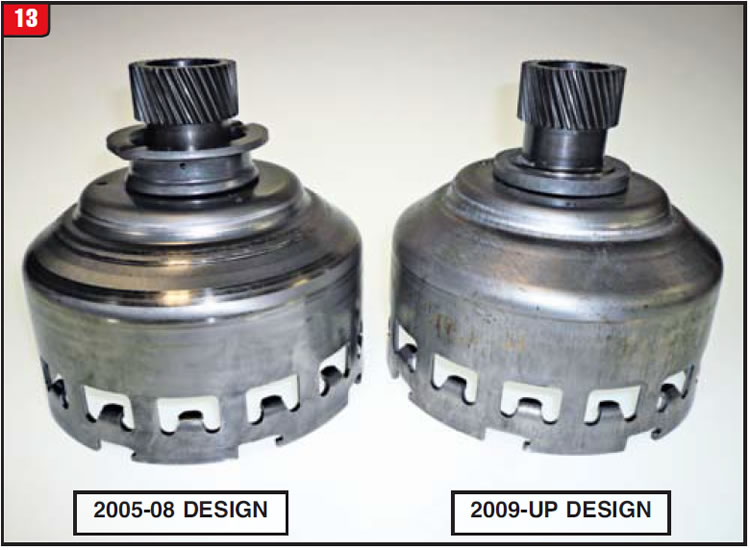
When the planet was released, another item that was modified was the sun gear shell. The previous design shell required a collar that acted as a thrust washer support. Since the new setup doesnʼt require washers, the collar was basically removed from the shell (Figure 13).
Until a short time ago, rebuilding a 2009-up 5R110W meant making a judgment call concerning replacement of the low-reverse friction and steels. The decision was to either reuse the original clutches or replace the entire planetary, which isnʼt cheap. The aftermarket did, as usual, come to the rescue.
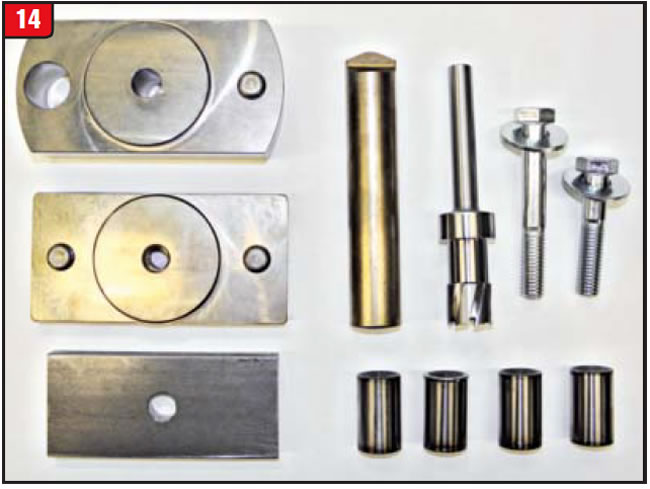
One repair option is provided by Northland Transmission, the folks who make several servo-bore repair-tool packages. Northland produces a 5R110W planet-pin replacement-tool package that allows removal and replacement of the pinion gear pins and thus the low reverse clutch pack (Figure 14). The tool package is also used if rebuilding the planet is necessary. The Northland part number is TSRP.
Another option was developed by PAT (Parts 4 Automatics) in Edmonton, Alberta. PAT has available a low reverse clutch pack that can be installed over the planet gears (Figure 15).
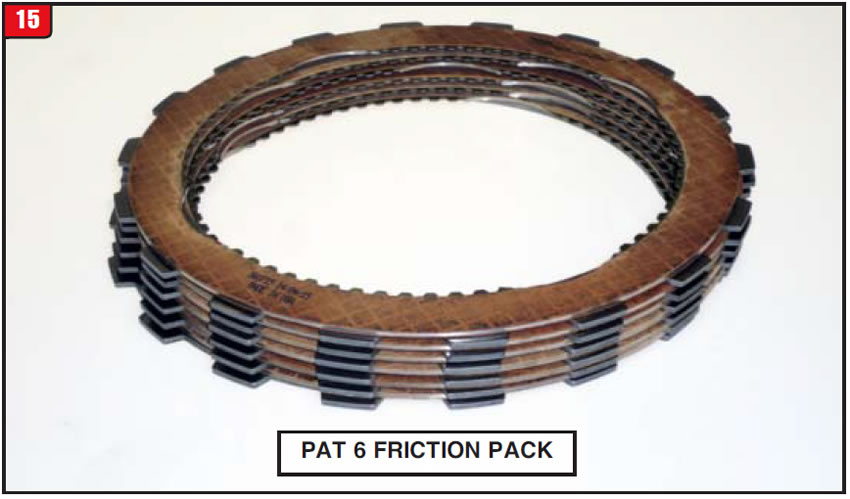
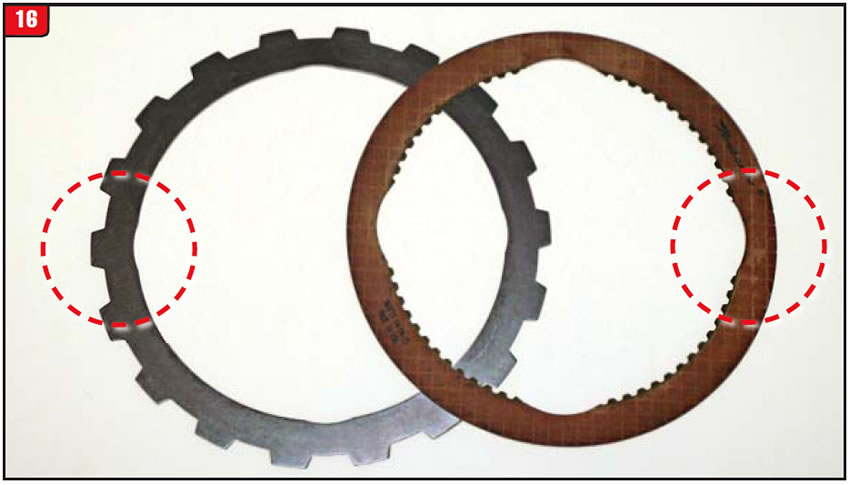
The kit includes 6 frictions, Raybestos or Dynax, 6 regular steels, and an oversize steel, if needed. Removal of the existing plates are accomplished by cutting them and PAT has an instruction video showing how. The kit of frictions and steels are notched to fit over the planet gears (Figure 16). The clutch pack kit number is 136119P4.
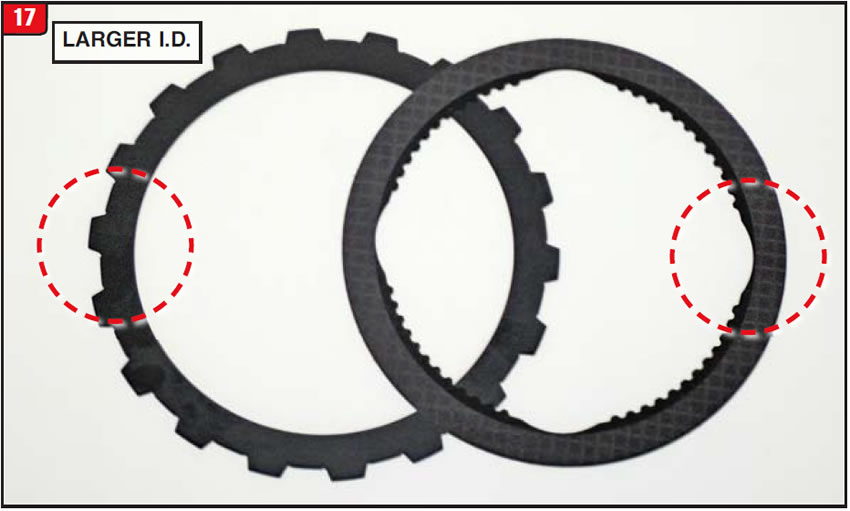
A third option comes from clutch plate manufacturer Alto. The company has also released modified 5R110W low-reverse frictions and steels. Frictions and standard thickness steels are available individually under part numbers: Friction 026744B, Steel 026703BK. The steel is Kolene.
Although the frictions are notched, the steels are stamped larger at the I.D. of the plate to fit over the planet gears (Figure 17).
With all of these aftermarket choices, a good planet/diode assembly no longer has to be replaced to merely change basic frictions and steels, which will help contain cost.

September 2015 Issue
Volume 33, No. 9
- 6R140 pump seal installation
- Ford Focus takeoff shudder
- 5R110W low/reverse clutch repair


