Shift Pointers
- Subject: Determining whether a PCM is defective
- Vehicle Application: Toyota AWD RAV4
- Essential Reading: Rebuilder, Shop Owner, Center Manager, Diagnostician, R&R
- Author: Mike McLaughlin
Recently we had a 2001 Toyota AWD RAV4, with 114,000 miles on the odometer, come into the shop for transmission diagnosis and repair. It had a bind feeling on the 1-2 shift and a flare when it shifted to third, no codes and burnt fluid. Once it was in third and then fourth, it would drive fine, and the lockup also functioned properly.
When we removed and inspected the unit, we found the direct clutches to be burnt almost to the point of not being able to function any longer. We rebuilt the unit and reinstalled it, and on a very short initial road test the bind was still evident and actually felt like a more-severe bind with the new clutches that were installed.
As sometimes happens, the result was corrected but not the actual cause of the transmission failure. Now it was time for a little more research and more diagnostics.
The research showed that this is a fairly common problem with 2001-03 RAV4s. TSB #TC002-06 says that for a bind feeling/harsh shift and/or code P0750, P0753, P0755, P0758 or P1760, there is an updated PCM for these vehicles that corrects the problem through a change in the manufacturing process, so it’s a hardware failure rather than a software failure, although the TSB does not explicitly say so. If the vehicle still fits under the 8/80,000 emissions warranty, Toyota will cover the PCM replacement; however, there is no extended warranty and no recall, and the transmission repair is not covered, even if the PCM failure fits under the terms of the emissions warranty. This vehicle was out of the emissions-warranty mileage period, and a new PCM is $900 to $1,100, so there can be somewhat of a gamble if you choose to replace the PCM simply because the bulletin says it’s been updated. This leads to the question of whether you can prove it to be defective and what the true cause of the failure is.
The answer is yes, it can. Since we’re a participating member of the Transmission Rebuilders Network Worldwide (TRNW), one of our recent focuses has been just that: working on methods to PROVE that a PCM or TCM is actually defective, without having to just take a blind gamble and replace it and simply hoping that it will solve the problem. With the many fine technicians who participate in TRNW daily, it’s like participating in a seminar seven days a week and makes every member a better technician just by participating.
Before we replace this rather expensive PCM, we need to determine whether it is truly the cause or there is still a problem inside the unit.
What some research shows, and from my experience with this one, when the PCM goes bad it’s the direct clutch that smokes because of the bind when the PCM is not controlling the solenoids properly. The first easy check is with the pressure gauge on the direct-clutch tap. The direct clutch (the one that smokes) is on in reverse, third and fourth with about 150 psi applied and in reverse at idle. In first and second the direct clutch is supposed to be off. When the PCM is bad and causing the bind, there is still about 55 psi on the direct clutch in first and second, when it should be zero.
That leads us to the next question: Is it a cross leak or a problem inside the unit, or an external problem or control issue? The factory manual says to unplug the transmission connector, which puts the unit in failsafe mode, and drive it. If the failsafe mode is reverse and then third in all forward positions, the problem is external or a command/control issue. If there’s any deviation from third in all forward positions, it’s an internal problem. That sounds good – BUT failsafe IS third and the direct clutch is supposed to be on, so it would seem that the bind pressure getting to the direct clutch would just be covered up, since it gets about 250 psi in the direct clutch during failsafe operation. This vehicle had the correct failsafe pattern.

Now, we have to try to prove whether the actual cause is internal or external. Only two of the five solenoids are really involved in this problem – SL1 and SL2 – and these are PWM-controlled shift solenoids.
In first, both SL1 and SL2 are on. When these solenoids are on, they actually exhaust fluid to keep a clutch off. They are turned off for the corresponding clutch to apply. So, in first, both SL1 and SL2 are pulsed on, which keeps the second clutch and the direct clutch off, and they will average about 5.5 volts with the pulses when operating properly. You can compare your readings with those in my screen captures or from the Toyota factory tech manual. When a shift to second is commanded, SL1 is shut off to apply the second clutch and SL2 stays on to keep the direct clutch off. When a shift to third is commanded, SL2 is shut off to apply the direct clutch.
The problem is that SL2 is NOT being pulsed at the correct rate and averages less than 3 volts, instead of 5.5 volts. The result is not enough pulses to exhaust sufficient fluid to keep the direct clutch completely off, and this allows the 55 psi to remain in the direct clutch, keeping it partially applied, causing the bind in first, second and manual low and smoking the direct clutch.
Check the electronic function and PCM control of the solenoids with the vehicle warmed up and at idle in drive. One thing to keep in mind, especially if you don’t work on imports regularly, is that these solenoids are power controlled, rather than the normal ground-controlled solenoids that you may be more used to seeing, so the high side represents the solenoid on time.
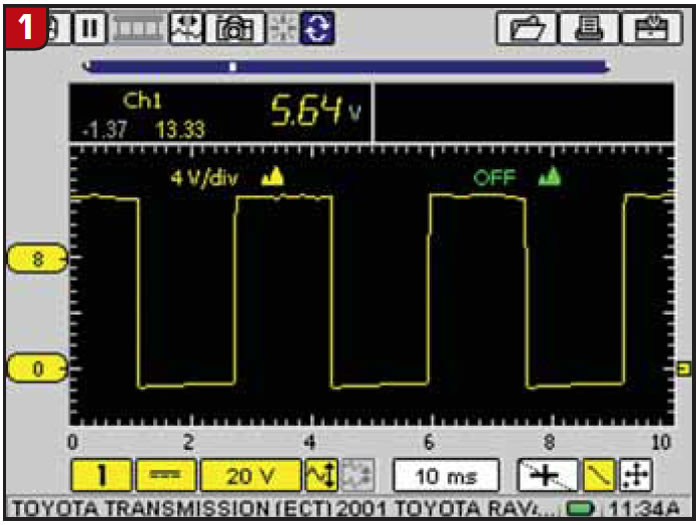
To check the electronic control for SL1, back-probe pins 5 and 10 at the transmission connector, and Figure 1 shows how it should look with the vehicle warmed up and idling in drive. The solenoid averages about a 50% duty cycle and 5.64 volts.
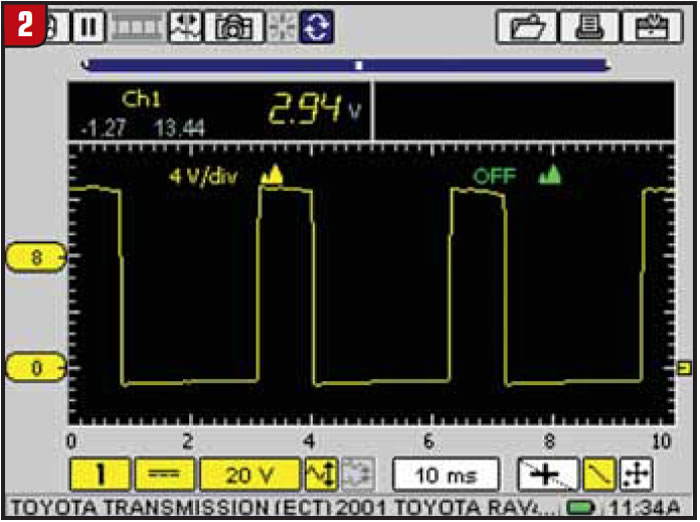
To check the electronic control for SL2, back-probe pins 4 and 9 at the transmission connector with the vehicle warmed up and idling in drive, and Figure 2 shows how the PCM is not controlling or pulsing the solenoid properly. There are not enough pulses to keep the direct clutch completely off, which allows the 55 psi to stay in the direct-clutch circuit. The solenoid averages about a 30% duty cycle and 2.94 volts.
At this point, we can be confident that replacing the PCM will correct the problem and not be a gamble, since we verified how the PCM was incorrectly controlling the SL2 solenoid and allowing the direct clutch to stay applied when it should be completely off.
Figures 3 and 4 again show SL1 PCM control, voltage and duty cycle with the vehicle warmed up and idling in drive.

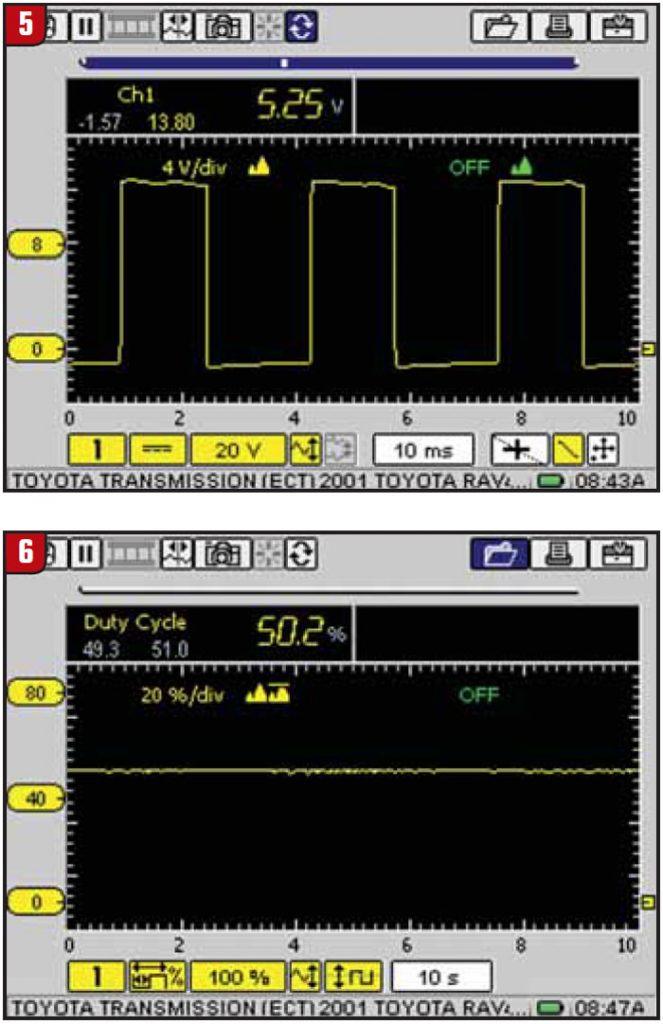
Figures 5 and 6 show SL2 PCM control, voltage and duty cycle with the vehicle warmed up and idling in drive.
Reinstalling the pressure gauge on the direct-clutch tap is the final proof that the problem is completely corrected. Where we had 55 psi in the direct clutch in drive at idle before the PCM replacement, we now have dead zero in drive and 120 psi in reverse, which is down from the 150 psi in reverse at idle before the PCM replacement. From neutral to drive, there is not even a flicker of movement in the needle.
One final note: This PCM from Toyota came in sealed packaging, already programmed from the factory, and was new with no core charge. It was also interesting to note that the calibration level was the same that was programmed into the defective PCM, which is further evidence that it’s a hardware issue, not a software issue, so reprogramming or resetting adapts isn’t likely to be a permanent fix. It’s also worthwhile to note that it may take up to a 30-minute road test for this condition to become evident, although this one was evident on the initial road test after the transmission was repaired.
Mike McLaughlin is the owner of Mike’s Transmission Service in Freeland, Mich.


