
A customer brought in a 2013 Ram 3500 6.7L Diesel with the following issues: a CEL, a transmission temperature display on the instrument cluster reading incorrectly, and harsh shifting that would go into limp mode. This customer informed us that he just took delivery of the truck from a Dodge dealership. The dealership was aware of the issues and diagnosed and replaced the solenoid pack with a genuine Mopar part to try to remedy these problems. The receipt for this repair was in the truck so I was able to verify that the work was performed and verify the part number used for the repair.
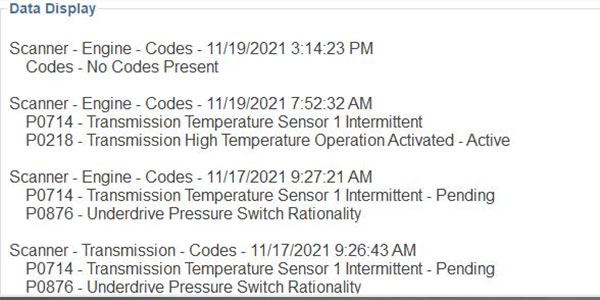
When I began my evaluation, I started with a complete scan of all the modules. The codes that came back were: P0218 (transmission high temp operation activated), P0714 (transmission temp sensor 1 intermittent), and P0876 (UD pressure switch rationality).
After clearing all the codes, I took the truck for a road test to see if I could duplicate the customer’s concern and see if any of the codes would reset. I drove the truck for 10 miles with no issues and none of the codes reset. I then decided to bring it back to the shop to do a visual inspection. I started by testing the batteries and alternator and they tested within spec. I then checked to make sure the case connector was completely seated and secure, and found that it was. I also checked for applicable TSBs and did not find any that pertained to this issue. I then decided to take the vehicle for another road test, but on an extended drive to try and get it to duplicate. Unfortunately, this also yielded no results.
Certain that all the data on the scan tool was correct, I knew I was dealing with an intermittent issue. We contacted the customer and informed him that we could not get the issue to repeat itself and asked him if he had any other information that could possibly aid us in getting it to act up. He said it happens after it sits outside overnight when it’s cold and occurs after he starts it up first thing in the morning. We kept the truck outside overnight to attempt replication.
Read more from our R&R Tech series here.
The next morning, I was still not able to get the symptoms to show themselves, so the customer decided to pick up his truck and take it home. He then called the next morning and said it had happened again, so he brought it back to us for further diagnosis.
The next morning, I went to see if the truck would act up and much to my surprise, it failed immediately after startup. I watched the transmission temperature display on the dash jump to 358°F right at startup, and within five seconds it dropped down to the correct transmission temperature reading. Following these events, operation returned to normal. Throughout additional road testing, the truck operated as it should.
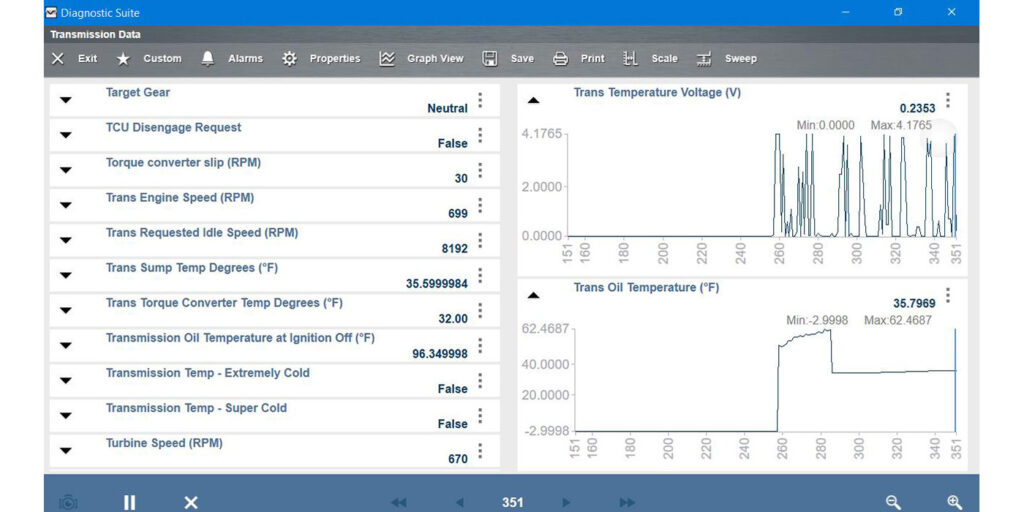
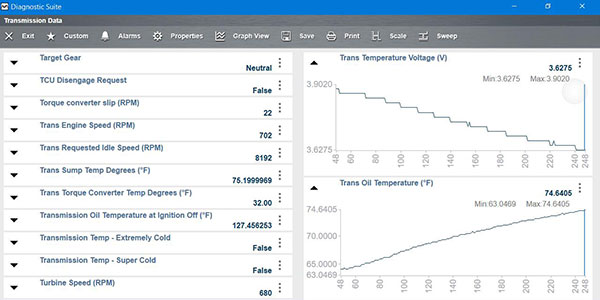
I came back to the shop and shut the vehicle off to let it cool. A few hours later once the truck was cold, I tried it again and was able to repeat the temperature display error and, as before, returned to normal operation. Figure 2 shows scan data upon startup (this was after the code has set so the transmission temp PID was defaulting).
At this point I needed to perform some component testing, so I reviewed circuit diagrams so that I could do some testing of the circuits and related components. Everything I checked tested correctly and normally, so at this point I was pretty convinced it was not a faulty solenoid pack. I also noticed that the temperature reading was correct when cycling the key on and off, and only after the engine was started would the temperature reading be excessively high again. I decided to take a closer look at wiring harnesses since it seemed likely to be related to the engine/transmission motion during cranking.
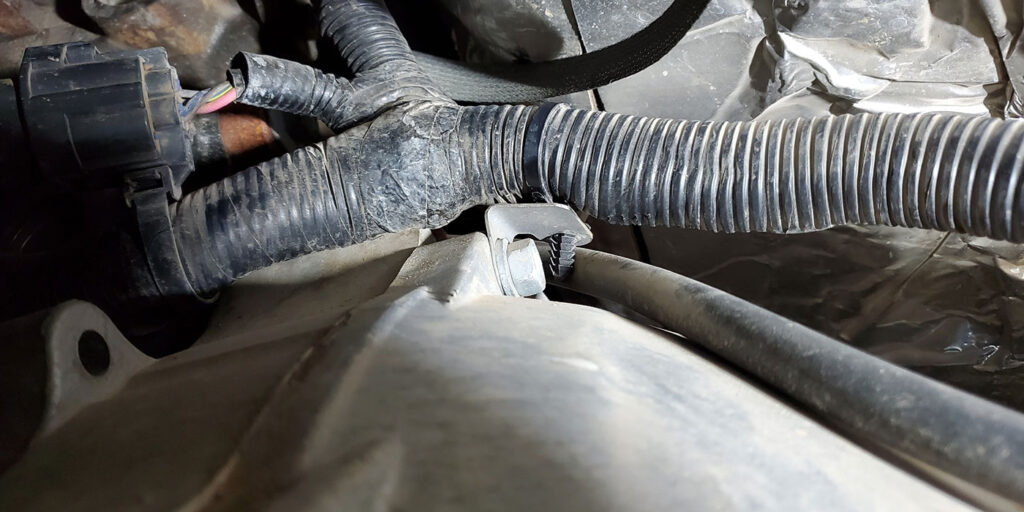
I inspected the transmission harness around the transmission and didn’t see any signs of rubbing or chafing. I then followed it all the way up the bellhousing and into the engine bay and it was there that I found an area of concern. The harness was attached to a bracket at one of the bellhousing bolts and there was a square boss coming off the engine block (as seen in Figure 3).
I pulled the up the data on the scan tool so I could monitor the PIDs while moving the harness against the suspect spot, and I was able to witness the voltage behaving erratically (as seen in Figure 4).
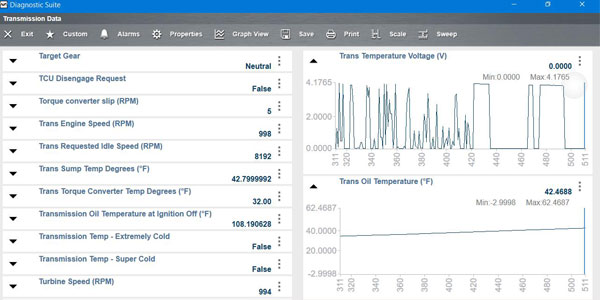
I removed the harness to closely inspect it and found two wires with very small holes rubbed into them. At this point I knew that this was the cause of the issue. I was able to repair the damaged wires that had rubbed through, and to reposition the bracket so the harness would no longer rub anywhere. As of this writing, the truck is still working, and the customer is very happy. For reference, Figure 5 shows the scan tool data under normal operation.
As evident in this anecdote, it took several attempts to repeat the customer’s concerns. We all encounter intermittent concerns and often spend far more time than we would like to try to pinpoint the problem. In the end, we do what we do to win repeat business from our customers. Wiring issues like this are often the root cause of intermittent vehicle issues. Sometimes it comes down to finding the needle in the haystack. If it were easy, anyone could do it, right?
Paul Loch is a diagnostician with Certified Transmission. He is an ASE Master Certified Technician who has been with the company since 2010.


