TASC Force Tips
- Author: Mike Steen, Certified Transmission
Have you ever noticed that most of the complaints or failures you have with a KM involve a burned end clutch? The complaints tend to be sliding 1-2, 2-3 spin-up, neutraling on the 3-4 shift, delayed engagements, no forward or no reverse.
I’ve seen every one of these complaints, only to find the end clutch burned. You might be thinking, “What does a burned end clutch have to do with a sliding 1-2 shift?”
The end clutch is not the problem, but the result of the problem. To understand how the end clutch fails, you really need to know a little bit about how the system works.
First, this is not your typical GM or Ford, which uses EPC pressure to raise and lower main line pressure. KMs run a fixed main line pressure in forward and reverse. This pressure doesn’t change and is roughly 120 psi in forward and 220 psi in reverse.
The EPC solenoid controls the amount of main line pressure that goes to the shifting elements (the front, rear and low/reverse clutches and the 2-4 band) and has no direct effect on the pressure-regulator valve.
The EPC solenoid is normally closed. When duty-cycled it exhausts reducing pressure, and it controls the shift feel and engagements. It’s important to note that I didn’t mention the end clutch as one of the clutches the EPC solenoid controls. That’s because the EPC solenoid doesn’t control the pressure in the end-clutch circuit.
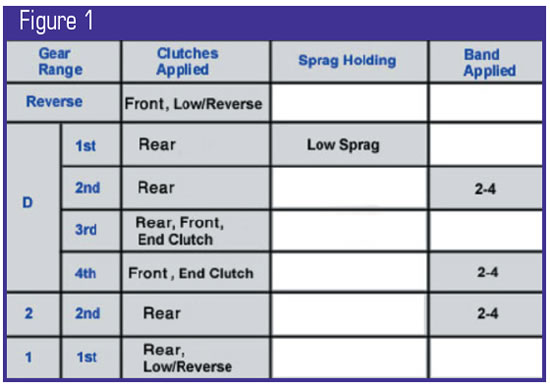
Under normal operation there is no need to control this pressure, because the end clutch is not a shifting clutch. Although the clutch-and-band application chart shows that the end clutch is applied in 3rd gear (Figure 1), the end clutch does not contribute to the power flow in 3rd gear and comes on after the front and rear clutches have applied. The front and rear clutches are the driving members and provide the 3rd-gear power flow. The end clutch is on only to be ready for the shift to 4th gear. Since the end clutch is already on in 3rd gear, it doesn’t have to come on in 4th. Controlling the end-clutch application this way allows it to come on without concern for engagement or load.
If the end clutch becomes a shifting clutch – in other words, does not come on in 3rd gear and applies during the 3-4 shift – it doesn’t take long to damage the clutch. One reason for this is that there would be a load on this clutch when it applied. This is a very small pack, with very thin steels to dissipate the heat. Also, usually after just a couple of shifts, the clutch pack is damaged.
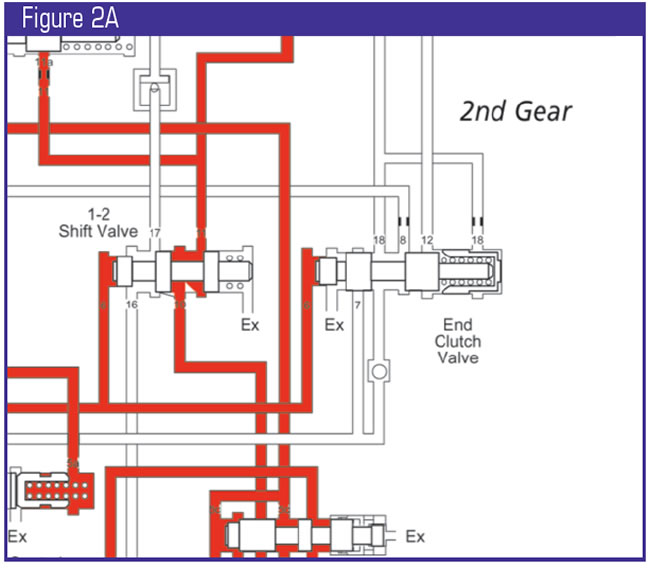
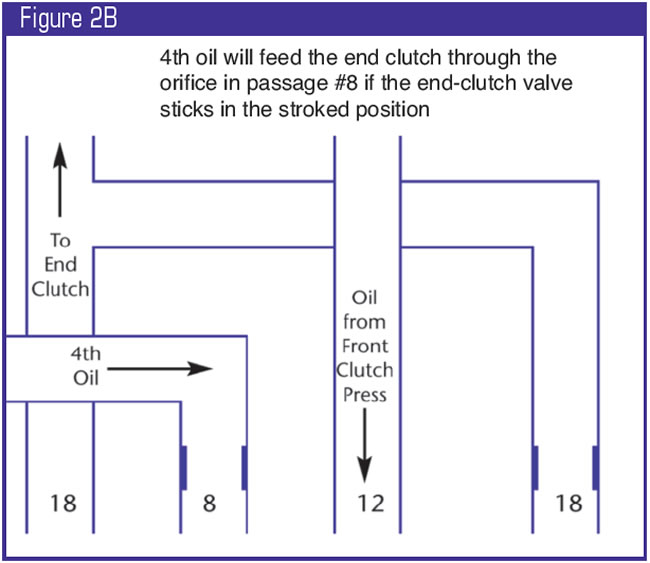
The end clutch becomes a shifting clutch if the end-clutch valve doesn’t move. This happens because the system has an orificed apply hole (Figure 2), a sort of failsafe through which the end clutch can fill during the 3-4 shift if the end-clutch valve doesn’t move. This orifice is meant to slow the application of the end clutch to control the apply under these circumstances. Remember that oil flow to this clutch is normally not orificed when it comes on in 3rd gear, because it’s normally not a shifting clutch. So it normally comes on with full main line pressure without regard to shift feel. When the end-clutch valve doesn’t move, the orifice slows the application so much that the end clutch can slip and be damaged.
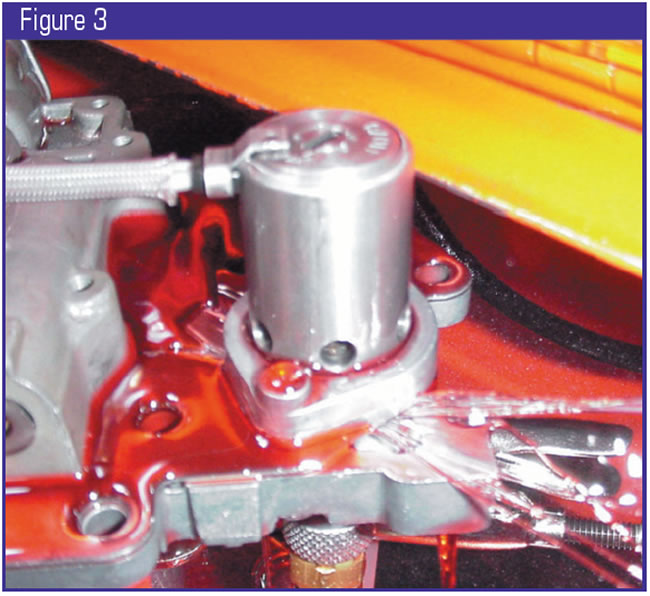
One way this can happen is that the end-clutch valve gets stuck in the stroked position. This would not allow the end clutch to fill in 3rd gear; it would be forced to fill through the orifice in 4th gear. This also can occur if the pressure in the front-clutch circuit is too low to open the end-clutch valve. You can have low pressure in this circuit for a number of reasons – seals, rings, servo bore etc. But what if pressure never gets up to normal? Remember that during the shift, the EPC solenoid is duty-cycling and controlling front-clutch pressure for a good shift feel. After the shift is completed, the pressure should be the same as main line pressure. If the EPC solenoid doesn’t close all the way, or if the seal leaks (Figure 3), it would have the same effect as if the EPC solenoid were duty-cycling. This would, in effect, keep the pressure low in the circuit. How low would depend on how bad the leak is.
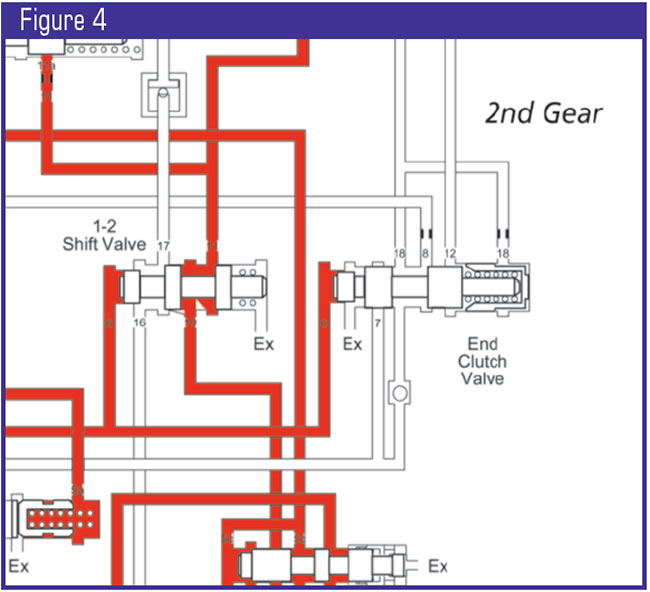
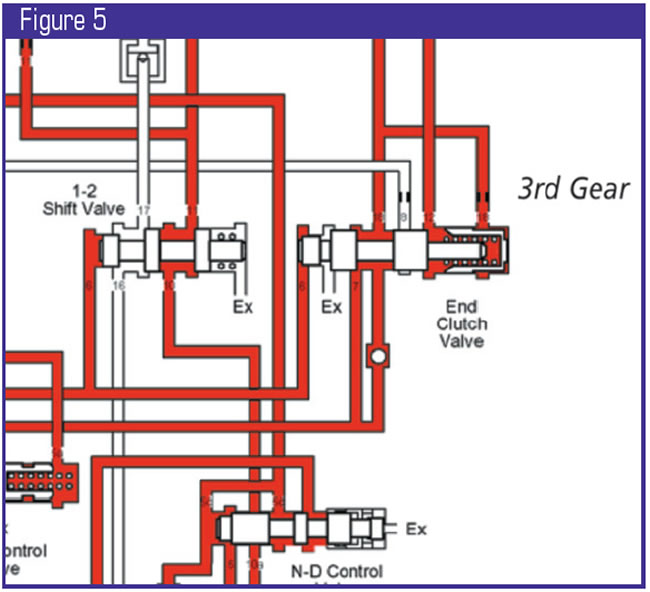
Now let’s look at how front-clutch pressure is supposed to open the end-clutch valve. In 2nd gear the end-clutch valve is stroked and held to the right by main line pressure (Figure 4). At the start of the 2-3 shift, the EPC solenoid controls front-clutch pressure, which applies the front clutch and releases the 2-4 servo. This pressure also goes to the right side of the end-clutch valve, between the spring and sleeve. The end-clutch valve prevents main line pressure from applying the end clutch. At this point, front-clutch pressure and the end-clutch valve spring are not strong enough to open the valve. As EPC duty cycle decreases, front-clutch pressure increases along with the spring on the right side of the end-clutch valve. Eventually, this pressure overcomes the main line pressure on the left side of the end-clutch valve, opening the valve and applying the end clutch (Figure 5).
The preceding example describes the 2-3 shift. The EPC solenoid controls the 1-2 and 3-4 shifts in a similar fashion. Both these shifts also can be affected if the solenoid leaks or doesn’t close all the way. The EPC solenoid also controls the engagement feel of forward and reverse. If the solenoid were to leak badly enough, the unit might either delay or not engage at all in forward or reverse. A good example of this is the computer’s built-in strategy. If it sees too much output speed in reverse, it will duty-cycle the solenoid to inhibit reverse engagement. You can simulate all of these complaints easily with a transmission tester that will control EPC duty cycle.
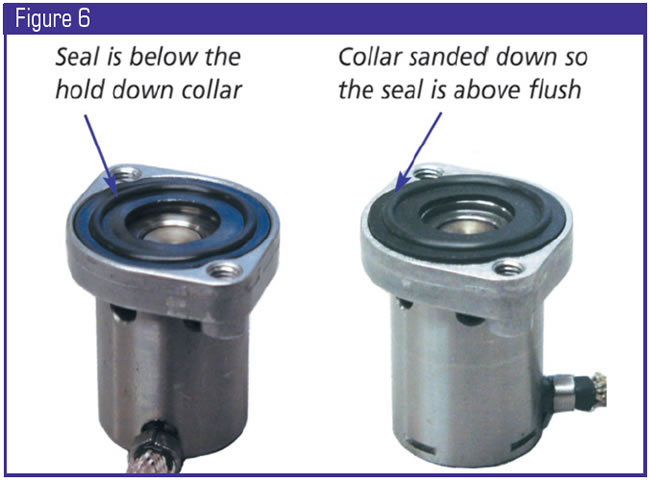
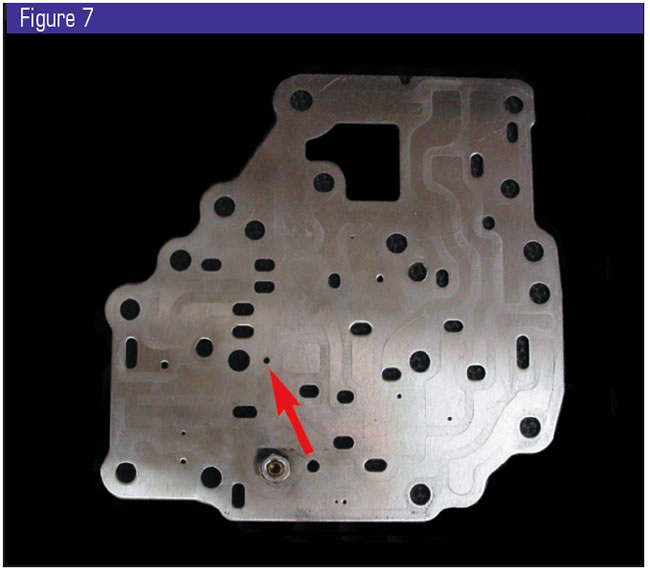
One area to check closely is where the solenoid seals against the separator plate. Make sure the outside diameter of the seal is not below the hold-down collar (Figure 6). If so, sand the collar down to where the seal is above flush. This way you should get a good seal. One other modification that may be worthwhile is to enlarge the orifice supplying 4th oil to the end-clutch valve to 0.065-0.070 inch (Figure 7). In case the end clutch ever becomes a shifting clutch, this will help to get the clutch on a little more quickly.