
Torque Converter Tech Tips
- Author: Ed Lee
If you want to rebuild a torque converter and do a good job, you need to pay attention to many details. Unfortunately, in today’s business environment that critical attention to detail is often sacrificed in the race to just get the job done and get it done quickly. If you were fortunate enough to have a good mentor when you were learning about torque converters, you learned that there’s a right way and a wrong way to perform most tasks. In some cases there’s a right way and several wrong ways to do the same job.
One good example of this is installing the springs into a roller clutch. There’s only one correct way to install the spring – but three incorrect ways to install the same spring.
To understand the correct method of installing the spring, look at the spring itself (see Figure 1). One end of the spring will have a flat area where the spring rests against the retainer. The retainer may be a separate, stamped-steel piece of the roller clutch or it may be an integral part of the outer race. In either case, the flat area of the spring always faces away from the roller.
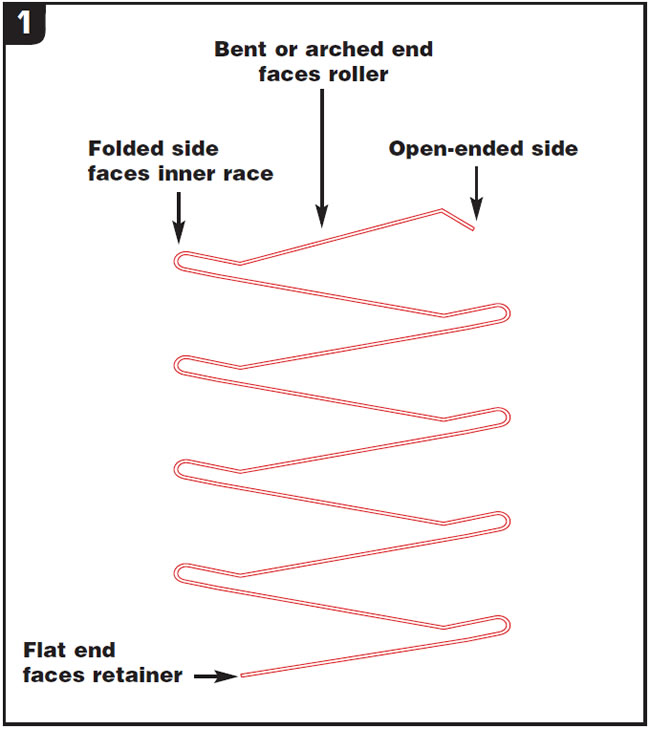
The other end of the spring will always have some sort of bend or arch, and that bend or arch configuration will always rest against the roller. Since the spring is formed from a continuous piece of metal, each end will have an open-ended side and a closed (folded) side. The next consideration is which direction the open or closed side of the spring faces. The quick and easy answer is that on the end of the spring that contacts the roller, the closed side of the spring faces the inner race of the roller clutch. To understand why the spring is installed in a specific manner, you have to look at the roller clutch.
The rollers of the roller clutch ride in wedge-shaped slots created by the ramps on one race and the smooth surface of the corresponding race. The springs always push the rollers toward the narrow end of the slots and keep them in the “ready to lock” position. It is a common practice to examine a roller clutch by picking up the assembly and rotating the inner race. The race should rotate freely in one direction and lock in the other.
This method works well for testing the roller clutch but doesn’t show the mechanics of the springs and roller. In reality, unless the stator-shaft splines are stripped or the stator shaft is broken off, the inner race never moves. Normally the inner race is fixed to the stator shaft and the rest of the assembly rotates around the race in a free-wheeling motion in the direction of engine rotation or is locked in the opposite direction by torque load. By holding the inner race and rotating the assembly around the race you can see that the spring side of the roller rotates away from the inner race.
Figure 2 shows the effect of the rotation of a roller on a spring that is installed properly. Note that the area of the second fold of the spring contacts the wall of the outer race and helps to center the spring on the roller.
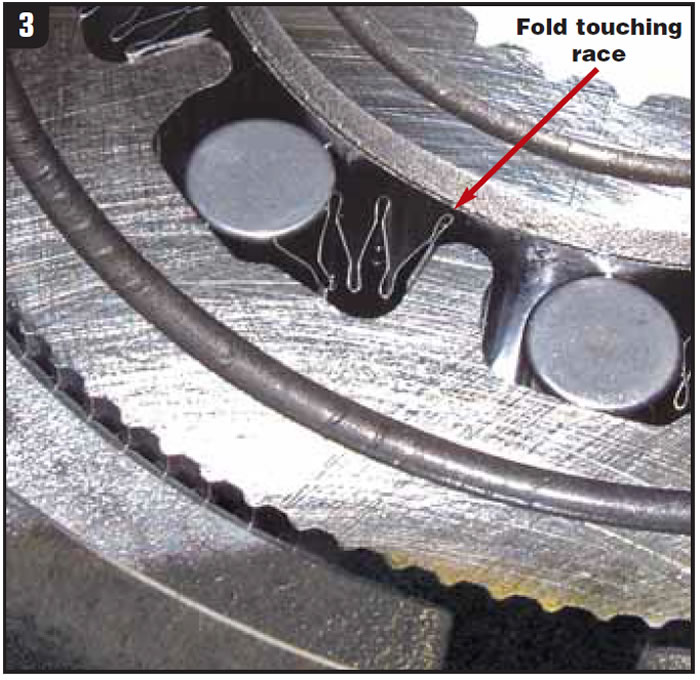
Figure 3 shows how the rotation of the roller affects a spring that is not installed correctly. Note that the open end of the spring in Figure 2 has been worn down by the roller, and the last fold of the spring near the flat end is in contact with the inner race. This contact with the inner race will eventually wear through, and the flat end of the spring will become a projectile. It is common to find small pieces of the accordion springs inside the converter. Most builders assumed that the springs were breaking from fatigue at the bends. But in most cases, a closer look at the springs showed that the springs were worn flat from contact with the inner race and there was not a jagged fatigue break.
Installing the roller-clutch springs correctly is just one small part of a good torque-converter rebuild, but paying attention to the small details will help to eliminate some big problems. You may have to invest a small amount of extra time to do the job correctly, but in the long run this small investment of time will surely pay for itself many times over.

Ed Lee is a Sonnax Technical Specialist who writes on issues of interest to torque-converter rebuilders. Sonnax supports the Torque Converter Rebuilders Association. Learn more about the group at www.tcraonline.com. ©2008 Sonnax Industries Inc.


