


A 2004 Hyundai Santa Fe developed an erratic engine stumble and initially would trigger various trouble codes such as P0301 and P0305, which are cylinder misfire codes. The issue got worse the more miles that it was driven to the point of being hard to start. The vehicle was equipped with a 3.5L engine and a five speed (F5A51) transmission with 105,000 miles on it.
In addition to the cylinder misfire codes was a P0446, which pertains to the evaporation canister that has a malfunction of the CCV (canister control valve), although no problem was found with the valve. One other more relevant code that was set happened to be a P0320, which can be triggered by an ignition/distributor sensor malfunction, which would explain the various cylinder misfire issues as well as hard starting.
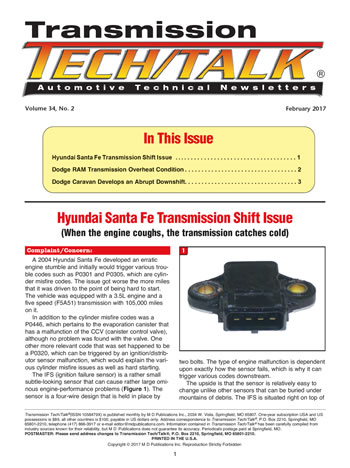
The IFS (ignition failure sensor) is a rather small subtle-looking sensor that can cause rather large ominous engine-performance problems (Figure 1). The sensor is a four-wire design that is held in place by two bolts. The type of engine malfunction is dependent upon exactly how the sensor fails, which is why it can trigger various codes downstream.
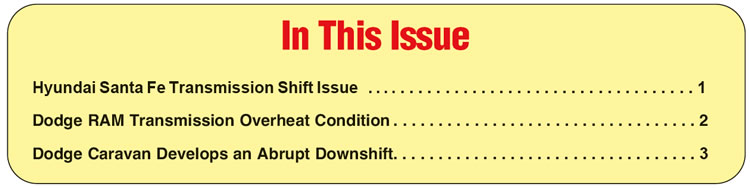
The upside is that the sensor is relatively easy to change unlike other sensors that can be buried under mountains of debris. The IFS is situated right on top of the engine in plain sight (Figure 2). The technician replaced the sensor and miraculously the engine started to run well and no more codes were set. During the final road test, however, a problem did surface that was not apparent while driving the vehicle with a crappy-running engine. The newly observed issue had to do with transmission operation only.
The transmission had erratic and sometimes harsh upshifts and downshifts; however, there was no check engine light or stored trouble codes relating to transmission operation. The question became, was this transmission problem there beforehand or as a result of the engine repair since there was no mention of it by the customer.

Not knowing the source of transmission problem, the technician had to start from scratch. Although the vehicle did have miles on it, the transmission fluid was full and looked to be in pretty good shape. The likelihood of a major internal transmission failure was pretty unlikely based upon how it operated, so initially the thought was to focus on the valve body or solenoids.
Before turning a wrench, one other component had to be ruled out that can also cause transmission shifting problems, which was the computer. Using a scanner, all sensor inputs to the computer were checked to make sure that everything was firing correctly as well as computer output signals to the transmission. Not only did everything appear to be in order, but the shifting issues that were occurring were not setting any trouble codes. One other procedure needed to be carried out.

All newer vehicles on the road today are computer-controlled to various degrees and when something goes south will require certain upgrades to make everything click. Much of the time when a repair is made, the computer may have to go through a relearn process or even something more extensive such as a reflash or an entire reprogramming. These processes are accomplished by various means depending upon manufacturer and vehicle model.
Another process that has become more prevalent over the years has to do with resetting shift adapts for the transmission. Any time that a problem has occurred on a vehicle, especially something that resulted in setting a trouble code, a disconnect can arise, affecting the computer command to the transmission. When that happens, computer strategy can enter the Twilight Zone and proper transmission operation no longer occurs. Information that has been acquired over many miles needs to go bye-bye and the computer reset to the initial factory programming.
As with doing a reflash or reprogramming, the procedure for resetting shift adapts is model specific. The Santa Fe, for instance, needed to have the computer deadheaded. The battery cables were disconnected from the battery and then connected together in order to dumb down the computer back to square one. Once done, the vehicle was re-driven and worked well initially. The more the vehicle was driven, the better the transmission shifted.
Newer years of the same vehicle now require a scanner in order to reset the shift adapts, therefore it is important to know which procedure to follow. Although the Santa Fe initially required engine work to be done, problems that bled over to the transmission still had to be addressed. Fortunately for the customer the transmission issue merely required a simple tweak.


The owner of a sizable landscape business owned several trucks, one of which was a 2011 Dodge Ram 3500. The Ram was equipped with a 5.7L engine and a 5-45RFE transmission with only 30,000 miles on it. Not only did the crew load up the truck with a lot of stuff, but much of the time a landscaping trailer was attached, adding even more weight to the equation.
In addition, when the temperature dropped and the snow started to fly, a plow was attached to do several parking lots. To say that the truck got hammered from time to time would be an understatement. Despite all that, the truck performed well for the first few years; however, as they say, all good things must come to an end.
During late summer, the operator of the truck happened to notice an increase on the temperature gauge for the transmission, especially when it was hauling the freight. As the situation got worse the owner decided to have his resident wrench check it out to avoid any meltdowns. The technician focused on the engine cooling system, which seemed to be functioning well.
Unfortunately, the tech was not familiar with the transmission cooling system, however, based upon vehicles of old, decided to bypass the transmission radiator and install an auxiliary transmission cooler. Since things were winding down with the summer landscaping work, the Dodge Ram was not exposed to the extreme loads that it was subjected to that created the temperature spike. Regardless, it was assumed that the issue was handled until of course snowplow season started. Lo and behold when the truck started to plow snow the transmission temperature gauge started to ratchet up.
By this time the owner of the vehicle decided to take it to a transmission shop and have it checked out. The shop’s technician went through the diagnostic drill to determine exactly why the temperature gauge would increase; however, the temp seemed to be normal under routine driving conditions. There were no trouble codes stored in the system and the transmission seemed to shift OK. One thing that was troubling was the condition of the transmission fluid, which was certainly discolored. In addition, the technician using a trouble light was able to see part of the torque converter and determined that it had gotten pretty hot.
Upon inspection of the cooler circuit, the tech noticed the addition of an auxiliary transmission cooler but assumed that it was sufficient to get the job done. All the cooler lines seem to be in good condition as well. Based upon the condition of the fluid and the discoloration of the torque converter, it was decided to remove the transmission and check it out in the event that something was wrong internally.
Overall, the transmission was in pretty good shape with no sign of slippage or lubrication problems so it was given a soft overhaul. Since there was discoloration of the torque converter, it was cut open to see if there were any problems with lockup; however, there were none. The transmission was reassembled and installed back into the truck along with the original torque converter and taken for a road test. Everything ran well as expected so it was returned to the landscape company to test the waters. Sure enough, when the next plow job showed up the transmission temperature gauge climbed well above 200° and back to the shop it went.
Assuming everything was right with the transmis-sion, the focus was turned to the cooler circuit and the actual cooler flow was measured to rule out any restrictions. The unit had good cooler flow. The technician started to question why an auxiliary transmission cooler had been installed and the owner of the truck told him why. At that point, the issue of cooling capacity started to be raised.
From the beginning, vehicles with automatic transmissions had a cooler tank situated in the bottom of the radiator to dissipate heat via the water from the engine. Some time ago manufacturers started to deviate from that scenario, especially on truck applications by using a standalone transmission cooler with sufficient capacity. As time went on, cooler design went one step further.
Today, vehicles can actually have a combo cooler design that uses one section for transmission fluid and the other section for air-conditioning (Figure 3A).
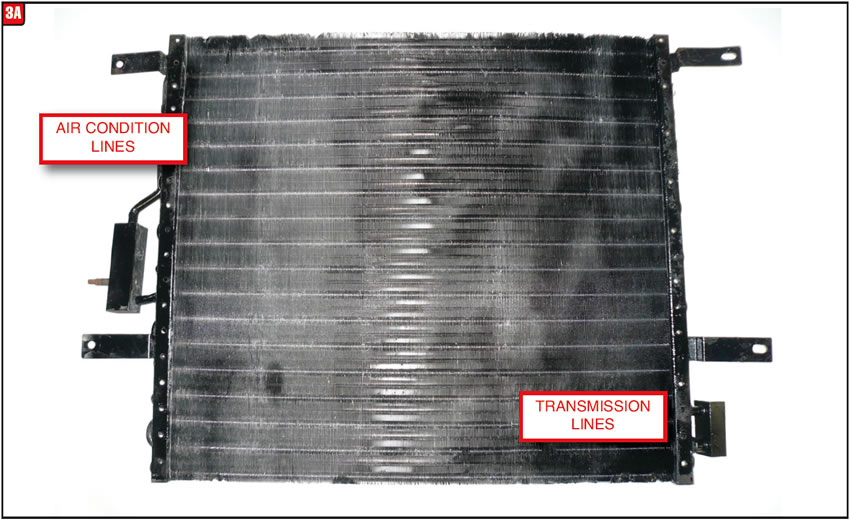
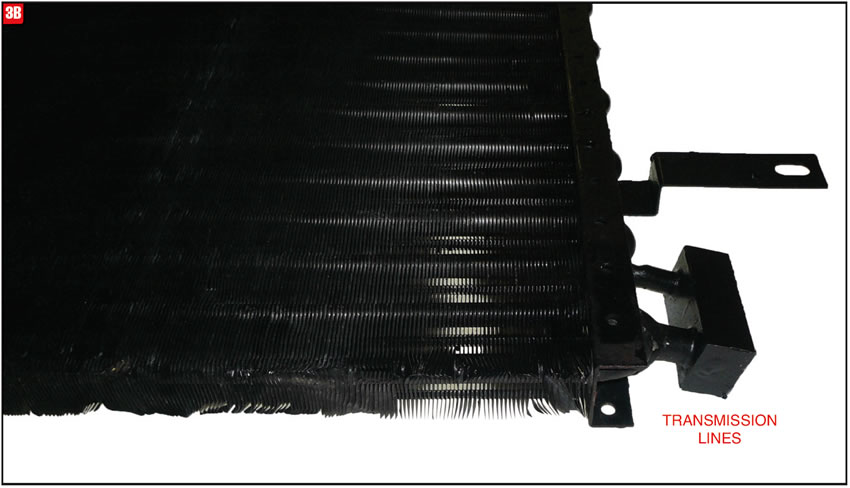
The cooler tank will have two sets of lines connected to it, one set of which for the transmission (Figure 3B). Such was the case for the Dodge Ram. It was certainly possible that the cooling capacity of the original unit became somewhat diminished leading to the initial overheating issue.
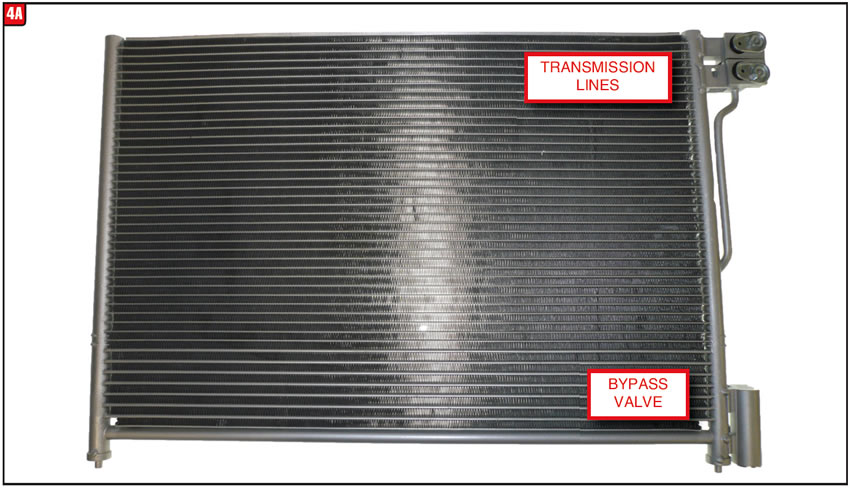
Another issue has surfaced on newer vehicles relating to cooler capacity, which has to do with the addition of a bypass valve although the Dodge Ram did not have one. An auxiliary cooler should always be inspected to determine if it is equipped with a bypass valve (Figure 4A).
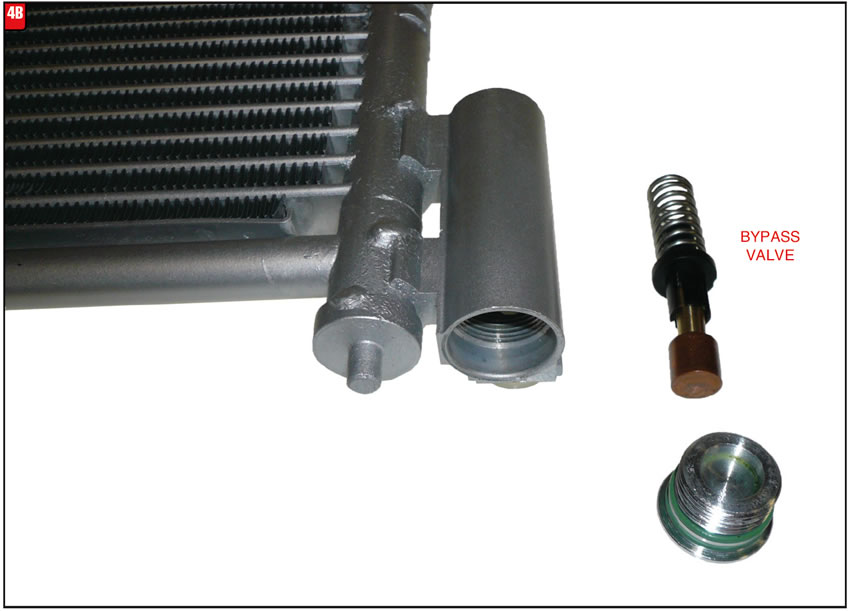
If it is, the valve should be removed to make sure that it’s clean and not stuck (Figure 4B).
Ultimately, the shop removed the auxiliary cooler that the landscaper had installed and replaced it with a cooler with a much higher capacity. Once done, the truck was put through its paces again and the temperature did not exceed the level that it was brand-new. Just goes to show the intent was correct but the execution was off just a bit. Capacity does matter in all things.


A woman was sailing merrily down the highway in her 2009 Dodge Caravan when all of a sudden the vehicle jerked and the engine rpm’s shot up, to her dismay. In addition, the check-engine light on the instrument panel started to light up, which created even more of a concern. Fortunately, she was close to an off ramp and was able to exit the highway without any collisions. After pulling into a parking lot she shut off the engine and tried to call for help, but no one was available. Finally, she decided to give it another shot, fired it up and drove away. To her surprise everything worked well and had no check-engine light – for the rest of the day that is. Sure enough, two days later it happened again.
The Caravan was equipped with a 3.8L engine and a 62TE six-speed automatic with only 68,000 miles on it. Up to this point the vehicle had been fairly reliable and ran well so the owner was planning on keeping it for a while. After the issue occurred a third time, the woman decided to bring it to the shop and have it checked out.
The technician took the vehicle for a road test and of course the transmission shifted great and no check-engine light, so the tech brought it back to the shop and hooked up a scanner to do it again. It took a while, but finally the shifting problem occurred and the check-engine light came on. The only trouble code that was stored in the system was a P076A, which refers to a direct clutch solenoid circuit-failure issue. The technician now had something to work with so the investigation began.
Since the trouble code that was set referred to an electrical problem, external issues such as the wiring harness and connectors needed to be ruled out. There are actually several conditions that can trigger a P076A and other codes can be set relating to a direct clutch solenoid problem. Chrysler has a rather extensive procedure to go by to discern whether the problem is internal or external. A scanner with the proper feature can be used to check for an inconsistent connection such as a corroded wire or terminal by using a wiggle test. Resistance values in the system as well as the direct clutch solenoid itself can also be tested.
Following the procedure, the technician was able to thoroughly test the electrical harness and other connections and was unable to find any broken or corroded areas. He then went on to check power, ground and resistance values and everything seemed to check out OK. Using a wiring schematic, the technician tested the resistance value of the direct-clutch solenoid and found that the number was a bit off indicating a bad solenoid (Figure 5). Note that the DC solenoid wire is T82.
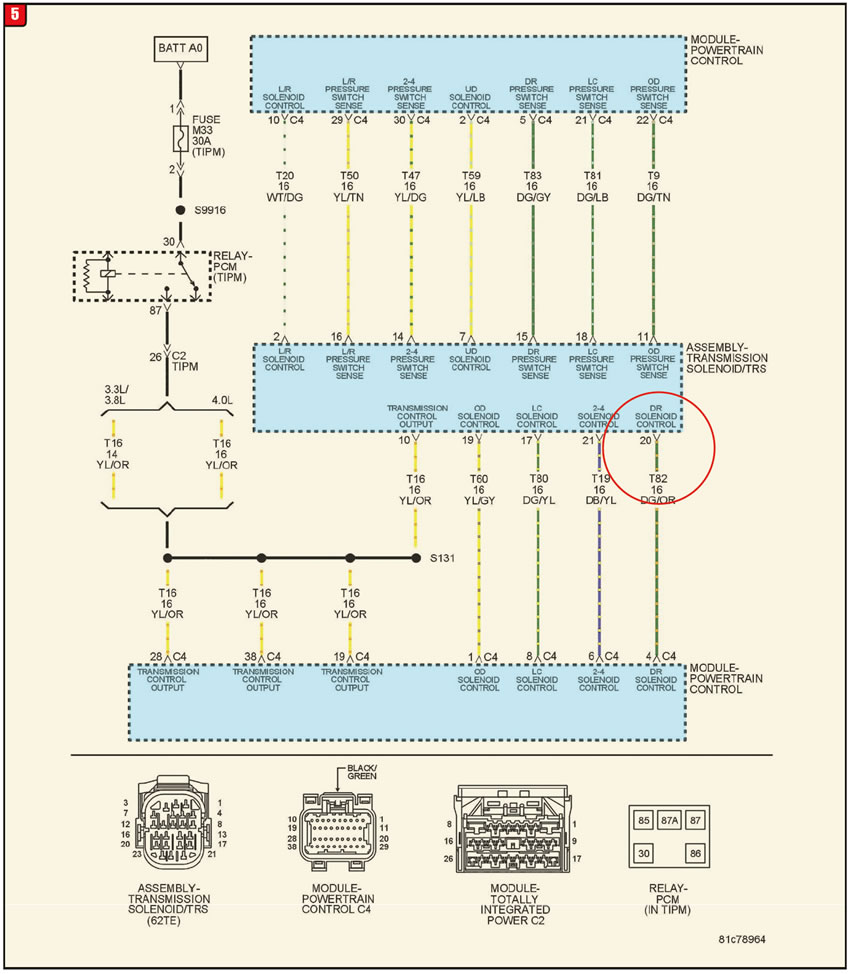
Confident that he found the problem the solenoid body was removed for inspection. The solenoid assembly on a 62TE is substantially different than its four-speed predecessor the 41TE (Figure 6). Even when Chrysler released the 41TES in 2007, the new six-speed setup still takes first prize as far as total stuff inside.
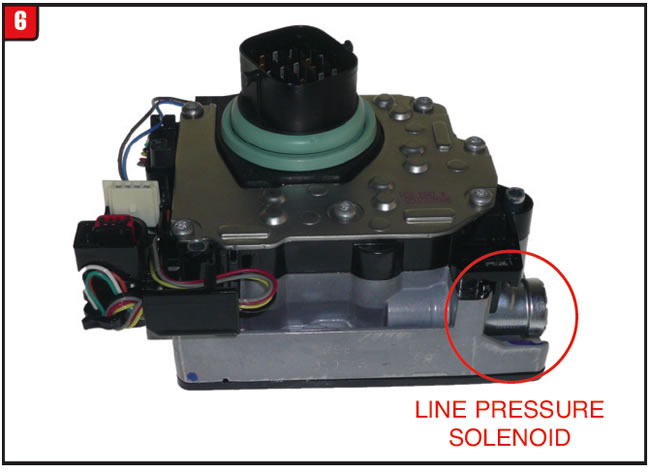
The 62TE contains six solenoids, five pressure switches, line-pressure transducer and three RPM sensors along with an internal range sensor. The TCC solenoid and line-pressure transducer are mounted to the valve body instead of the solenoid body. There is one other item connected to the solenoid assembly that also needed to be checked which can cause similar issues and that is the solenoid screen plate (filter plate). Always inspect the screen plate for any worm track blowouts regardless of transmission type.
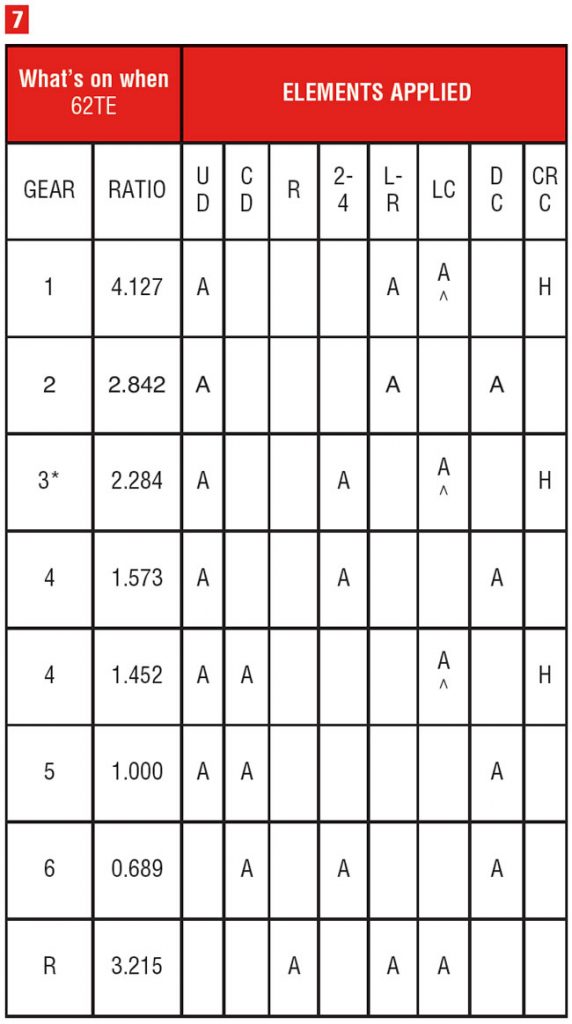
Fortunately for the vehicle owner a new solenoid assembly was installed and worked well as opposed to a more critical issue which could have been the case. The direct clutch solenoid controls one of the most troublesome areas of the 62TE which is of course the underdrive direct clutch assembly. The underdrive (compounder) direct clutch and low clutch is what makes a 62TE a six-speed model beyond the 41TE four-speed models. The direct clutch cycles on and off between first, second and third gears (Figure 7). The 62TE can actually have seven speeds due to the forth prime position. Forth prime is there to avoid a double swap feel during certain shift conditions. Follow the chart closely when diagnosing a problem. The issue that the customer was having could have just as easily been attributed to the direct clutch due to the low clutch drum sealing ring wear which affects direct clutch apply.
Chrysler has addressed the sealing-ring wear problem by switching over to non-rotational sealing rings similar to a 4T60E scenario. When rebuilding a 62TE it is always advisable to upgrade to the new design low clutch housing. In this case the upgrade was not needed; however, as time goes on it may be.

February 2017 Issue
Volume 34, No. 2
- Hyundai Santa Fe Transmission Shift Issue
- Dodge RAM Transmission Overheat Condition
- Dodge Caravan Develops an Abrupt Downshift


