


A customer arrived at the shop with the complaint of an inconsistent check engine light, or MIL (malfunction indicator light). The vehicle was a 2008 GMC Acadia with a 3.6L engine and 6T70 transmission. It had 112,700 miles on it; however, the transmission did not exhibit any drivability problems.
A scan tool was connected and trouble codes were retrieved. There were three codes that appeared: P0752, P0877 and P0989. The P0752 indicated the number one shift solenoid, and the P0877 and P989 indicated a faulty transmission-fluid pressure (TFP) switch.

Ultimately, the culprit was one of the pressure switches, which are part of the mechatronic valve body (TEHCM). There also could have been an issue with the number one solenoid; however, itʼs academic because currently only the entire assembly is available, not individual solenoids.

Older transmissions that would produce a check engine light with or without other symptoms were not much of a problem. Pull the trouble codes and then replace the offending part; simple, right?
Newer transmissions that have a TEHCM (transmission electro hydraulic control module) are a bit more difficult to deal with.
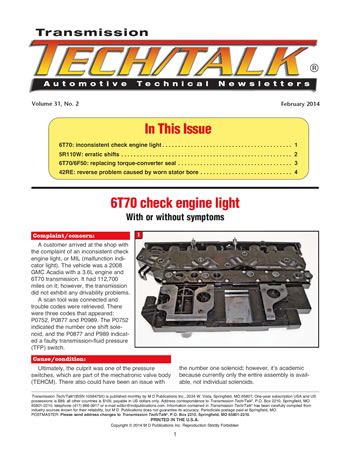
The TEHCM on the 6T70 is a rather compact unit that contains a lot of stuff (Figure 1). In addition to the plastic assembly containing the TCM, it also contains all of the solenoids used by the 6T70 (all eight of them). The pressure switch, which was normally part of the pressure-switch manifold (PSM) in older transmissions, is part of the 6T70 TEHCM as well. The only item that is currently available separately on the 6T70 TEHCM is the screen plate, which is included in most OE and aftermarket rebuilding kits.
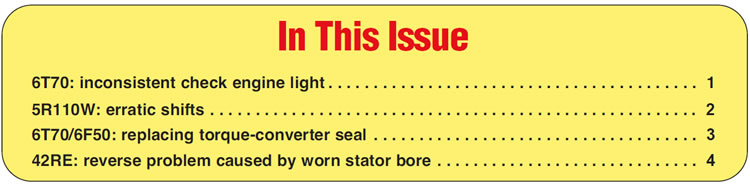
One of the issues concerning the 6T70 has to do with the pressure switches. After a certain amount of miles (usually more than 50,000), one or more of the switches start to deteriorate (Figure 2). Either the switch covering or the rubber seal can fail, which will trigger the codes.
Unfortunately, repair of the switches is not possible, which means that the TEHCM must be purchased – for several hundred dollars. Beyond that, since the TCM is included, reprogramming of the unit must be done as well. If a shop does not have the proper equipment, then the vehicle would need to go to an OE dealership for re-programming or find someone that specializes in it.
GM is aware of the problem, and improvements have been made to the replacement TEHCM. The upgraded unit can be identified by the white TFP-switch color (Figure 3). The upside is that beginning in 2013, GM started to phase in the Gen 2 models, which no longer use TFP switches.

This scenario will continue to increase as other transmissions go to a mechatronic valve body. Understanding component cost and reprogramming procedures can only help when a vehicle arrives having a check engine light, with or without symptoms.


A 2007 Ford F-250 HD truck equipped with a 5.4L engine and 5R110W transmission experienced erratic shift conditions. In addition, the tow/haul indicator light would flash periodically and a P0713 trouble code would set as well. The problem would not happen initially. The vehicle needed to warm up somewhat before things started to happen. The transmission worked well for a bit, even though it had more than 180,000 miles on it.
Although various internal or external components could contribute to these types of problems, the particular cause of this one turned out to be the transmission-fluid temperature (TFT) sensor.
Computer-controlled automatic transmissions have always required some type of transmission-oil temperature (TOT) sensor for temperature input. As computer systems became more sophisticated, accurate temperature readings became more critical for proper operation. Internal line pressure, shift strategy and lockup all rely on correct temperature information. TOT (TFT) sensors have varied in size, shape, location and function depending on transmission model. Some sensors may even be in a cooler-line circuit.
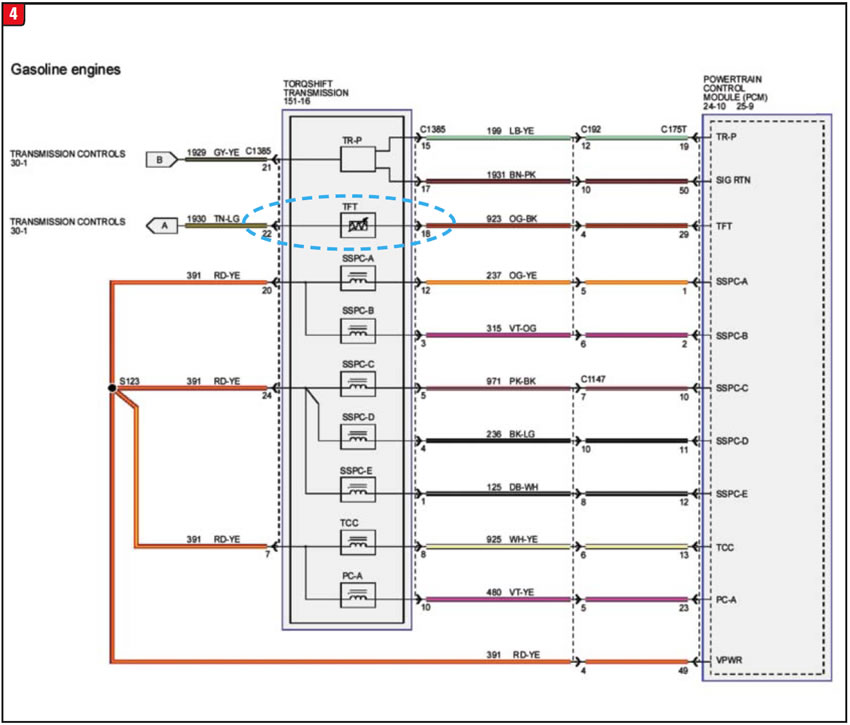
The TFT on the 5R110W is on the valve body and uses pin numbers 18 and 22 (Figure 4). The solenoid harness and connector terminals plug into the TFT sensor, just like the solenoids. Some transmission models hardwire the harness and TFT together.
There are several diagnostic trouble codes that relate to the TFT. The P0713 indicates a “low” out-of-range condition that occurs at the wrong time. During the diagnostic test, the scan tool showed a gradual increase in temperature, but then the reading went to nothing, which set off the symptoms.
The computer must see a consistent, gradual change in the resistance value of the TFT in order for everything to function well (Figure 5). How the readings change will determine which trouble code might be set relating to a problem.

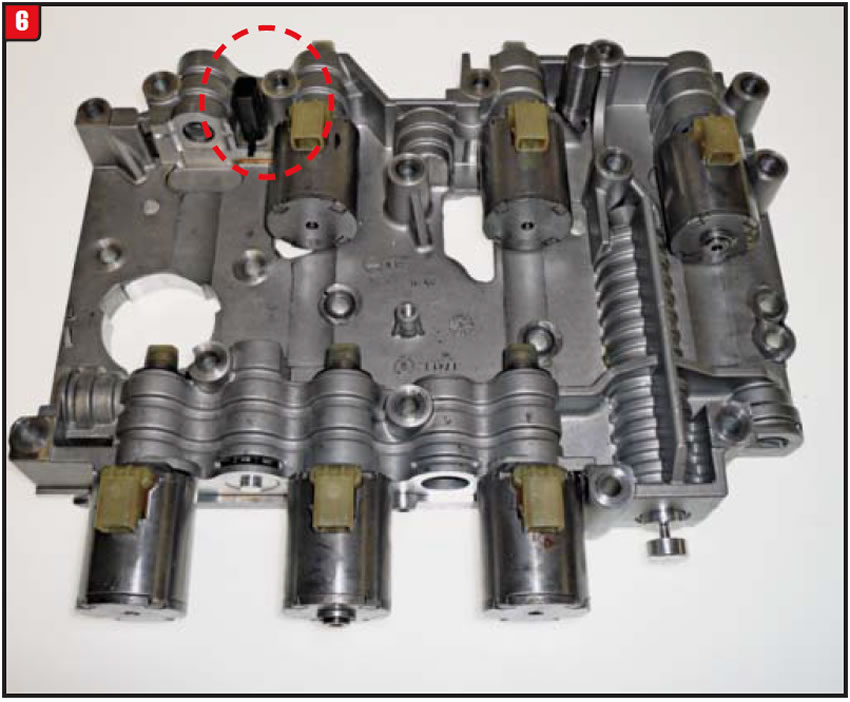
Once it is determined that a TFT problem exists, the pan will need to be removed to expose the solenoid body (valve body) and electrical harness. The harness connections should be checked first to ensure the integrity of the wires and terminals. If all checks out to be good, then on to the TFT.
As stated, the TFT sensor plugs into the valve body (Figure 6).
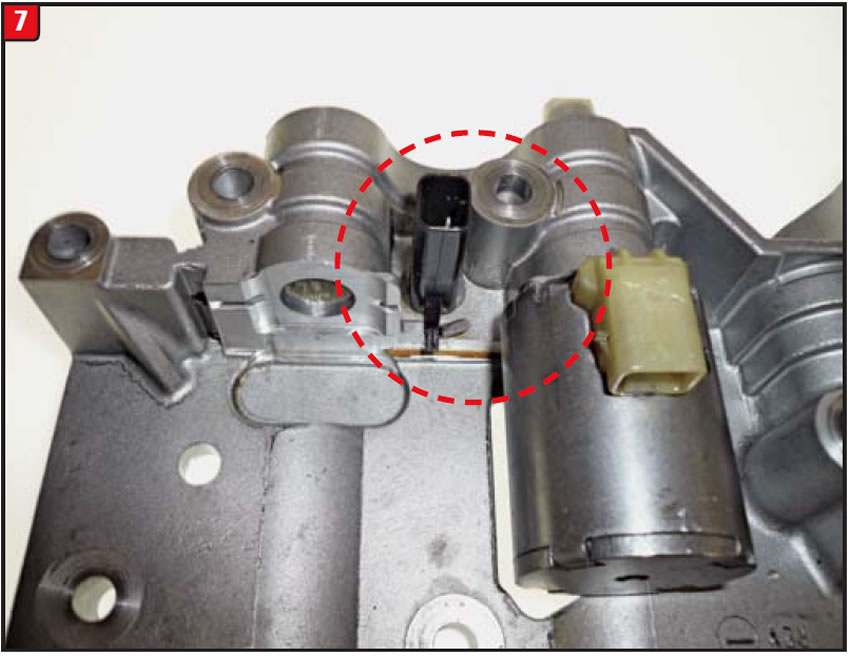
To avoid breaking the TFT during removal, refer to Figure 7. The close-up of Figure 7 shows a plastic tab sticking out from the sensor. Pull down on the tab, rotate the sensor counterclockwise and pull it out of the solenoid body.
To reinstall, merely push the new sensor back into the body and twist clockwise. The tab will lock into position. Plug in the harness and replace the pan. Using a scan tool, retest the new sensor to ensure proper operation.
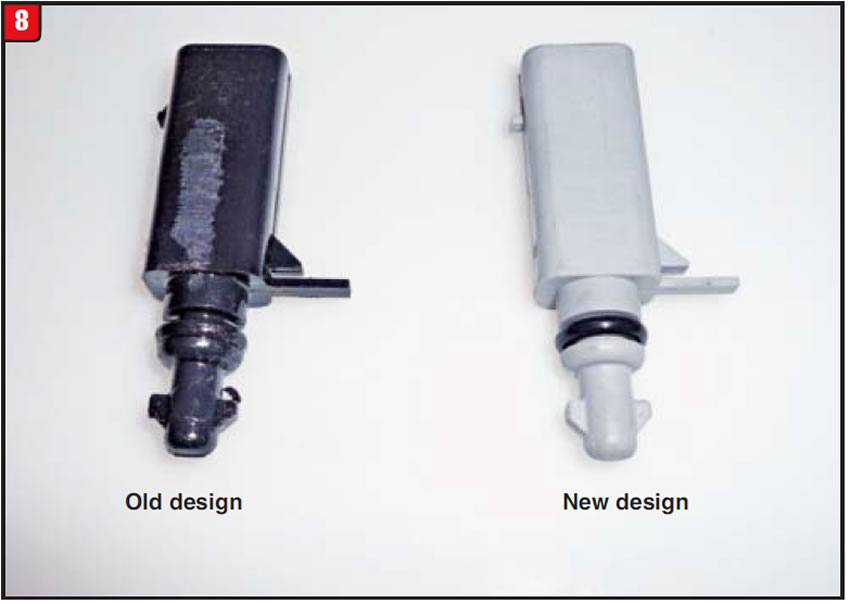
Over the years, minor changes have been made to the TFT sensor; however, the current application will retrofit to 2003 (Figure 8). Note the tangs on the sensor that hold it in place.
With all the iron that makes up a transmission, it is still the little things that mean a lot.


There are various procedures that pertain to the repair of any transmission. Some are minor, while others are relatively more difficult. Regardless, any procedure that is done incorrectly can certainly spell big trouble in the end. Such is the case with the 6T70/6F50 transmission family when it comes to changing the torque-converter seal.
Normally, changing a pump/converter metal-clad seal is no big thing, but on the 6T70/6F50 popping the seal out of the pocket can be a chore. To start with, the seal manufacturer must use “super glue” in the bore coat that goes around the out-side diameter of the seal.
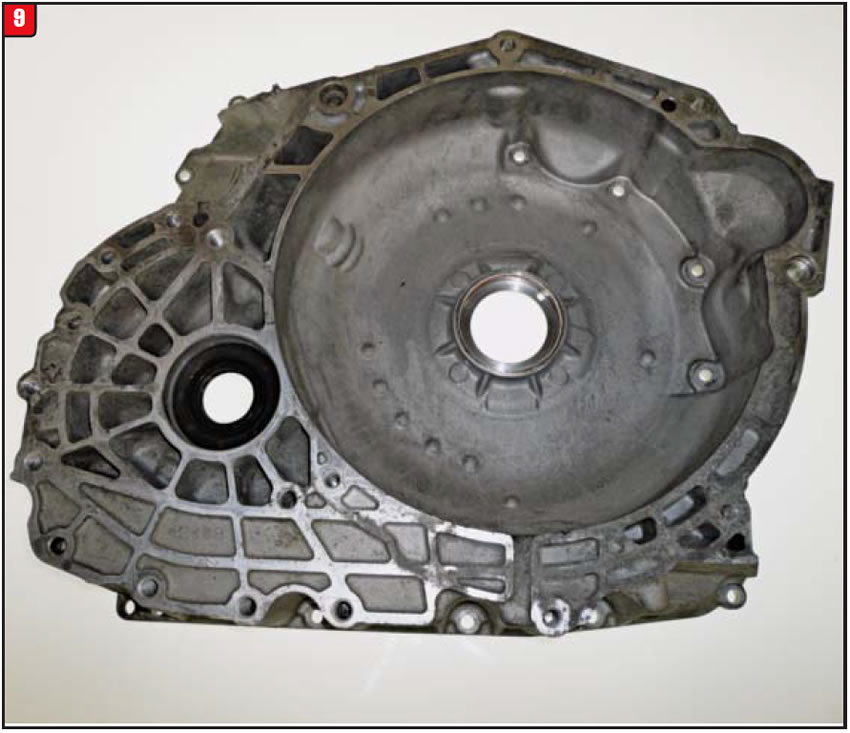
Next is the position of the seal. On the GM 6T70 bell-housing the seal is set down in a fair amount, making a side shot with a chisel a little tough (Figure 9). Note that there is a drain-back hole in the bore of the housing to provide a rear access to the seal. The problem is that the bellhousing has to be removed from the case.
At least on the Ford 6F50 bellhousing, there is a window at the side to provide access to the edge of the seal. The problem is the strength of the side wall of the seal bore.
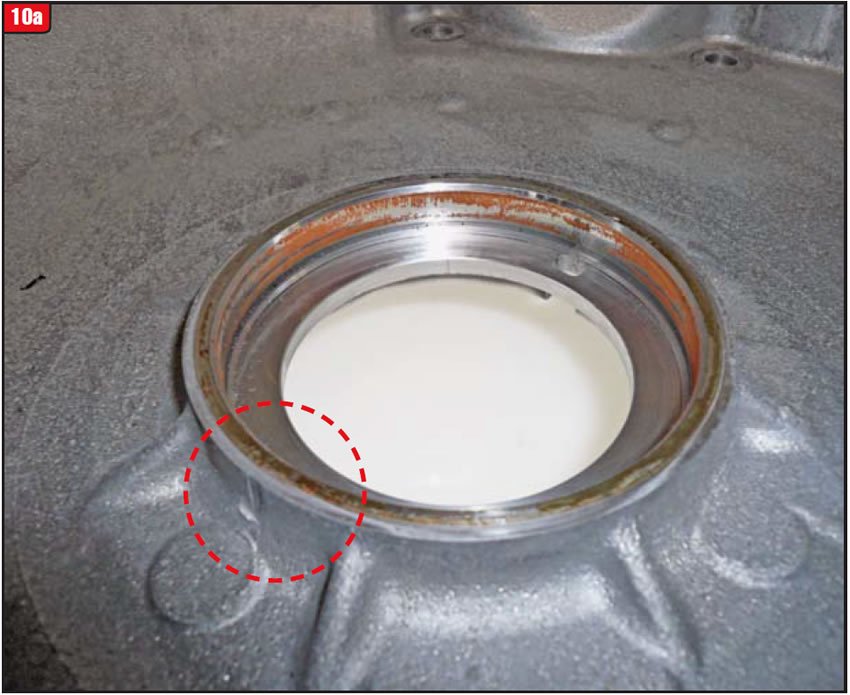
There have been reports of the side wall of the seal pocket breaking because of the technician trying to remove the 6T/6F seal just like with any other transmission. The reality is that the wall thickness may vary from model to model (figures 10a & 10b).
Note the thickness of the side wall of the housing in Figure 10a, which happens to be GM.
Compare that with the housing in Figure 10b, which is Ford.
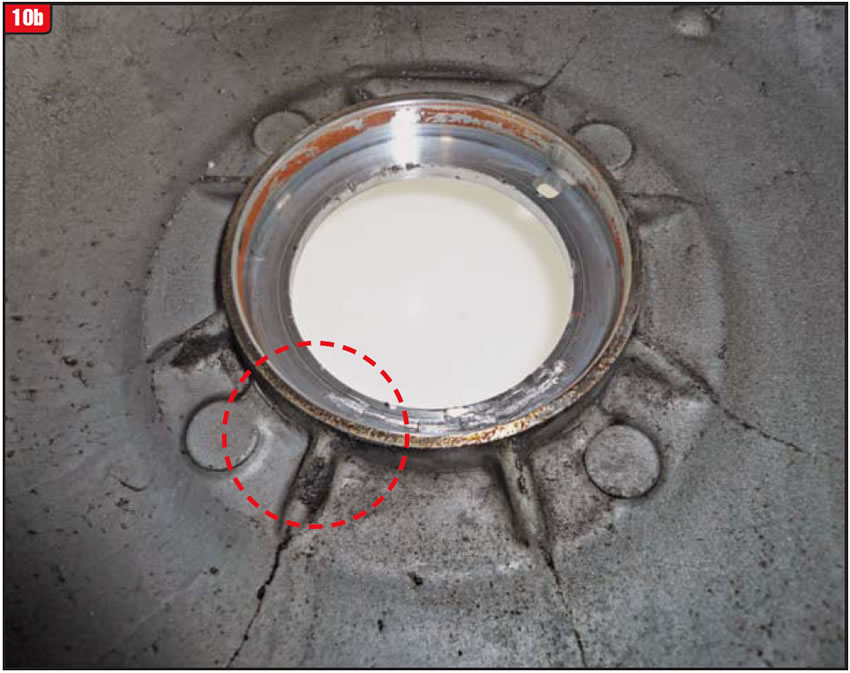
The wall thickness of the Ford housing is noticeably thinner than that of the GM. Whacking the seal from the wrong direction could result in taking out a chunk of the seal pocket. If that happens, guess what: The shop eats a bellhousing.
So be aware of the potential and use some caution with the hammer and chisel so that in the end, a minor task does not become a major headache.

A customer with a 2002 Jeep Cherokee 4.0L engine and 42RE transmission complained of some kind of reverse bumpety-bump, but only when the vehicle was cold. As the vehicle warmed up, reverse started to function correctly.
Initial park/reverse, park/drive application was good cold and hot, as were all upshifts and lockup. There was no binding or neutral drag either.
The reverse condition was similar to a hopping sensation, almost like a caliper sticking against a warped rotor. Throttle position did not seem to affect the condition; only temperature change did.
During a preliminary brake inspection, one of the calipers was found to be sticking slightly; however, it turned out not to be the cause.
The vehicle was a 4WD, which meant that there could also be a transfer-case issue. Once all external possibilities were ruled out, the transfer case was also inspected and found to be in good condition. Finally, the transmission was removed and disassembled.
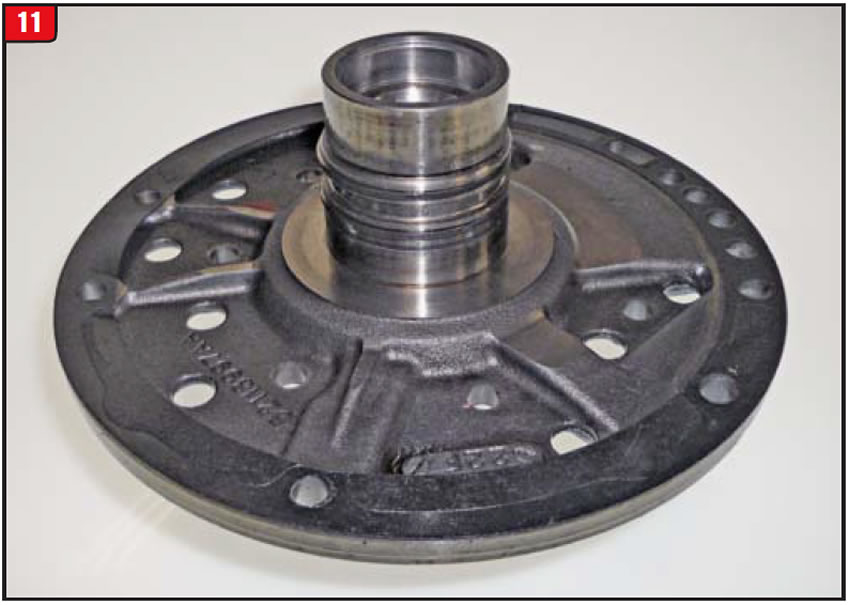
Once the transmission was disassembled, the inspection revealed a worn stator support and input shaft (figures 11 and 12). The rear clutches were slightly burnt and the rest of the components, although having more than 100,000 miles on them, were not too bad. So, how could a worn stator bore cause that type of reverse problem?
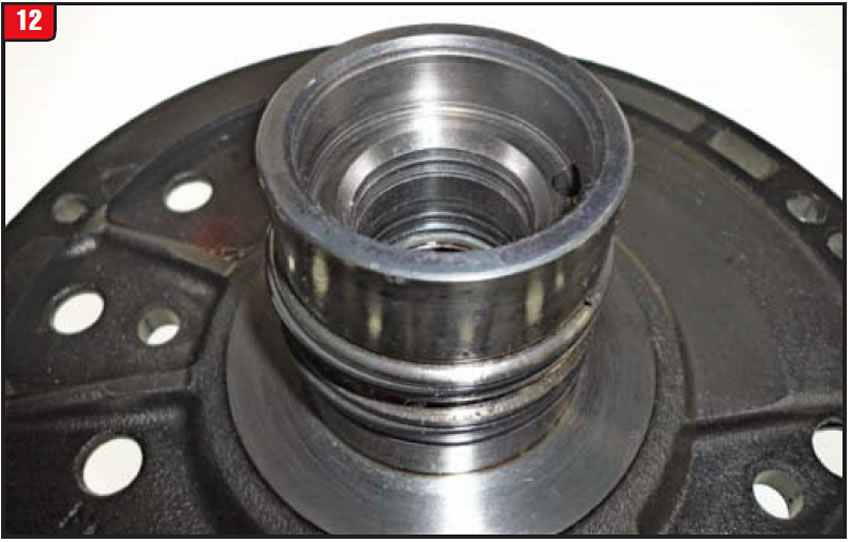
Apparently, the rear clutches were partially applying in reverse because of the worn bore in the stator.
Normally, the symptoms of a worn stator bore would be a soft or slipping park/drive apply, a neutral drag or creep, or a lockup converter issue. In addition, it would make sense that the conditions would get worse as the vehicle warmed up, because of the cross leak (Figure 13). The 42RE that was in the Jeep certainly did not conform to the norm.
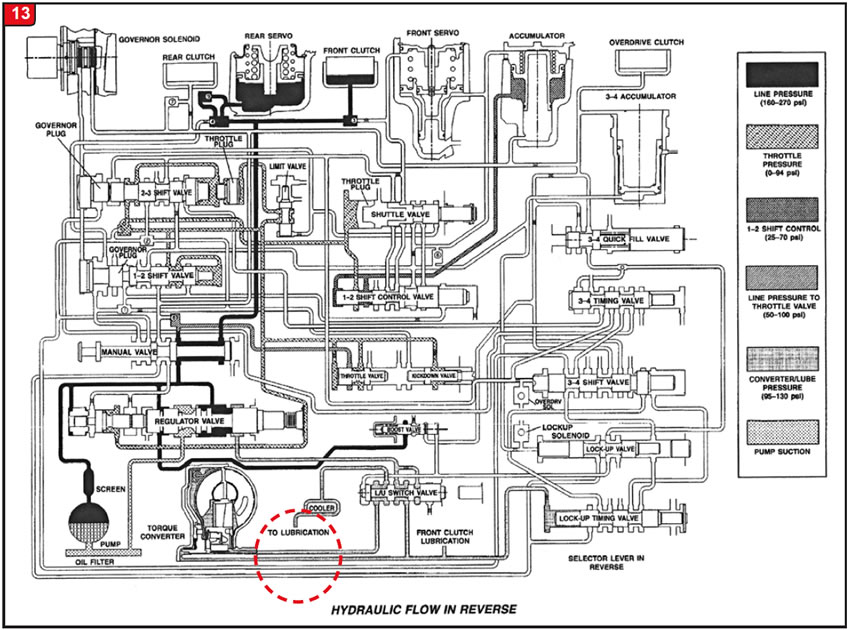
Although the fluid that would leak into the rear-clutch apply circuit comes from the torque converter, in reverse, pressure is boosted substantially, which would explain why the rear clutch was being partially applied in reverse and not in neutral.
Along with the reverse-pressure boost is the fact that when fluid is cold it will tend to provide more pressure than when hot. Once the unit warms up a little, the fluid thins and will leak out due to cross leaks or, say, worn sealing-ring bores.
The oil schematic in Figure 13 illustrates where the fluid goes when everything works correctly. It will not show where the fluid goes when things go awry, such as how the fluid would cross over where itʼs circled. When youʼre searching for the problem it always pays to read between the lines.

February 2014 Issue
Volume 31, No. 2
- 6T70: inconsistent check engine light
- 5R110W: erratic shifts
- 6T70/6F50: replacing torque-converter seal
- 42RE: reverse problem caused by worn stator bore


