R&R Tech
- Author: Kevin Wayne
- Subject Matter: 2003 Chevy 2500 pickup, 4L80E
- Issue: P1860 code
Work through the problem on paper first
Like many of you, this time of year I am usually asked to assemble a variety of items and gifts for my family members. In light of these requests, I have spent a significant amount of time analyzing why we waste so much time assembling, disassembling and re-assembling items out of an unwillingness to simply read the instructions. Often this process results in leftover spare parts and frustration.
I often marvel at how this happens, considering the detailed product resources typically provided by the manufacturer. This information usually contains step-by-step instructions that, when followed, virtually guarantee success. Yet, whether due to pride, an attempt to save time, or simply thinking we know better, more often than not we fail to take advantage of this information. It is this concept of properly using information that I wish to apply to the diagnostic automotive field.
We often spend time projecting what we believe is going wrong onto the vehicle diagnosis, rather than diagnosing the vehicle with an open mind and allowing the vehicle to dictate the direction we should go. We fail to look up the necessary information because we assume we already understand what is happening. When there are not direct, step-by-step instructions on what the problem is, almost all of us have a way of researching how a system works. These might include wiring diagrams, apply charts and Passbooks with information and notes added to them from previous experiences. Time, money and effort are wasted when we fail to develop a systematic approach to the diagnostic process. A systematic approach is a step-by-step process that is followed the same way each time, allowing the vehicle’s facts and symptoms to dictate the direction you go.
To develop this step-by-step procedure, one should have a written sheet of the exact vehicle symptoms presented alongside an apply chart, applicable diagnostic sheets for codes, wiring diagrams and system operation information. By spending time gathering information and working through the problem on paper before ever taking anything apart on the vehicle, you can quickly devise an approach that should include starting with the quickest, easiest checks first and working your way to a more detailed or intrusive test if needed.
I have found that it is so much easier to quickly eliminate the things that can’t cause the problem when all the information is sitting right in front of you. This allows a visual, more-accurate picture of how the specific problem you are having could have been created. Additionally, this process narrows down the problematic possibilities, leaving a shorter list of things that could be a potential cause. Recently I encountered a situation that I believe adequately illustrates my thoughts.

Take this 4L80E
The vehicle was a 2003 Chevy 2500 pickup with a 6.0 liter engine and a 4L80E transmission.
Upon its arrival, I was informed that the vehicle had been to two previous shops before arriving at our shop. This truck was an old farm truck and had been treated as one might expect a work truck to be treated. The customer’s complaint was the vehicle staying in a lower gear at times, and also had erratic shifts. The first shop began by replacing the transmission with a used unit, and then a recently rebuilt one. The symptoms remained the same through the transmission changes, and led to the customer becoming aggravated and taking it to a different shop.
The new shop replaced every electrical component inside the pan in an attempt to solve the problem. This also had no effect on the complaint, which resulted in the shop recommending the customer to bring it to our facility.
Upon test-driving the truck, I noted that it would shift into the 1st, 2nd, 3rd, and 4th gears, but a little on the firm side. After achieving 4th gear, which it would only do for two to five seconds, the transmission would quickly go back into 2nd gear and stay there until I brought it to a stop. As I started through the gears again, the exact same pattern would happen. Once it downshifted to second, it would not come out unless I brought it to a complete stop. I also noted that as I downshifted out of overdrive the transmission would shift into 3rd gear.
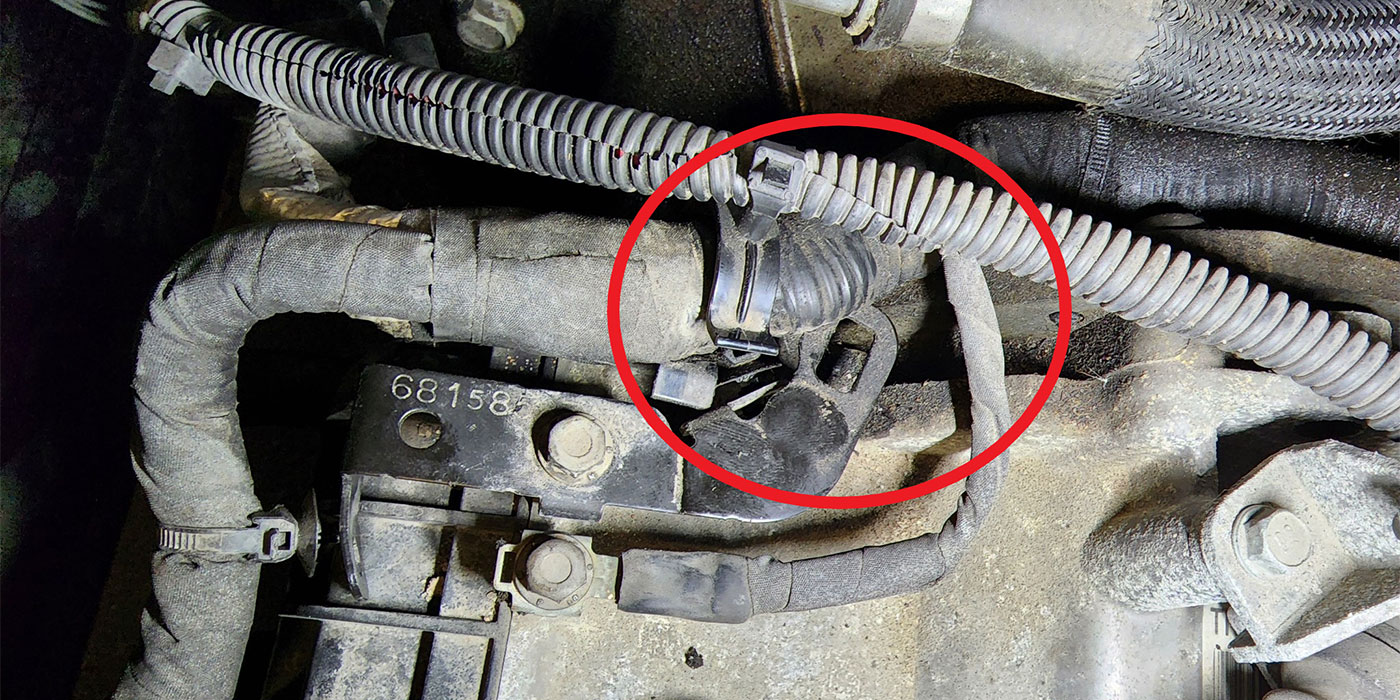
While staying out of overdrive, if I came to a stop and took off again it would shift 1st through 3rd just fine, and worked as designed. The transmission was setting a P1860 torque converter clutch PWM solenoid circuit code and the fluid appeared to look brand new. While on the initial test drive I took my scanner and had the screen customized to show specific PIDs, solenoid 1-2, solenoid 2-3, input and output speed sensors, vehicle speed, gear command and gear ratio. According to solenoid data, the transmission should have been shifting normally based on the solenoid signal commands.
This screenshot (Figure 1) is from the truck when it was stuck in second gear.
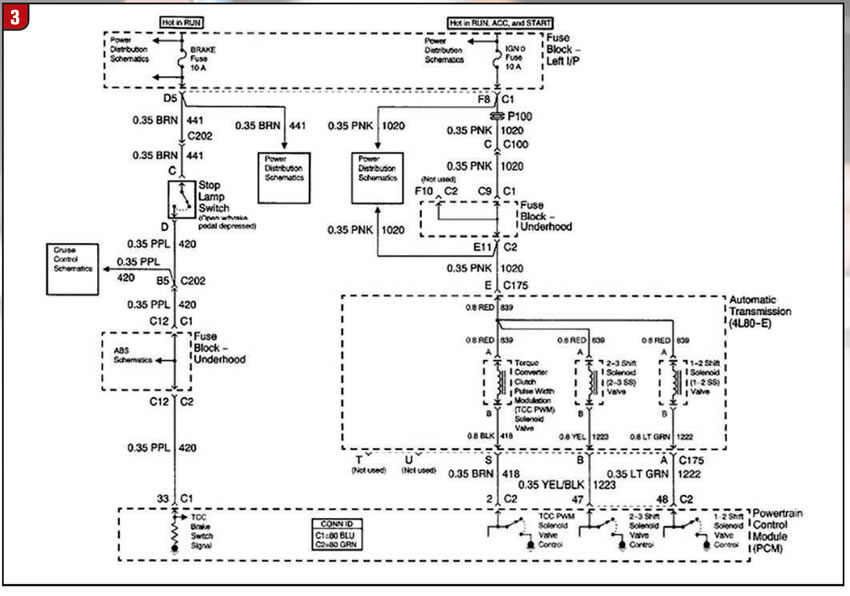
Next, I sat down with my check-out sheet and retrieved a copy of an apply chart from my 4L80E Passbook, a complete transmission circuit wiring diagram, and diagnostic code description sheet for the P1860 code. The first thing that stood out to me when looking at the apply chart was that in this transmission, both solenoids off would be 2nd gear (Figure 2). In like manner, both solenoids on make 4th gear.
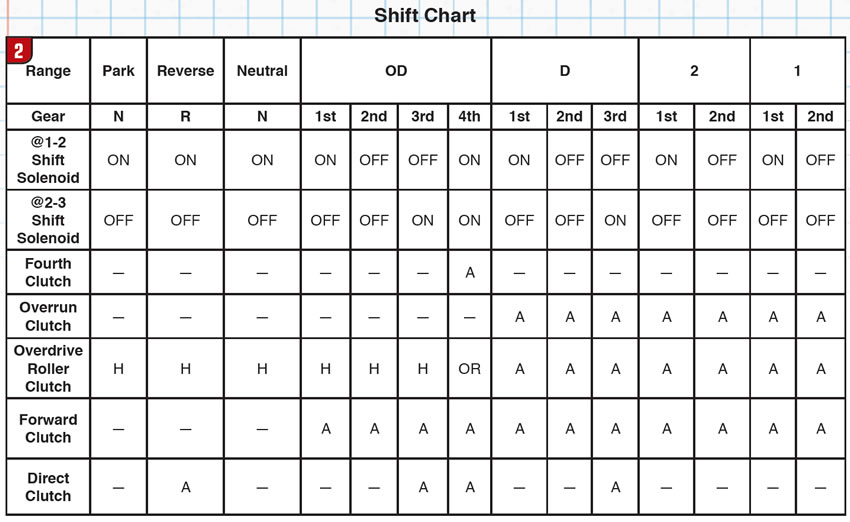
Armed with this information, I was already starting to believe that I had a ground or power problem; when both solenoids are energized it would be drawing max current, and obviously no current would be 2nd gear. As I looked at the wiring diagram and code information I noticed that all the solenoids got their power from one source, including the torque converter clutch solenoid of which I have a DTC for. Based on this quick information, I already have a really good idea of what I want to test first (Figure 3).
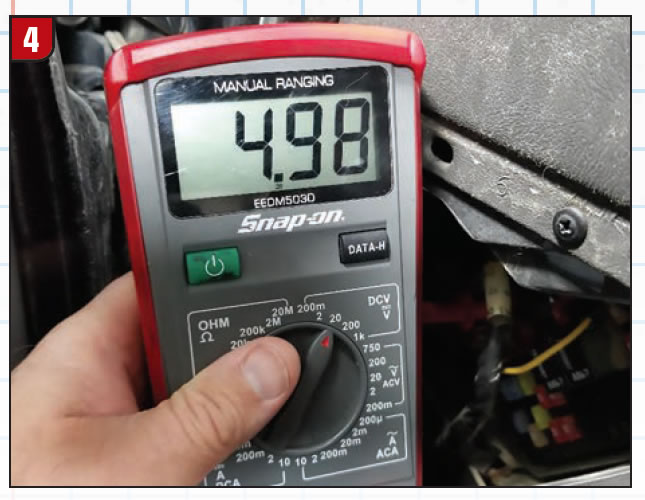
I decided to test voltage to all the solenoids at the ignition fuse IGN in the fuse box. To me this seemed to be the fastest and easiest test and would lead me to the cause of my problem.
I removed the fuse cover and used my voltmeter to check voltage at the fuse (Figure 4). Sure enough, I only had 4.98 volts key on. If I played with the ignition switch, voltage would vary but would never go over 6 volts. This would obviously cause the problem that the truck is having. The voltage was enough to fire each solenoid individually but when both were commanded on, current was insufficient to operate both solenoids at the same time and it then would go into second gear.
I recommended an ignition switch 23 minutes after I climbed into the car for a test drive. The ignition switch was replaced and the transmission shifted normally with no codes.
I know this is a problem many of you may have seen before. The diagnostic process was basic. However, keep in mind that this vehicle had been to two other shops and the customer had spent a significant amount of money and time attempting to solve the transmission problem. I believe this was due to a lack of organization by the other shops and failure to gather enough information about what exactly was going on. Rather than taking an organized, systematic approach, supposed solutions were thrown at the problem in an attempt to fix it. Almost always, this is because we don’t completely understand what it is that is happening. Gathering, printing and writing down all the information during the initial check-out may seem like it could take a significant amount of time and effort, especially when gathering it for the first time. After you develop the discipline to do so, it becomes a comfortable process. Having all the necessary information in front of you enables the easy organization and understanding of potential causes.
With the correct information you are able to know, and not just assume, keeping you on a focused track to finding out what the problem is, and significantly saving wasted time, money and effort. This process alleviates mistaken thoughts and helps us remain focused, addressing the problem as a new one, not projecting previous diagnoses onto the vehicle.
To me it is clear: By taking the time to gather a complete an accurate list of information and working through the problem on paper, it will always help you make a more focused and efficient decision.