Diagnosing Solenoid Performance Faults in A761, AB60 & A960 6-Speed Units - Transmission Digest

Diagnosing Solenoid Performance Faults in A761, AB60 & A960 6-Speed Units

The Toyota/Lexus A761, AB60 and A960 6-speed transmissions have been showing up in shops more frequently over the last couple of years. Warranties are expiring and people seem to be hanging on to their vehicles longer these days. Even so, there are a number of different issues with these transmissions, including torque-converter clutch failure that is especially chronic with AB60 Tundra applications. Common to all these units is a problem that sticks out a bit more than the others, though: on-off solenoid mechanical fault codes. You’ll see these as P0751 S1 solenoid performance, P0756 S2 solenoid performance, P0761 S3 solenoid performance and P0766 S4 solenoid performance codes.

Diagnosing Solenoid Performance Faults in A761, AB60 & A960 6-Speed Units

TASC Force Tips

Author: Jim Dial
Subject Matter: Solenoid diagnostics
Units: A761, AB60 & A960 6-speed transmissions
Issue: On-off solenoid mechanical fault codes

TASC Force Tips

  • Author: Jim Dial
  • Subject Matter: Solenoid diagnostics
  • Units: A761, AB60 & A960 6-speed transmissions
  • Issue: On-off solenoid mechanical fault codes

The Toyota/Lexus A761, AB60 and A960 6-speed transmissions have been showing up in shops more frequently over the last couple of years. Warranties are expiring and people seem to be hanging on to their vehicles longer these days. Even so, there are a number of different issues with these transmissions, including torque-converter clutch failure that is especially chronic with AB60 Tundra applications. Common to all these units is a problem that sticks out a bit more than the others, though: on-off solenoid mechanical fault codes. You’ll see these as P0751 S1 solenoid performance, P0756 S2 solenoid performance, P0761 S3 solenoid performance and P0766 S4 solenoid performance codes.

These types of Diagnostic Trouble Codes (DTC) set when the transmission control module (TCM) commands a specific gear and an incorrect ratio is shown from the input and output speed sensors. As an aid for diagnosis, the TCM will set a DTC related to the solenoid or combination of solenoids responsible for that gear ratio. This can be a tricky situation, as the same performance codes also can set when a clutch in charge of holding the gear ratio is slipping or neutraling out. Immediately throwing new solenoids at the problem can be an expensive mistake if the clutch actually is to blame. The key to diagnosing the problem right the first time is verifying solenoid commands and gear ratios with a thorough road test and capable scan tool.

The trouble area that these three transmissions have in common relates to the feed that these solenoids are provided. On-off solenoids typically are fed reduced pressure from a solenoid modulator valve or fed line pressure through a very small orifice to prevent flooding. Oddly enough, these 6-speed solenoids are fed regulated, non-orificed line pressure from the manual valve. You can count this as your little-known and even less-cared-for fact of the day, but it’s an extremely important one.

The significance of the unusual feed system is where our problem lies, because there is another on-off solenoid connected to same oil circuit feeding the solenoids: the SR solenoid. This particular solenoid does not have a performance code connected to it to aid in diagnosis. The fact of the matter is that the trouble codes listed really are of no help other than pointing us to the solenoids. The actual problem is deeper: It is the solenoid feed.

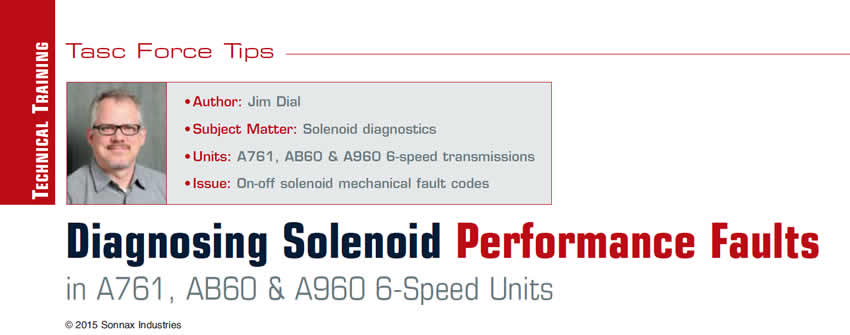
Figure 1 shows the locations of S1, S2, S3, S4 and the SR solenoid where you can see an exhaust port deeper in the bore from the SR solenoid.

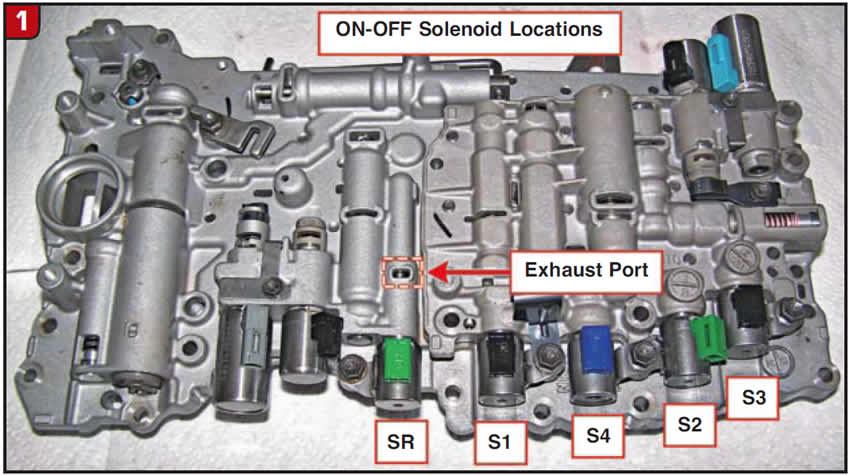
This port is directly below the retainer pocket for the bore plug behind the SR solenoid (Figure 2 shows the OE bore plug and retainer removed from the valve body).

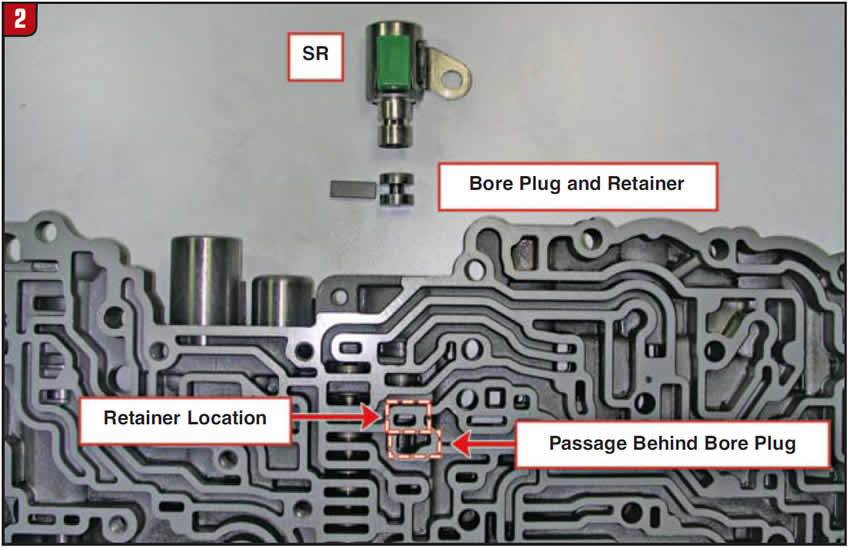
This bore plug separates solenoid feed (line pressure) and a circuit that is charged in first through fourth gears (Figure 3). This problem area was discovered by Jeff Parlee, director of product support at Valve Body Xpress, and it was easy to see when run on the valve-body test machine. As soon as the line-pressure circuit was charged, oil started dumping out of the exhaust port. It was one of those “that can’t be right!” moments, and of course it is not right.

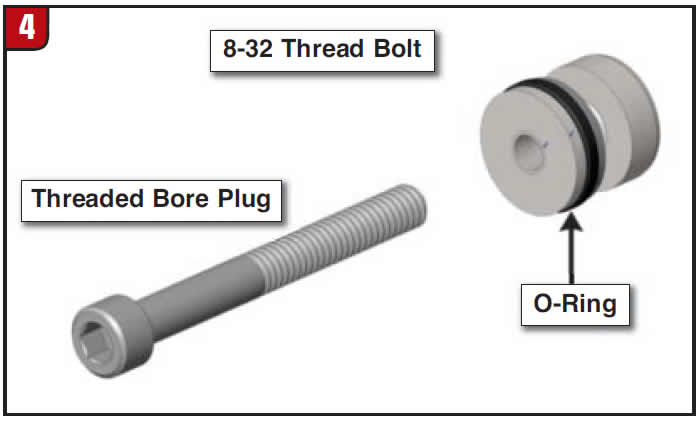
Not every shop out there has a valve-body test machine, so this problem can be missed very easily. A good repair for this area is an O-ringed bore plug that is threaded so it can be installed down into the bore with ease (Figure 4). The O-ring prevents solenoid feed (which we know now is line pressure) from leaking into the sump. This leak not only causes low solenoid feed, but also low line pressure that we all know is not good.

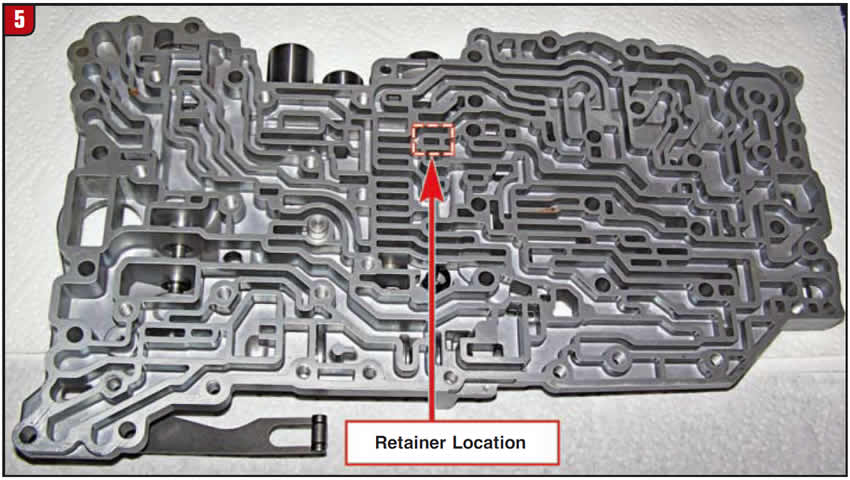
Removing the OE bore plug is where the challenge lies. Figure 5 shows the location of the retainer for this bore plug. A large paper clip and needle-nose pliers can help push this bore plug out of its location starting at the exhaust port and/or the passage behind it (Figures 2 and 3). By the way, this is the one that always falls out of the casting when cleaning it, as there is no valve or spring that lives here to keep pressure on it.

I hope this overview of solenoid diagnostics has been helpful and proves that little-known and even less-cared-for facts are important to diagnosing hard-to-find problems.

Jim Dial is a Sonnax technical specialist and a member of the Sonnax TASC Force (Technical Automotive Specialties Committee), a group of recognized industry technical specialists, transmission rebuilders and Sonnax Industries Inc. technicians.

Was this content valuable?

Thanks for your feedback!

You May Also Like

Sherlock Holmes Approach to an AB60 No-Move Situation

The effectiveness in diagnosing automatic transmission malfunctions is an art form. Although there are similarities among the wide varieties of transmissions on the road, each transmission has its own peculiarities. Aside from having mechanical, hydraulic, and electrical hardware systems to contend with, software/programming issues and various vehicle platforms make diagnostics much more difficult.  Using scopes provides

ab60

The effectiveness in diagnosing automatic transmission malfunctions is an art form. Although there are similarities among the wide varieties of transmissions on the road, each transmission has its own peculiarities. Aside from having mechanical, hydraulic, and electrical hardware systems to contend with, software/programming issues and various vehicle platforms make diagnostics much more difficult. 

GM 6T40 Pump Identification Guide

The 6T40 was introduced in 2008 for General Motors front-wheel-drive cars in the Chevrolet Malibu and has gone through several changes throughout its three generations, specifically in the pump area. The 6T40 is closely related to the more lightweight 6T30 and the heavier duty 6T45 and 6T50. Generation one started phasing out during the 2012

Seeing the Forest AND the Trees

They say that the proverbial phrase “I couldn’t see the forest for the trees” means that a person or organization cannot see the big picture because it focuses too much on the details. Related Articles – 4L60E Harsh 1-2 Shift – TASC Force Tips: Diagnosing 8L45 & 8L90 Shift Complaints – TASC Force Tips: Hydraulics

The Manifold Pipeway

The Honda six-speed transmission has been on the bench of many specialty shops for one reason or another (figure 1). But, for those of you who have yet to lay your hands on one, mounted on the upper side of the unit is one of the largest, if not the largest solenoid and pressure switch

8L90 Vacuum Testing

Below are the diagrams for vacuum testing GM 8L90 transmissions. Note: OE valves are shown in rest position and should be tested in rest position unless otherwise indicated. Test locations are pointed to with an arrow. Springs are not shown for visual clarity. A low vacuum reading indicates wear. For specific vacuum test information, refer

Other Posts

Toyota/Lexus UA/UB series: Critical wear areas and vacuum test locations

Sonnax has provided the following guide on critical wear areas and vacuum test locations for the Toyota/Lexus UA and UB lines of transmissions. Technicians working on these models should find this guide helpful. Related Articles – Manual transmission sourcebook 2023 – Shift pointers: High-mileage transmissions and the aches and pains of age – Looking for

Tasc-Tip-Nov-Featured-Image
Tips and tricks for Chrysler switch valve plug testing

As technicians, we are often faced with build issues that can sometimes be frustrating at first. But with a little ingenuity, these frustrations can be turned around and made simple. Related Articles – 6T40 delayed engagements after overhaul – GM 6T70/75 slips and delays in first – How to fix GM 6T70/Ford 6F50 rattling noise

tascfeature-1400
Watch: CVT electric and communication codes

Find out if your transmission module is not sharing information properly. Different codes will indicate different issues within the transmission. Watch the latest video from Transtar for more information. Related Articles – Road to AAPEX season 2 finale: Where the road ends and the show begins – Road to AAPEX season 2, ep. 9: The roads

CVT-Electric-and-Communication-Codes-1400
Watch: Transmission trouble codes

If you are seeing trouble codes with your transmission, it is important to understand the differences and what each separate code indicates. Watch the video above from Transtar for the details. Related Articles – Watch: CVT fluid diagnostics – Road to AAPEX Ep. 8: Paving the way for automotive innovation – Road to AAPEX Ep.

Transmission-Trouble-Codes-1400