The codes being diagnosed in this article are:
- P0507: Idle speed performance higher than expected
- P0871: OD pressure switch rationality
- P0934: Line pressure sensor circuit low
A 2006 Jeep Commander using a 545RFE transmission arrived at our shop from an independent muffler and general repair facility with three codes: P0507, P0871 and P0934. The codes are for Idle Speed, OD Pressure Switch and Line Pressure Sensor Circuit fault, all in that order.
The history known of the vehicle up to this point was that the transmission had failed, exhibiting a symptom of a no-move condition. The independent repair shop chose to install a rebuilt transmission and torque converter before the vehicle arrived at our shop. After a fluid check and scanning for codes, we took the vehicle on a short test drive. During this road test, we noted that drive engagement was a little lazy along with a tie-up going into the first 2-3 shift which immediately initiated limp-in mode, setting code P0871 only. After erasing this code, a quick learn was performed, but this resulted in no change in the drivability issues of the vehicle along with the return of P0871.
What direction to take now?
A check of the Clutch Volume Index (CVI) values all show center of range with no readings going to the extremes. A pressure gauge reveals that the pump and regulatory system is performing well. Having completed performing these basic checks, it becomes obvious now that it’s time to dig deeper.
The technician removed the transmission pan for inspection and found no debris; the fluid is clean, filters are in place and sealing correctly. They then pulled the valve body to inspect the solenoid assembly and gasket, as well as all valve body surfaces and accumulators. No problems were identified.
Getting concerned now with no visual causes being discovered, they located and installed a suitable replacement valve body and solenoid assembly along with a new pressure transducer.
When the vehicle was driven cold the next day, it functioned flawlessly for the first 2 miles before it exhibited the 2-3 tie up causing it to go into limp-in mode a short distance later. The issue with a delayed forward engagement remained constant. When the vehicle was scanned for codes after this road test, it was discovered that P0934 was now accompanying code P0871.
The team now decided to make a call to the previous shop, which revealed that it had installed two transmissions, a replacement Powertrain Control Module (PCM) with programming and at least one additional valve body and solenoid assembly with no record of what codes were pulled and only a vague description of both transmissions having missing gears.
Read more stories from our Technically Speaking column series here.
Based on this new information, the team made the decision to pursue the circuit code and call in a mobile wiring and programming specialist to eliminate any of the previous mistakes that could have been made. After a more extensive test drive and diagnostics, the vehicle set additional codes of P0731 (Gear Ratio Error In First) and P1790 (Fault Immediately After Shift). But these codes set without the vehicle moving out of the parking space or even attempting an upshift.
Now what?
A close look at the Parameter Identification Trigger Functions (PIDs) started to show that when the vehicle was placed into Drive with the brakes applied, as the transmission temperature increased, the pressure read by the transducer was dropping while the turbine speed sensor started to show RPMs revealing clutch slippage. Technicians also observed that the underdrive pressure switch would flutter during the delayed engagement until the RPMs were raised slightly. Now we were getting somewhere with codes P0731 and P1790. But what about codes P0871 and P0934?
Isolating the PIDs to monitor transducer voltage and the pressure reading from the transducer, transmission pressure was falling fast, and as the pressure fell, the voltage fell with it. If you look at the criteria for the P0934, it can be set if the voltage drops below .34 volts. This is normal if the engine is not running. In this case, the voltage being drawn low was caused by the loss of pressure. The loss was low enough of a drop to meet the criteria of setting code P0934.
The P0871 code could be set sitting still in the parking lot by power braking the vehicle in drive range to 1700 RPM. No transmission shifts were made and the only clutches that were on during this test are the Underdrive and the Low/Reverse clutches. The OD pressure switch could be seen gradually fluttering on and off until the transmission was put into limp-in mode. So now we could reasonably assume that there may be a cross leak somewhere in the Underdrive clutch’s hydraulic circuit.
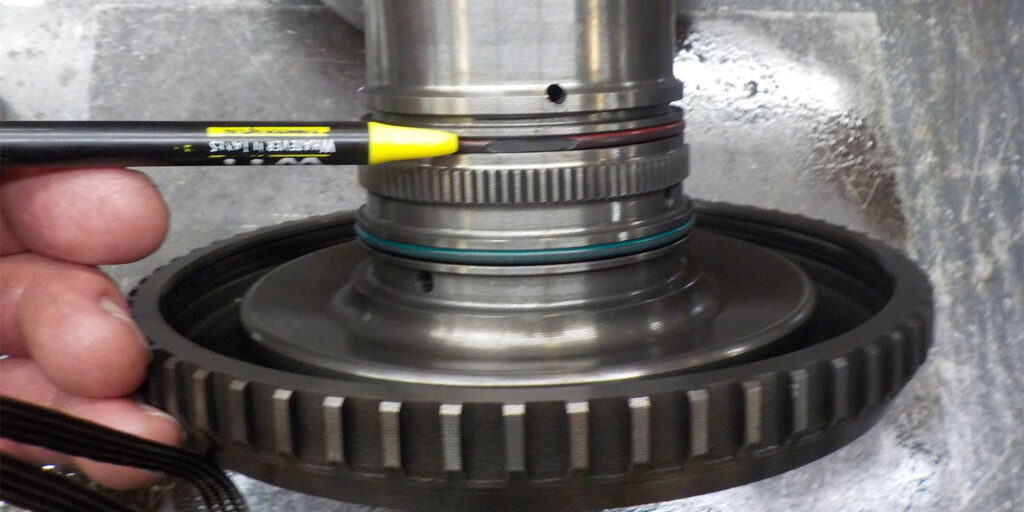
The technician removed the transmission for further inspection as the symptoms did not seem to be related to the previously installed valve bodies, solenoid assemblies and transmissions. With a careful and detailed postmortem examination of this current transmission, it was found to have a pinched O-ring on the Input Clutch Hub (Figure 1).

There are two O-rings here and, in this case, the red O-ring was the victim (Figure 2). With a poor seal in this area of the Underdrive Clutch circuit, when shifted into Drive, fluid pressure was allowed to intrude into the Overdrive Clutch circuit. This Overdrive Clutch circuit is open to exhaust whenever the transmission is in first and second gear. This cross leak in first gear was pre-charging the overdrive clutch circuit. This caused the OD clutches to apply sooner than expected, producing the tie-up on the 2-3 shift.
Additionally, this pressure intrusion into the Overdrive Clutch circuit was enough to exceed the exhaust, causing this pressure to increase enough to close the OD pressure switch, setting the rationality code. This also explains why the transmission shifted well cold and declined in performance the warmer it became: The colder thicker fluid was not able to cross leak into the OD circuit as easily as it was when the fluid thinned with heat. It was all a matter of diagnosing the diagnostic codes themselves.