Intermittent pressure switch codes on vehicles with the Aisin Seiki AS68RC transmission have been very difficult to nail down to one specific cause. The two most common pressure switch codes for this transmission are P0746 clutch pressure control solenoid A or linear solenoid A performance or “Stuck Off,” which also includes pressure switch 1 mechanical fault. The second-most common code is P0776 clutch pressure control solenoid B or linear solenoid B performance or “Stuck Off,” which also includes pressure switch 2 mechanical fault. What typically happens is that the diagnostics start with the definition of the trouble code on the scan tool.
The code definitions shown above are the full definition of the code and honestly, if we don’t take the time to get that full definition, we will only get the first four to five words in the sentence. If we are really lucky, we will get the word “performance,” which refers to a mechanical problem in the hydraulic circuit of the solenoid, per the definition on the scan tool. Commonly, the words “pressure switch” will not be listed on the scanner.
Interestingly, the Dodge Ram truck P0746 code lists clutch pressure control solenoid A or linear A performance first; but Mitsubishi applications list pressure switch 1 as being at fault, with no mention of linear A performance.
Furthermore, if we go into OE diagnostics for Dodge, it takes us through five different monitor conditions that are connected to five different set conditions — very thorough, but very complicated. The worst part of it is that the possibilities of the root cause are actually inside this virtual piñata full of maybes. The list includes a harness problem with pressure switch 1, a bad pressure switch 1 or a problem with control valve 1 (which happens to be immediately behind linear solenoid A). It also lists an internal mechanical transmission problem and, of course, a bad TCM.
The issue here is that you may not have access to OE diagnostics, and you have replaced linear A or B solenoid three times, which keeps coming back with this same code intermittently. Without the OE diagnostics, it is like your brother moving the rope for the piñata every time you take a swing with your trusty Louisville Slugger.
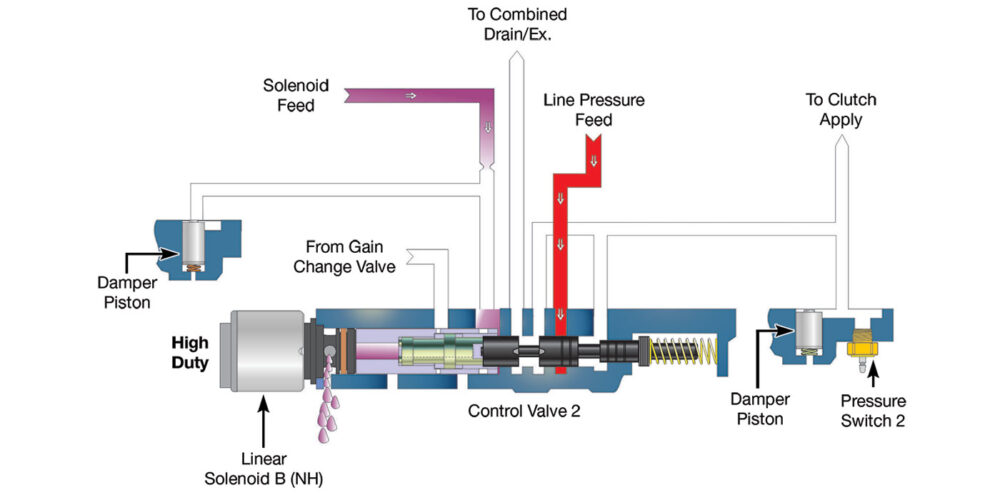
Let’s break this down so we can make some kind of sense out of it, now that we have a full description of possibilities. It seems like the common denominator for this code points to a pressure switch problem of some sort, whether it be mechanical, in its hydraulic circuit or a bad connection with the switch. To explain this correctly, we need to first look at the hydraulic circuit to see the items in play. Figure 1 (above) shows a partial circuit diagram of linear solenoid B when it is at high duty cycle.
This solenoid’s output pressure acts on control valve 2. Notice, in Figure 2, that when linear B duty cycle drops, control valve 2 moves to the right and connects line pressure to clutch apply pressure.
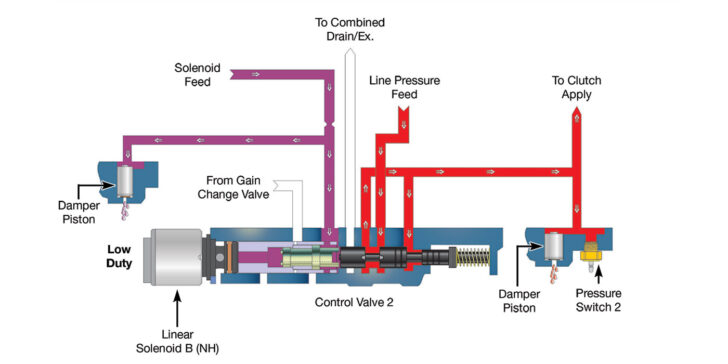
At the same time, clutch apply pressure is directed to a damper valve and pressure switch 2. Believe it or not, this damper is the most common root cause of a pressure switch 1 or 2 code. Regarding the damper piston, the bore on which the piston rides becomes worn out and allows pressure to leak past the piston. This pressure loss can affect how quickly the pressure switch responds or closes. This, in turn, causes a trouble code to be set, as the TCM thinks the pressure switch is stuck off. The TCM commanded a gear change, and the pressure switch in charge of feedback to the TCM did not change state quick enough. Both dampers connected to pressure switches 1 and 2 oil circuits are identical (Figure 3).
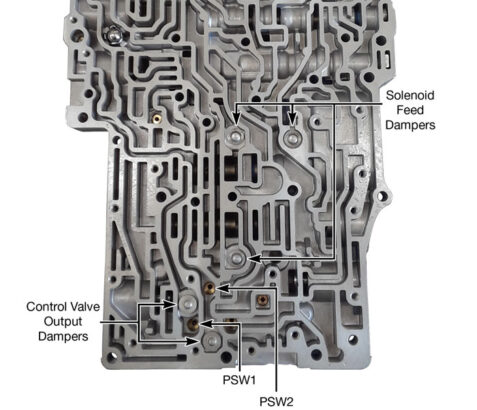
Figures 1 and 2 also show that there is a damper connected to the solenoid feed circuit which can also wear. These pistons can be easily checked by vacuum testing the exhaust port by the spring end. Wear can also be seen in the bottom of the bore. Figures 4 and 5 show a cross-sectional view of the damper pistons and the location for vacuum testing.
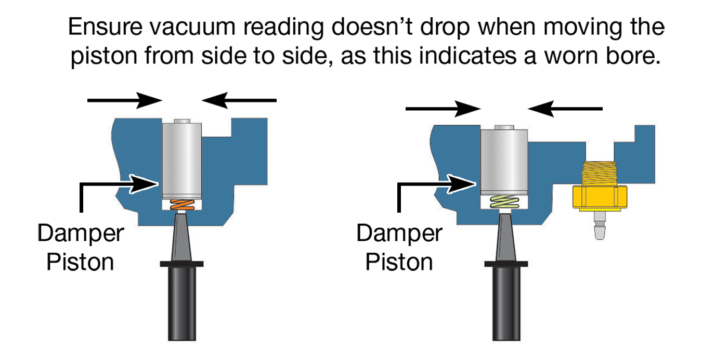
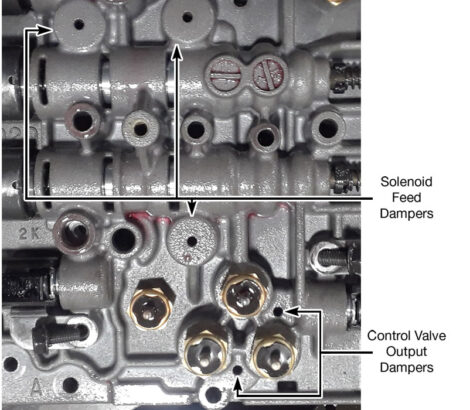
Note: When vacuum testing these pistons, be sure that the vacuum reading does not drop when moving the piston from side to side, as this indicates a worn bore. A new piston and casting will test 20-plus-in.-Hg, and worn bores can go as low as 4-in.-Hg. There are also relief pistons in the upper valve body that are for cooler relief and a solenoid feed relief. These two locations can be vacuum tested in the same way: by vacuum testing the spring side exhaust port on the back side of the casting.
This same vacuum testing process can also be performed on AS66RC and AS69RC applications, as they can experience similar wear in the three relief valves.
Jim Dial is a Sonnax technical specialist. He is a member of the Sonnax TASC Force (Technical Automotive Specialties Committee), a group of recognized industry technical specialists, transmission rebuilders and Sonnax technicians.