


The owner of a 2010 Mercedes GLK started to hear a noise while driving at about 25 mph. Initially, the sound was a faint growling noise only at lower speeds; however, as the mileage increased so did the decibel level. By the time the customer brought the vehicle in for inspection it had 118,000 miles on it and the noise was pronounced.
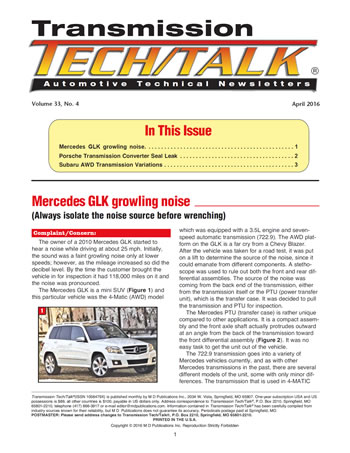
The Mercedes GLK is a mini SUV (Figure 1) and this particular vehicle was the 4-Matic (AWD) model which was equipped with a 3.5L engine and seven-speed automatic transmission (722.9). The AWD platform on the GLK is a far cry from a Chevy Blazer. After the vehicle was taken for a road test, it was put on a lift to determine the source of the noise, since it could emanate from different components. A stethoscope was used to rule out both the front and rear differential assemblies. The source of the noise was coming from the back end of the transmission, either from the transmission itself or the PTU (power transfer unit), which is the transfer case. It was decided to pull the transmission and PTU for inspection.
The Mercedes PTU (transfer case) is rather unique compared to other applications. It is a compact assembly and the front axle shaft actually protrudes outward at an angle from the back of the transmission toward the front differential assembly (Figure 2). It was no easy task to get the unit out of the vehicle.

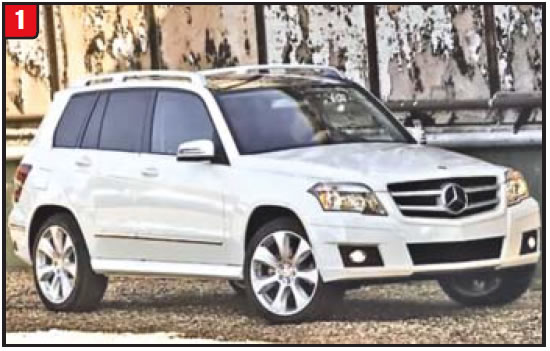
The 722.9 transmission goes into a variety of Mercedes vehicles currently, and as with other Mercedes transmissions in the past, there are several different models of the unit, some with only minor differences. The transmission that is used in 4-MATIC applications is certainly a breed apart (Figure 3). The back of the case has the look of a 4WD adapter plate with a hole at the outer edge to accommodate the front driveshaft. Due to the compact nature of the vehicle platform, the side of the case is actually indented inward for driveshaft clearance. The PTU section was disassembled first to see if that was the source of the noise.

As soon as the PTU was peeled down, the source of the noise became real obvious. There were two bearings in the assembly, which were pitted, that was causing the growling noise. The issue then became where to source the bearings, either from the dealer or in the aftermarket. Unfortunately, Mercedes does not provide individual bearings for their PTU.

Externally, the GLK so-called transfer case looks more like the transfer clutch housing on a Subaru AWD. Once the typical Mercedes output shaft flange and nut are removed, the next item to be removed is the PTU rear housing (Figure 4). The rear housing contains an output shaft ball bearing and a regular type of metal-clad seal. There is an additional housing that goes between the PTU rear housing and transmission case, which is the intermediate housing. Internal components need to be removed before the intermediate housing can be separated from the transmission case.

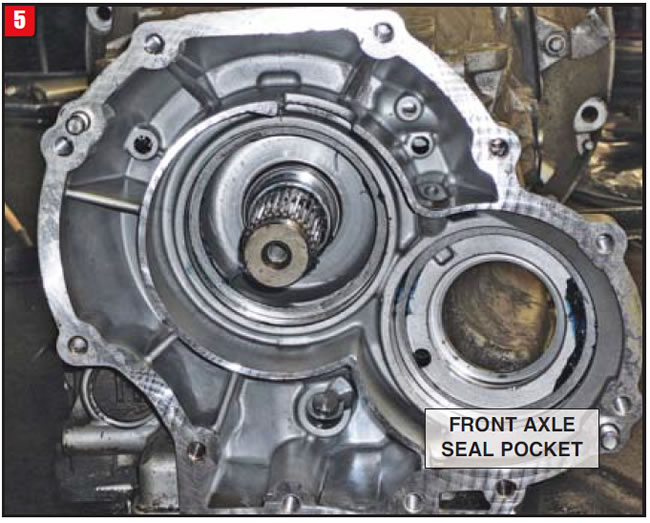
With all of the PTU components out of the way, the back of the transmission case is exposed, with only the transmission output shaft sticking out (Figure 5). In addition to the case having two pockets for bearings, there is also a pocket for the driven gear meta-clad seal. The problem with the design is that if the metal-clad seal would leak, the entire PTU would have to be disassembled to change it. Normally, access to that type of seal would be gained by merely removing the axle shaft. The seal pocket on this model is somewhat enclosed, preventing removal from the front. The lubrication return hole is also at the back of the case.
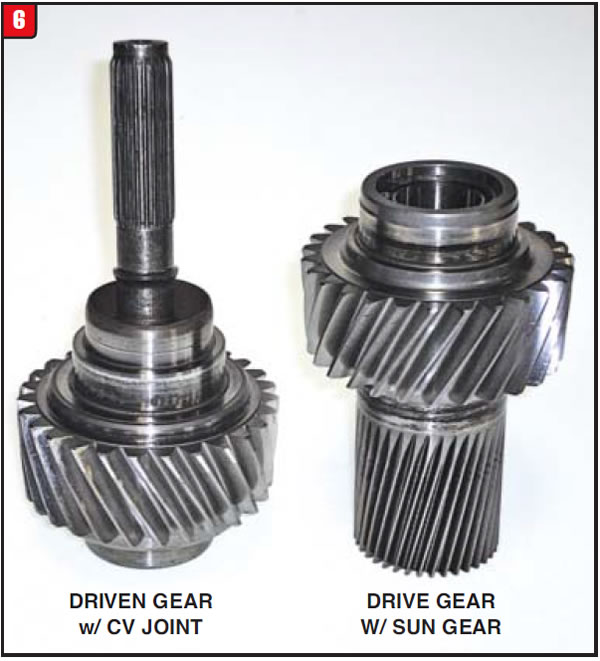
Unlike a regular transfer case in a Chevy or Ford, the GLK is pretty basic, component-wise that is. There are just two gears that transmit power from input to output (Figure 6). The drive/driven gears may appear simple however they are a little more involved than the norm. The drive gear has the added feature of having the planetary sun gear teeth cut into it, basically two gears for the price of one. The driven gear is absolutely unique, in that it contains the front axle shaft CV joint. This joint is what enables the front axle shaft to be at an angle with the vehicle’s center line. The CV joint is inserted into the driven gear and the assembly is then welded together. The joint is pre-lubed with merely a dust seal on the end of the front axle shaft to keep out the elements.
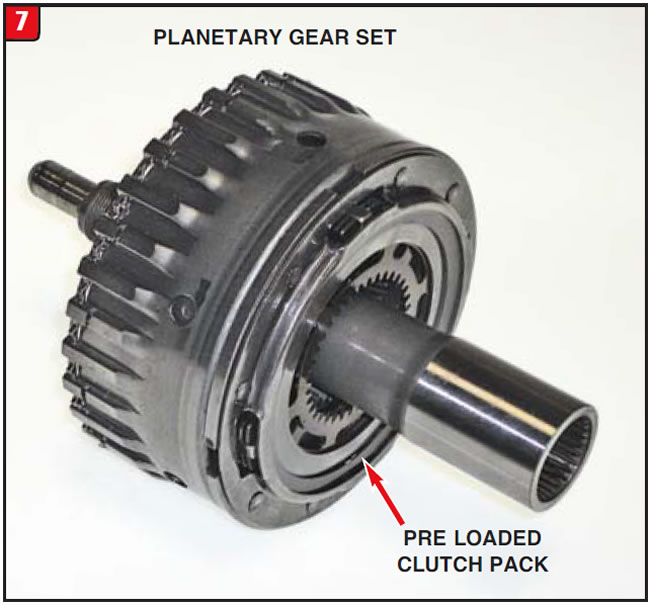
The other item that enables this transfer case to be as compact as it is happens to be a component found in most automatic transmissions, which is the planetary gear set. Unlike other transfer cases that have a planetary carrier, the GLK unit has a special type of clutch assembly (Figure 7). From an operational standpoint, the PTU is light on external controls, as in, there aren’t any. The power split for the GLK is 55% front axle and 45% rear axle, which does not change due to the clutch arrangement. The clutches, which are contained within the planetary carrier are preloaded and will not easily rotate. The internal plates are splined to the sun gear with the external plates splined to the planet, which keeps the assembly in a direct drive mode unless wheel spin occurs. The clutch plates will limit excessive wheel spin.
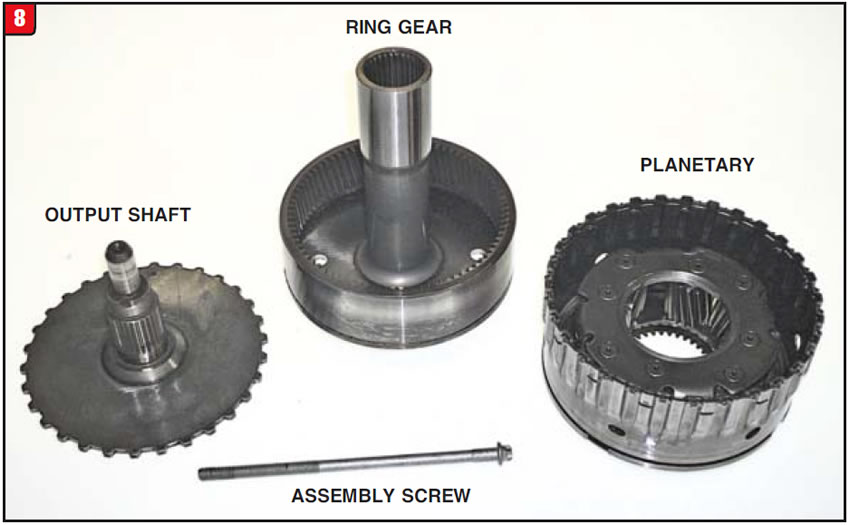
To gain access to the planet set requires removal of the rear housing. With the housing removed, the next disassembly step is to pop the snap ring that holds the output shaft flange to the planet carrier. Once the output shaft is out of the way, there is a super long bolt –holding the planet set to the transmission shaft –which must be removed (Figure 8). The bolt has a Torx head and should be replaced during reassembly. The bolt goes through the ring gear shaft and is torque to yield.
After the PTU was disassembled, everything was checked over and only the two bearings were found to be bad, which tends to be an issue for this type of transfer case. Due to the mileage, all the bearings were replaced as a precaution. The original bearings were produced by Timken Bearings, but by their affiliate in France, and since they are not available from Mercedes, they had to be purchased in the aftermarket using the bearing part numbers. The bearing/race part numbers are:
- Bearing x1 – NP925485, Race x1 – NP31842
- Bearing x3 – NP604623, Race x3 – NP577617
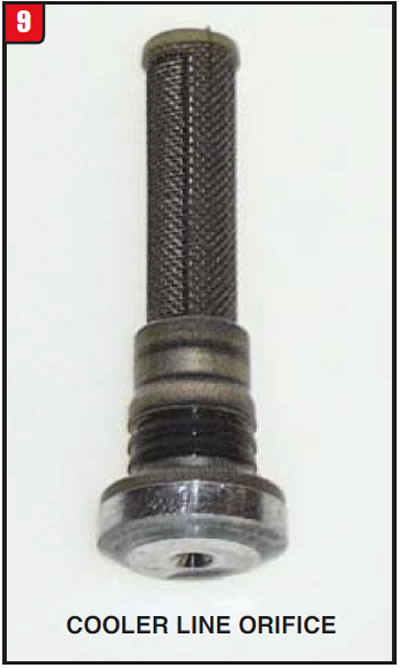
Due to the AWD design, the transmission return cooler line is also a little different. There are two outlets in the line, one of which being in front next to the pump with the other outlet at the back of the case to feed oil to the PTU. A concern is that the rear outlet has an orifice plug pushed into it, and if debris accumulates around the plug it could reduce needed oil flow, causing a failure. Always remove the plug and clean it during any service (Figure 9).
With the bearings replaced and the PTU reassembled, the vehicle was driven and was quiet as a mouse, without ripping into the transmission, what luck.


A customer noticed some oil spots on the floor of his garage but didn’t know quite what they were, so he brought the vehicle in for an inspection. What he was driving was far from a bottom feeder set of wheels. The vehicle was a 2005 Porsche Cayenne Turbo with a 4.5L engine and a TR60-SN six-speed automatic transmission. Although it was 10 years old there were only 57,000 miles on it and was in mint condition. Everyone definitely needed to handle this car with kid gloves.
The Porsche was taken on a thorough road test to make sure that everything worked correctly, that there were no trouble codes, noises or other issues. Everything worked well and there was no shortage of juice with the pedal to the metal. The vehicle was put on a lift to see what was going on underneath, and as the customer stated, it was a little wet. What was leaking appeared to be transmission fluid coming from the bell housing area and then blowing back onto the transmission pan.
A quote to repair the leak was presented to the customer, which he agreed to, and work began to pull the transmission. Doing an R&R on a Porsche Cayenne is no small thing. Major chunks of exhaust and frame parts had to be removed along with other stuff, in order to get to the transmission. The installer did receive a commendation for his efforts.
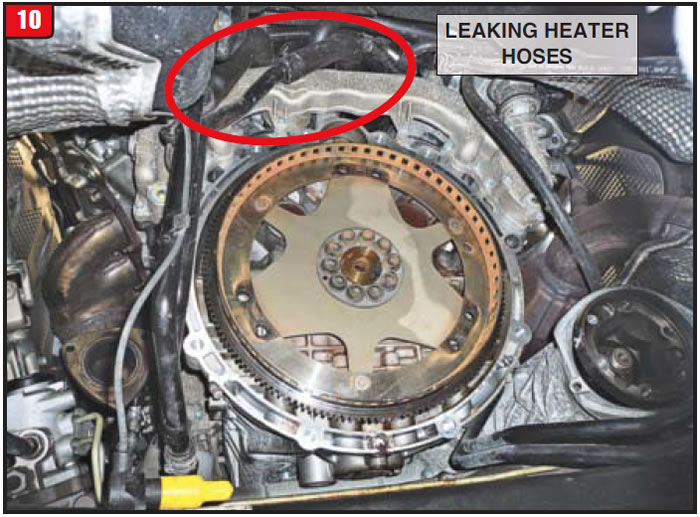
After the transmission was out of the way, the installer was giving everything the once over and fortunately noticed something odd. Not only had transmission fluid been leaking out of the front seal, antifreeze was apparently leaking from the back of the engine. Not only were there wet areas from the antifreeze; the installer also noticed rusting on the flex plate and elsewhere (Figure 10).
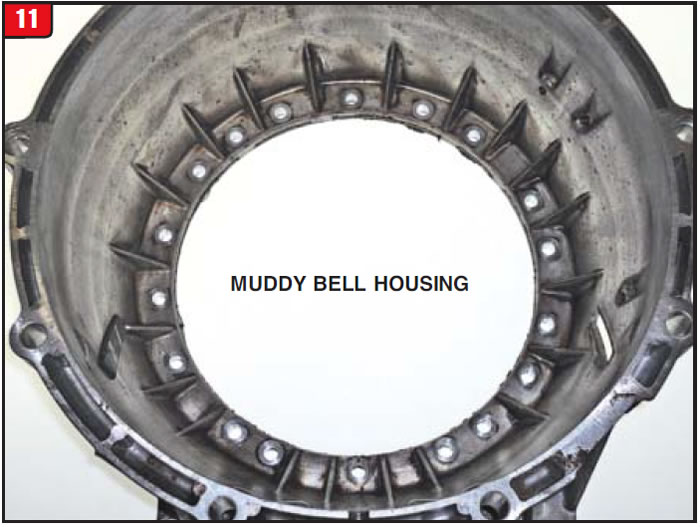
Beyond the discovery by the installer was further evidence found by the rebuilder. Once the transmission was put on the bench, the builder pulled out the torque converter and also noticed something odd. The inside of the bell housing looked like mud (Figure 11). Both technicians started to put 2 and 2 together and realized that it was antifreeze that was attacking the rubber of the torque-converter seal. The question then became how to address both issues.
After closer inspection of the engine, it was determined that the heater hoses were leaking. Under normal conditions and with a regular vehicle, a heater hose repair would be no big thing. However, this vehicle was after all a Porsche. Apparently, heater hose leaks on certain Porsche models are not uncommon due to the material that they are made from and chemical makeup of the antifreeze. The replacement heater hoses are now made from aluminum and certainly are not cheap. After a period of time the leaking antifreeze did cause the converter seal to get spongy and start leaking.
To replace the heater hoses actually requires removal of the engine’s intake mani fold due to the heater hoses running underneath. The replacement heater hoses come in a set of two, joined together. The installer certainly earned his pay addressing his part of the repair, leaving the rebuilder to deal with the original transmission leak issue. Due to the antifreeze issue, there was a concern that the pump body O-ring could have been affected just like the torque-converter metal-clad seal.
Therefore, the rebuilder decided to remove the pump. The pump on certain transmissions can easily be removed by just zapping the bolts; however, such was not the case with the TR60-SN.
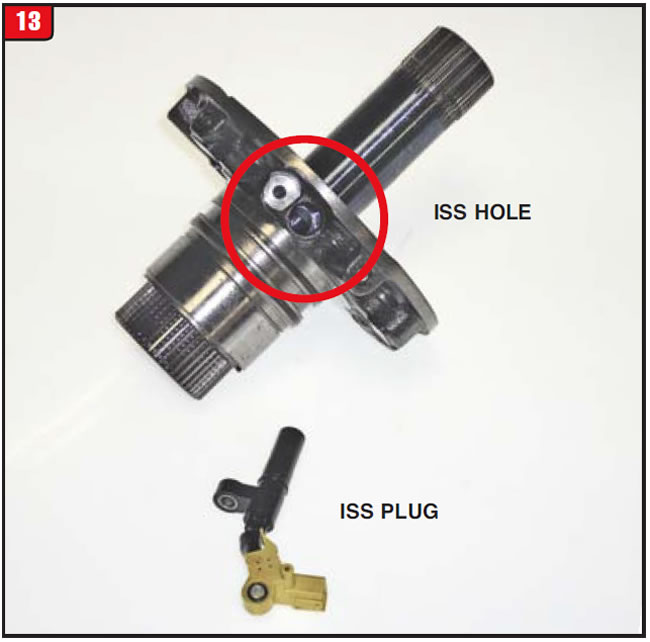
After the pump bolts were removed, the builder started to lift the pump assembly out of the case but felt some resistance. Luckily, he did not continue to try to pull the pump the rest away out because of what was connected. The back of the pump contains an input speed sensor (ISS), which has very little loose wiring. In order to remove the pump, the pan must be removed to gain access to the harness wire. Unfortunately, the harness plug that connects to the ISS is located in a narrow part of the case with an opening next to the pump body (Figure 12). It takes a bit of effort to reach in and disconnect the harness plug from the ISS plug as well as reconnecting it.
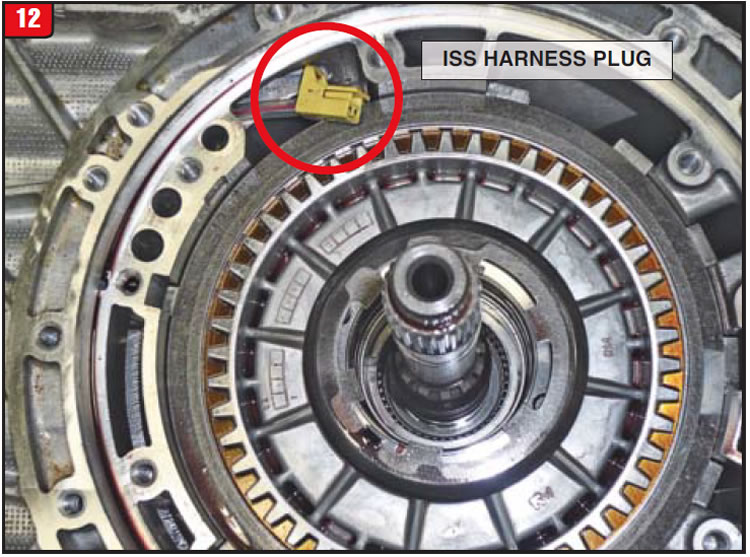
The ISS is a fairly long probe that protrudes through the stator support to register off of the input shaft reluctor teeth. The ISS bolts to the stator support and pump body (Figure 13). As shown in the illustration, the ISS electrical plug is real close to the sensor itself. Once the rebuilder unplugged the sensor, the pump was removed and disassembled to check for any damage and to replace both seals.
On this particular TR60-SN, there is a caged bearing pressed into the pump body that the converter hub rides in. There are, however, other models that use a pump body bushing instead of a bearing. The basis for the difference between transmission models has to do with torque-converter design.
Certain models of the TR60-SN utilize a torque converter that operates like a regular lockup and merely has one release and one apply oil passage. The other model converter actually has three oil passages that affect the direction the lockup piston moves for apply. Component differences between the models include the torque converter, pump, input shaft and valve body. The easiest way to discern one model from the other is by the input shaft.
The two-passage design input shaft has no O-ring at the tip of the pilot, whereas the three-passage design input does have an O-ring on the converter end. The pump body with a caged bearing is the two passage design. Be aware of the torque converter type before ordering any replacement part.
This not so simple fix could have resulted in a comeback down the road had the technicians not been able to look past the obvious and address all of the issues. Diligence always pays off.


When a customer called the shop concerning a noise on his Subaru, visions of a bad transfer clutch came to mind, based on Subaru history. The vehicle was a 2009 Subaru Outback with a 2.5L engine and was AWD, as most are. The noise occurred as the vehicle would make a turn, and if the transmission was an automatic the cause would have been fairly clear-cut. The problem was that the transmission was a five-speed manual shift, which makes a slight bit of difference.
For years, Subaru vehicles with automatic transmissions have had their fair share of noise and chatter problems related to the transfer clutch and components, requiring different fixes. The layout of a manual shift transmission, compared to an automatic, is fairly comparable with a few subtle differences. Both transmission types have the final drive (differential) incorporated, which means noise while turning could stem from the spider gears on either unit.
Another area of the transmissions that can create noises while turning has to do with transfer components, which are different between manual shift and automatic models. A manual shift transmission does not use a transfer clutch pack controlled by a valve body and solenoid, but rather by a completely different type of doodad.
After driving the vehicle several times and listening to the transmission while on a lift, it was determined that the noise was coming from the back end of the transmission. Luckily, access to the transfer components can be achieved by removing what is normally considered the extension housing. Not wanting to wrench more than necessary, the extension housing was removed from the case half in the vehicle.
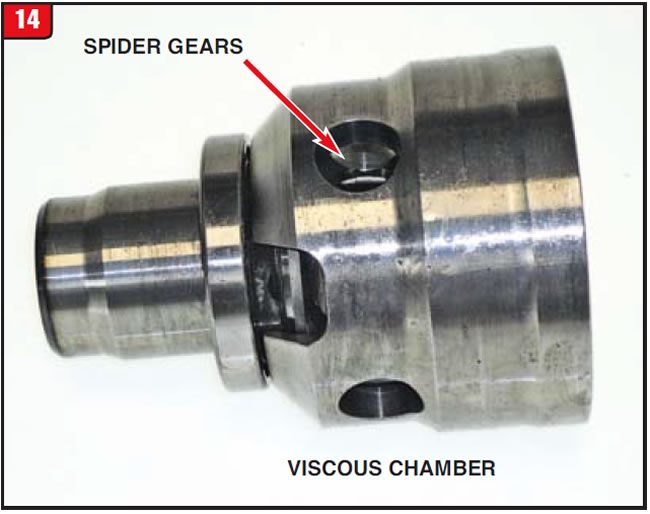
As expected, the source of the noise turned out to be the main transfer case component, which happens to be a viscous coupling (Figure 14). It is the viscous coupling that enables a manual shift transmission to be all-wheel drive just as the transfer clutch does for an automatic transmission.
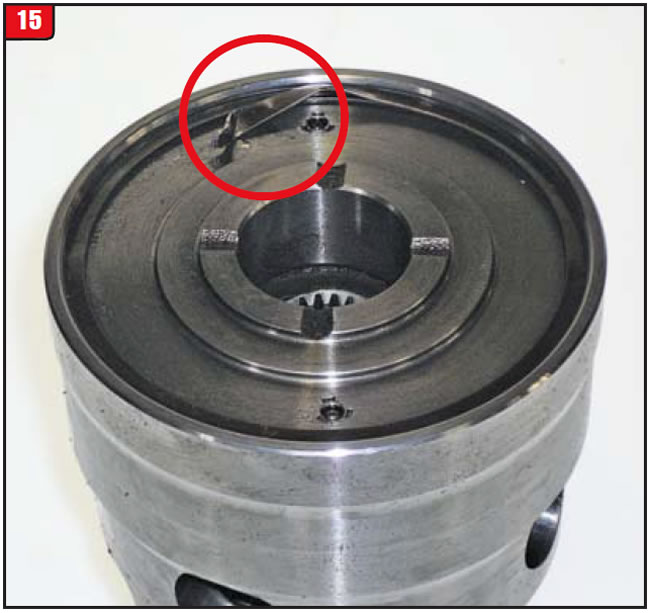
The viscous coupling, which Subaru refers to as the center differential, is a compact unit containing conventional spider gears found in any differential as well as the viscous chamber that provides the reaction force. What failed on the center differential was a large spiral snap ring that holds the viscous unit into the housing (Figure 15). When the end of the snap ring dislodged from the groove, a piece of it broke off and would rub the gears at times. The remaining part of the snap ring would also rub other components based upon load. Fortunately, the snap ring did not blow out entirely or there could have been major problems.
The next decision was how to repair it, since these viscous couplings do not fall from the trees. One option was to purchase a brand-new unit from Subaru with a list price of over $450. Another option was to scuffle around a boneyard for a good used transmission and hope for the best.
A third option entails the rebuilding of the viscous unit, which can be done by companies in that type of business such as STE. Rebuilding any type of viscous coupling is always dependent upon the extent of damage and availability of replacement parts. Due to a time factor, the decision was to buy a new replacement from Subaru. The transfer case was reassembled, a regular transmission service was performed and the vehicle was thoroughly driven. The transmission worked well and, of course, the noise was gone.
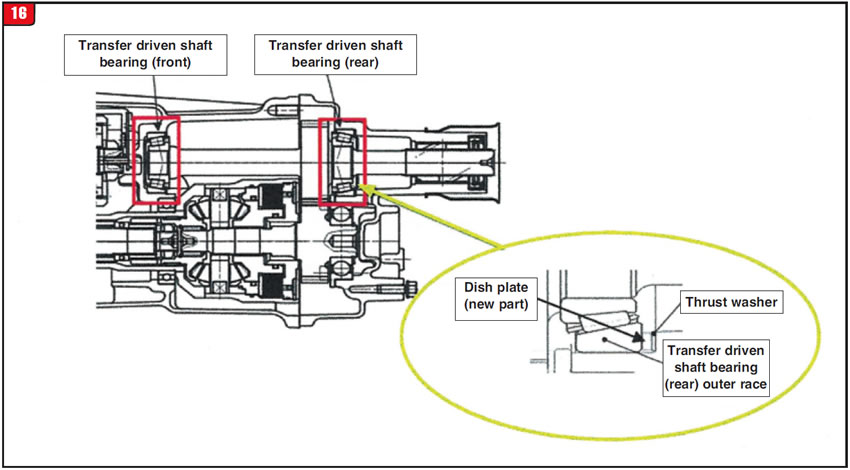
There is one other issue that pertains to this type of noise, which Subaru has issued a TSB about. On certain models of this type, a temperature-sensitive howling noise can occur due to a change in bearing pre-load from cold to hot. To address this issue, Subaru has modified the extension housing bearing pocket to accommodate a waved plate between the tapered bearing race and selective shim (Figure 16). The waved plate keeps a constant load on the tapered bearings regardless of temperature. If a vehicle shows up with this scenario, contact Subaru for the replacement components.

April 2016 Issue
Volume 33, No. 4
- Mercedes GLK growling noise
- Porsche Transmission Converter Seal Leak
- Subaru AWD Transmission Variations


