Up to Standards
- Subject: Diagnosing and correcting shift problems in manual transmissions
- Essential Reading: Rebuilder, Diagnostician
- Author: Mike Weinberg, Rockland Standard Gear, Contributing Editor
In last month’s article we started this series on manual-transmission diagnostics. We continue here with a more-advanced discussion. We covered the absolute need for all technicians to understand the theory of operations and power flow of the units they are working on so they can successfully diagnose problems. The topic addressed in this month’s article is shift problems, their causes and fixes. The next chapter will deal with diagnosing noises, and we will close the series with advanced electronic and function diagnosis of electronic and active transfer cases.
Synchronization
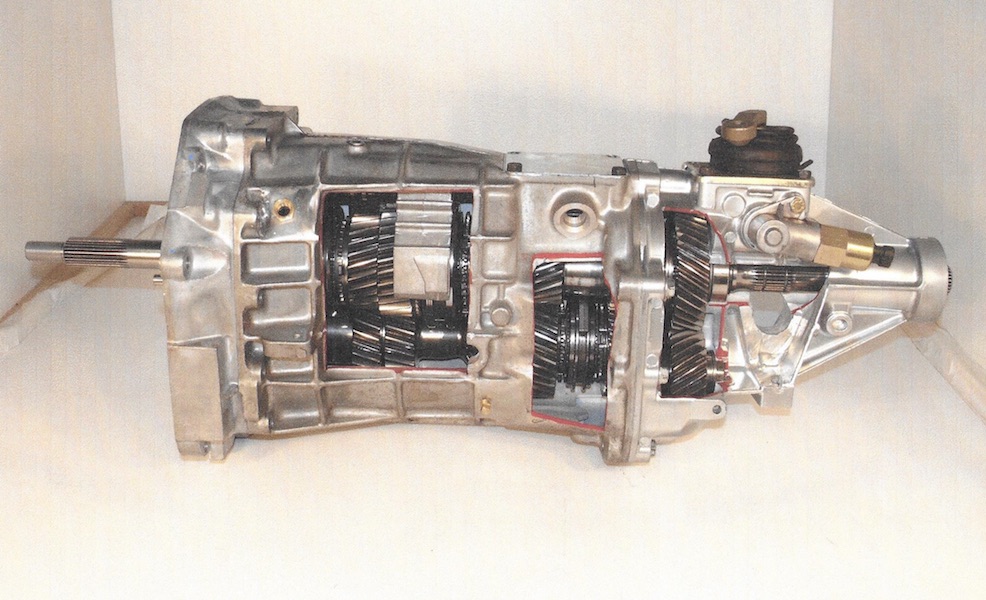
To properly determine the cause of shift problems we first have to understand synchronization. Simple in concept, the idea of smoothly selecting another gear without clash is still widely misunderstood. To synchronize is defined as to match two or more objects. In the Hollywood venue, it means that the unit commander has all of his detail “synchronize” their watches by putting each man in the unit on the same exact time so that each one responds at the proper time.
In the transmission, because each gear operates at a different speed on account of ratio differences, it means to match shaft speeds so that the output shaft or mainshaft is turning at the same speed as the speed gear to get a clash-free shift. Again, there are different designs, but all perform the same function.
During a shift the driver depresses the clutch pedal, disconnecting power from the engine to the input. There is a slight time lag here because of clutch drag and flywheel inertia. The drive wheels are now turning the mainshaft, and since the hubs of the synchronizers are splined to the mainshaft, they will be turning at road speed. The input, cluster and speed gears will be dropping in speed as long as the clutch is disconnected and the speed gears freewheel.
The driver will now move the shift lever to the position of the gear to be selected. As the synchronizer (synchro) slider moves toward the speed gear being selected, the synchro keys (struts, dogs etc.) move to force the synchro ring onto the cone of the speed gear.
The synchro ring is a wet clutch. It must exhaust the oil from the speed-gear cone and grab the cone with enough force to speed up or slow down the speed gear to match the rotational speed of the mainshaft, which will be moving at a faster rate than the input, cluster and speed gears. The synchro ring (blocking ring) has external teeth that match the inner splines of the synchro slider and the external engagement teeth on the speed gear.
The ring can rotate about 0.250 inch side to side and, during the initial movement of the slider, blocks the slider from engaging the speed gear until the shaft speeds match. When the shaft speeds match, the ring will relax and move side to side enough to permit the slider to couple with the speed gear and lock the speed gear to the mainshaft, and the shift is completed with no gear clash or grind. No matter what the design looks like, all synchronized transmissions operate in this manner.
Common shift problems
Lubricants
Because the synchro ring is a wet clutch, the material that the ring surface is composed of is matched to the lube fill for the gearbox. Rings have been manufactured of bronze, brass, paper (clutch) lining, Kevlar, carbon-fiber and sintered-metal compounds. Using an incorrect oil in a unit will create multiple shift problems.
Using 90W gear lube in a transmission designed to run on ATF will result in high shift effort and grinding, because the ring is not designed to exhaust such a high-viscosity fluid. There are few transmissions that use 90W anymore, because even if it is the correct lubricant specified for the unit, there will always be cold-shift problems in cold-weather areas.
Also important to realize is that when you put an incorrect lube in a unit it will soak into paper-lined, carbon-fiber and sintered-metal rings and reduce the coefficient of friction for a long time, even after you replace it with the correct lubricant.
Too much or too little oil in the unit also will create shift problems, as it changes the timing of the synchro components and causes grinds, high shift effort or damage to the ring surface. Too much lube slows the gear train excessively and changes the intended shift timing. Too little oil causes the ring surface to engage a dry cone and burn up the surfaces of the cone and the ring, leading to early failure and shift complaints.
Clutch concerns
For the whole range of motion desired in synchronizing the gears, the design is based on a clutch that releases and engages correctly. Any vehicle driven for even a short time with a clutch that does not release properly will cause immediate and lasting damage to the synchronizer components. It does not have to occur in all gears as is commonly believed. If the clutch is dragging at the release point you will have no or limited disconnect between the engine and the input. If the input is still turning with any level of engine torque it will seriously impede synchronizer operation and create rapid internal damage as the components fight the input torque to match shaft speeds.

A quick test for proper clutch release is to jack up the vehicle so that the drive wheels are off the ground and, with the engine running, shift through the gears. If shifting improves, find out what is wrong with the clutch and rectify it.
This is not a completely foolproof test, because if the driver has driven the vehicle for a time with a poorly releasing clutch, internal damage may already have killed the gearbox internally. This test works best with a known good unit that has been rebuilt or repaired and does not shift correctly. A careful inspection of all clutch hydraulics/cables, body and powertrain mounts, clutch forks and release bearing or pilot bearing, and checking for firewall flex are a must on every repair.
Internal clutch components such as a bent or twisted disc, bad input-shaft or clutch-hub splines, or transmission misalignment will create the same problems. On most modern vehicles measuring the air gap on the disc in the released position, which should be about 0.50 inch, is very difficult. In some instances you’ll have to drill a hole with a hole saw in the bellhousing, use a feeler gauge to measure the released air gap and seal the hole with a freeze plug when finished.
Shift linkage
Adjustment of the shift linkage to the correct specification is critical. Worn or out-of-adjustment linkage will alter the timing of the shift and create problems. Stretched cables, worn or missing isolator cups under the shift lever, or vehicle modifications performed improperly will cause gear jump-out, grinding shifts or complete gear damage.
An example is in trucks or cars that have had lift kits installed. In many instances, changing the body height and not compensating for shifter travel by enlarging the shifter opening will cause a gear to be only partially engaged because of interference with the lever by the floorboard. This is particularly nasty in reverse gear with a unit that uses a movable reverse idler to engage reverse. The shift is made into reverse, but because of the interference the stick travels only far enough to engage reverse halfway. When the driver engages the clutch he peels half the teeth off the reverse gear and winds up with a heavy repair bill.
Internal damage
Many times you will find a unit that is working correctly externally but will not shift correctly. It is possible to have synchro rings that are contaminated with metallic debris from other internal damage. The steel particles flowing through the oil damage bearings and other moving parts but get imbedded into the cones of the synchro rings. This changes the composition of the rings and we have steel trying to grab a steel cone with the resulting skidding across the speed-gear cone, as steel cannot grab steel. You now have grinding into gear and damage to the slider and the engagement teeth on the speed gear.
Other types of synchronization failures and gear jump-out occur because of excessive endplay of either the speed gear or the mainshaft or input shaft. If the unit was run low on oil it is possible that the speed-gear journals are worn and the gear can literally move out from under the slider. If the endplay is not set correctly on the input shaft or mainshaft because of improper shimming or failed bearing, the entire shaft will have excess endplay with the same results.
Improper driving techniques by car owners, such as the experts who want to “power-shift” without using the clutch, can create problems. If you do not disconnect the input from the engine during a shift on a synchronized unit, the internal parts of the synchronizer process will fail quickly. Customers with sports-type vehicles add power-enhancing features to the vehicle and in many instances raise the engine speeds well beyond the original design parameters. A unit that was designed to shift correctly at 6,000 rpm may not be able to complete a shift at 8,000 rpm because of centrifugal force or a surface area on the ring that was never intended to work at these speeds.
Then we have the split-second-shift expert. You physically can move the shift lever before the clutch releases or faster than the synchro can work. This also leads to hard or grinding shifts with internal failures. This is very common in reverse gears when the driver does not come to a full stop when parking and engages reverse with the vehicle still moving forward, which puts the entire weight of the moving vehicle onto the reverse components.
On many six-speeds we see damage to the synchro engagement teeth on reverse as the driver shifts from 4th to 5th but misses 5th and tries to engage reverse because of over-travel of the shift lever, which instantly damages and rounds over the pointing on the reverse speed gear. Worn shift forks will create shift problems because of the inability to fully engage the gear, causing gear hop-out, or grinding because the synchronizer ring no longer is in full contact with the cone of the speed gear.
Another key item is a worn-out cone on the speed gear. Certain synchronizer rings made with sintered metal are very aggressive and can remove material from the cone surface. This is common in ZF truck transmissions. You could not measure the taper on the cone to determine whether it is true even if you had the design prints. The easy way to check all the synchro cones when rebuilding a unit is to take a permanent marker and cover the synchro cones on the speed gear with ink. Then take a known good ring, place it on the cone and twist it onto the surface as it would be in operation. Remove the ring and examine the pattern left on the cone. It should be even across the whole surface of the cone top to bottom, with no skips. You would be surprised to find how many gears are being grabbed by the ring only at the top or bottom.
Following through on our theme of really understanding how the unit shifts and all the parts and specs that must work together to create a smoothly shifting unit will make you more in charge of your own destiny. Ignorance here is expensive and dangerous.