Up to Standards
- Author: Mike Weinberg, Contributing Editor
Clutch replacement is a common shop repair that is a profitable and relatively simple job if you follow proper inspection and installation procedures. About 50% of all manual-transmission failures or wear-related problems begin with a worn or damaged clutch.
When I say clutch, it is important to think about the big picture and look at the whole vehicle. If we view the vehicle as a collection of related systems instead of separate components, we are on our way to becoming better diagnosticians and growing our profits. The “clutch” should not be seen as a flywheel, pressure plate and clutch disc but, rather, viewed as entire system to transfer power from the engine to the transmission and ultimately to the driving wheels.
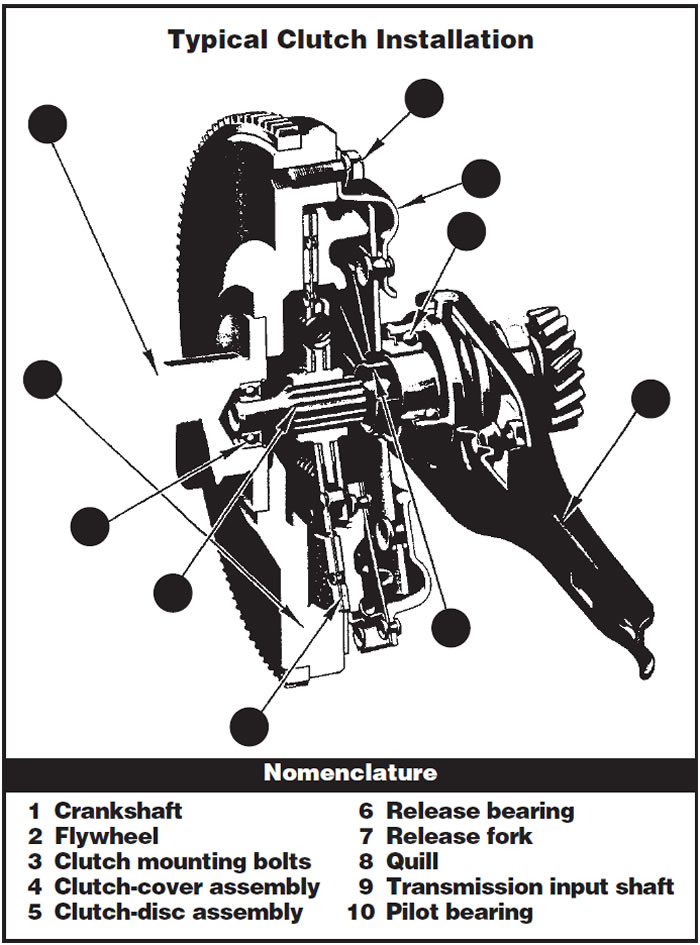
This means that a great variety of components have a profound effect on the clutch and its operation. There are the clutch components, the state of tune of the engine, the release or clutch actuation system, powertrain mounts, driveshafts, firewall, pedals and other components in the vehicle interior, and various vehicle fluids that can contaminate the friction materials of the clutch.
The following is an outline by symptom that should be used as a guide to solve clutch problems. It is important to be aware that many clutch problems show up as transmission-related issues, and repairing the transmission without locating the root cause of the failure will only lead to a second failure.
For instance, you repair a transmission that has excessive shift-fork wear. You replace the forks and synchronizer sliders and any other parts, such as bearing and synchro rings, that may be collateral damage. Now you must determine why the forks failed. Is it driver abuse, where the driver is rushing the shifts before the clutch is fully released? Is the pilot bearing seized or damaged so that the input keeps turning even though the clutch is disengaged? Is the clutch-release system functioning properly? Are the input-shaft splines rusted or damaged and not permitting free movement of the clutch disc? Are motor mounts or body mounts preventing the proper amount of fork travel to get a good release? Was the transmission filled with the proper lubricant? Were the shift forks or shift mechanism defective? If you are not inspecting and reviewing all components of the related systems, you will wind up throwing parts and labor into a giant black hole that sucks profits and morale out of the shop.
Complaints:
No release
- A – Worn or damaged pilot bearing
- B – Damaged or bent clutch disc
- C – Damaged or bent input shaft or splines
- D – Disc friction material sticking to pressure plate or flywheel because of corrosion
- E – Damaged or collapsed pressure plate that will not lift off flywheel
Slipping
- A – Oil or antifreeze contamination of disc
- B – Worn clutch friction material
- C – Improper disc thickness
- D – Damage to pressure plate resulting in decreased clamp load
- E – Clutch actuation system worn or bound up, preventing full clamp load of pressure plate
- F – Excessive wear on friction surfaces of flywheel and or pressure plate
Clutch Chatter
- A – Contamination of friction material by leaking engine or transmission fluids
- B – Defective clutch cushion segments on the disc (Marcel plate)
- C – Damage or wear to the clutch actuating system
- D – Damaged or worn mounts, suspension, shocks, sway bars, springs etc. or improper driveshaft angle
Noise
- A – Pilot bearing or bushing; noise present with clutch fully disengaged (may be mistaken for release bearing)
- B – Worn or damaged release bearing
- C – Misalignment of transmission or clutch disc, pressure plate, flywheel, release bearing or clutch fork.
- D – Damaged transmission bearings or components
- E – Gear rattle and neutral rollover noise, commonly caused by rough-running or out-of-tune engines
Vibration
- A – Clutch set or flywheel out of balance or mismatched to engine
- B – Missing dowel locating pins or loose mounting bolts on clutch or transmission
- C – Misalignment of transmission, clutch or flywheel
Proper Clutch-Installation Techniques
- A – Make sure that the replacement clutch is proper application for engine and transmission combination
- B – Check engine and transmission thoroughly for lubricant or antifreeze leaks, and repair
- C – Check for proper alignment; make sure all bellhousing dowel pins are present and not worn or damaged
- D – Always resurface or replace flywheel
- E – Check release-bearing carrier, clutch fork and transmission quill tube for wear or damage
- F – Inspect crank mounting flange for flywheel and replace crank pilot bearing or bushing
- G – Thoroughly clean inside of bellhousing to remove all old friction debris, grease and oil
- H – Make sure that the release bearing slides freely on quill tube
- I – Clean input-shaft splines, lubricate lightly, and confirm free movement of disc on input shaft
- J – Always use an alignment tool or input shaft to align clutch disc when bolting up pressure plate
- K – Tighten pressure-plate bolts in a “star” pattern to the correct torque level by HAND; use no air tools
- L – Always use a jack to support transmission during installation. NEVER hang the transmission on the clutch disc.
- M – Check all components of the clutch-actuation system for proper function, and replace any worn parts
- N – Power bleed the hydraulic system, or adjust cable or lever systems for proper release and free play
- O – Test-drive the vehicle cold and hot, shifting through all ranges including reverse for proper operation
- P – Take a test drive with the customer driving to ensure proper driving habits and technique
The planning and care that you take in your work are critical to profitable results. In the hectic, pressure-filled world we live in it is easy to overlook seemingly small items. Attention to detail in all aspects of the work is the key to solving problems and cutting waste and comebacks. If you create checklists for each job and follow a routine consistently, your success rate will be high.
Any worn component found should immediately trigger the question “How did this happen?” Every part of the system is related to another part, and just replacing worn parts does not fix the problem. Finding the cause of a failure solves the problem long term. Anything else becomes a game of chance. Games of chance are fun for after hours but become very expensive when they get mixed up in your work product.